

It is a layer material that the Gray painted part becomes the black-and -white line .
You can use it to express the shadow texture of walls and ground , and to make a gray line drawing of vector material ! The advantage is to make a quick draw of the shadow lines in line with Perth.
Create line drawings with gray lines or arrange gray line drawing material
↓
Apply with an air brush
↓
The painted range becomes line art.
↓
Apply with an air brush
↓
The painted range becomes line art.
※ The animation is an example of the painting by arranging the line drawing material.

This material collection is "Shadow line painted in gray (for your Own)".
Another material collection is "Gray Ray (gradation line)"(CONTENT ID: 2000509) .
* If you want to tint the intensity of the line, the gradation line is more suitable.
-------------------------------------
We can create a new gray line drawing material using this material.
It is not possible to redistribute textures and tools, but we believe that the distribution of line drawings created by the originals is not a problem with textures being reused.
Please check the bottom of the commentary for details.
-------------------------------------
■ Material Collection Contents
Shade layer material in gray
4 Points of drawing material
Gray Line Flow line tool 2 points
(The following is the same as that which is in the gradation line material collection)
replace alpha Airbrush 2 points
auto action
■ Gray Line drawing materials how to use the folder

Draw in the line material layer with the flow line tool for the gray Line drawing.
Because the drawn line cannot be seen, it is shown in the Swatch layer.
If you can make a gray line, hide the Swatch layer and apply an air brush to the "paint here" layer.
The painted range is a monochrome line drawing that reflects the line art you created.
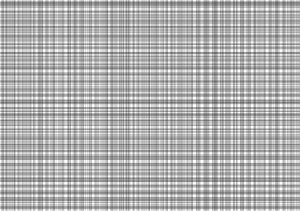
The texture for "gray line drawing" is a texture for the lines with Zara. The lines are smooth, making the wire processing smoother. (Depending on the original line drawing)
The thin painted part of the airbrush is not thin in the monochrome line drawing.

If you want to increase the line drawing, please add "line drawing layer additional set" in "Gray Line drawing material" folder.
The attached airbrush is set to replace alpha.
This setting is not darker than the value of the specified opacity .
To help you adjust the line. (The Paint sample is "hatching random" in the material collection in the Shadow Line (gradation line) that paints in gray. )
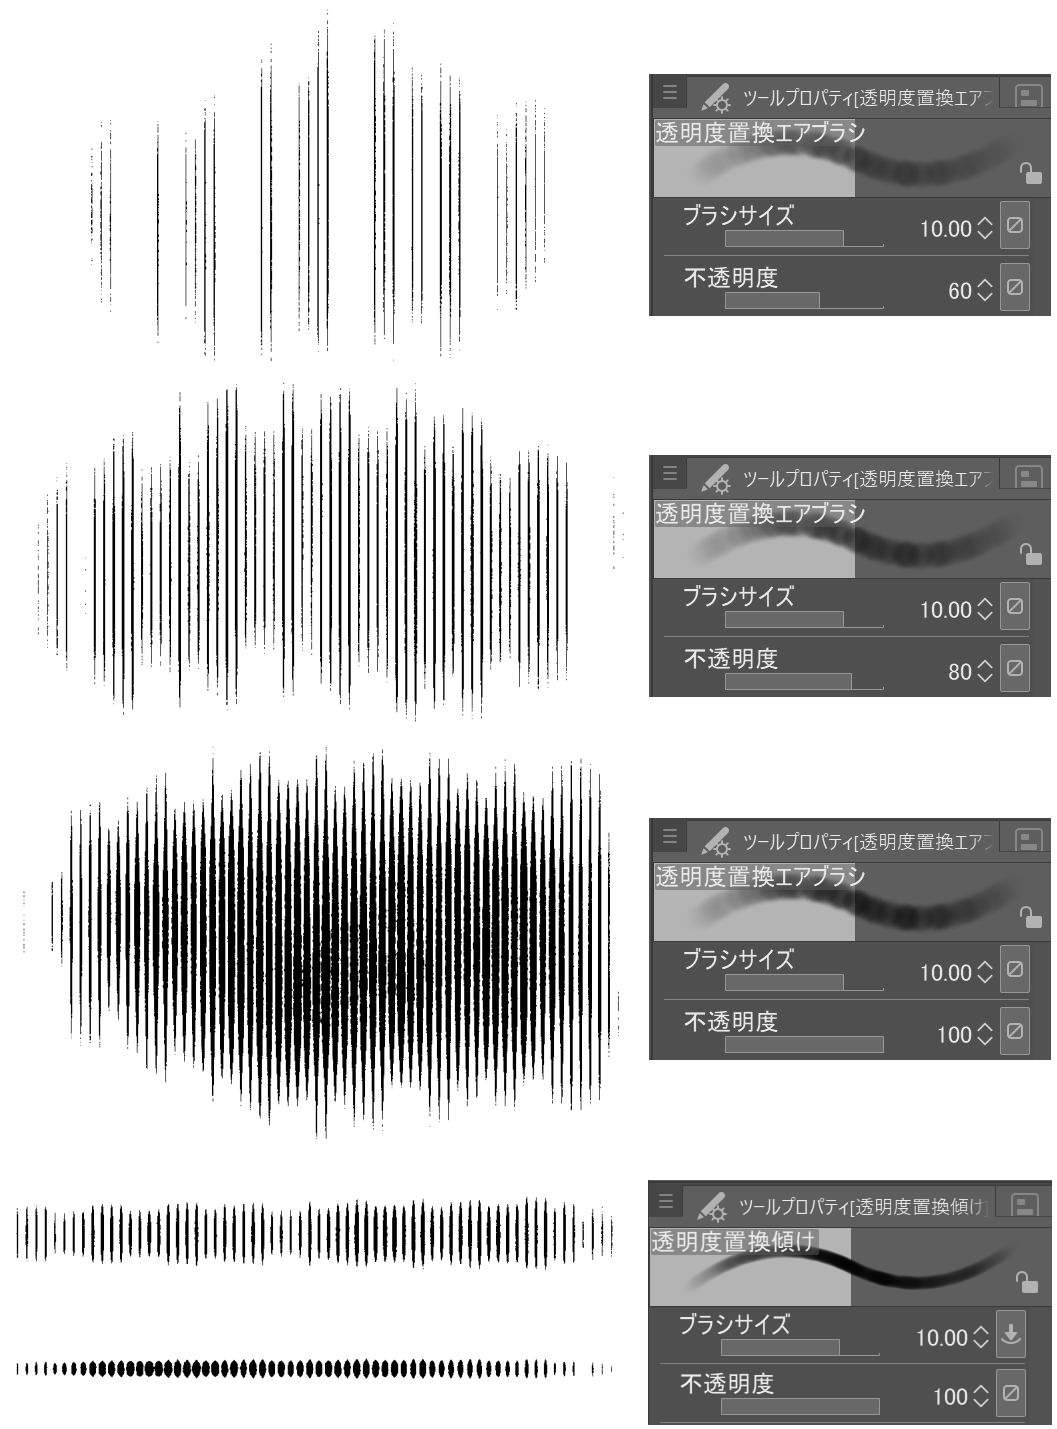
※ Replace alpha Tilt is set to change the thickness of the brush cursor by the tilt function of the Pen tab. (It is not available on tablets that do not have a tilt function.) )
If you set the pen perpendicular to the tablet, the brush cursor is thicker and narrower.
※ The settings of pen pressure of the brush "brush density" contains "random". Because a sense of material is easy to appear when I paint it with Betas, I put it so that irregularity goes out intentionally. Turn it off if you don't need it.
■ Drawing materials
We have created some line drawing material here.
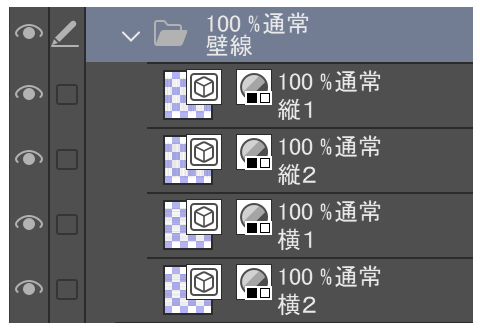
Vertical x2/x2 Horizontal layer is divided into the one to have the variation in overlap.
○ I want to make sure that the lines that I stretched from the wall to the top and left are not overlapping.
○ I want to prevent the line of shadows of the upper and lower stages from overlapping the steps of the stairs.
Please use it in such an application.

Remove the outside line of use and free transform it to suit your perspective.
When deformation, it is easy to check the gap of line if you hide the side of the horizontal line drawings.
(During deformation, when the deformation frame is felt in the way, you can hide the border without fix transformation if you press the space bar. )

Add the line-drawing layer extra set, as many as the number of line drawings.
Replace the deformed line drawing with the "wire material" layer in each layer set.
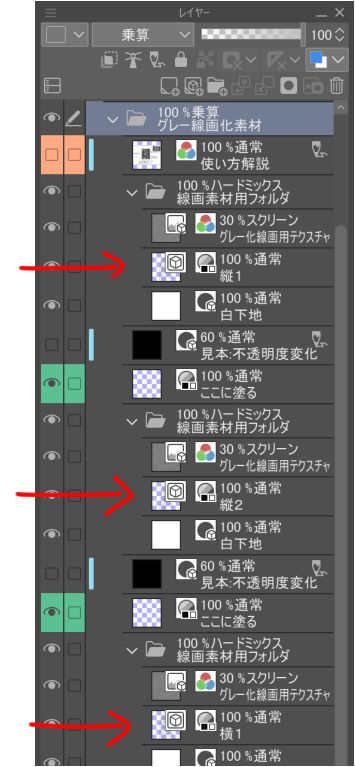

In this way, you can draw with different lines up and down.
I put a layer color to the line drawing material on the right figure.
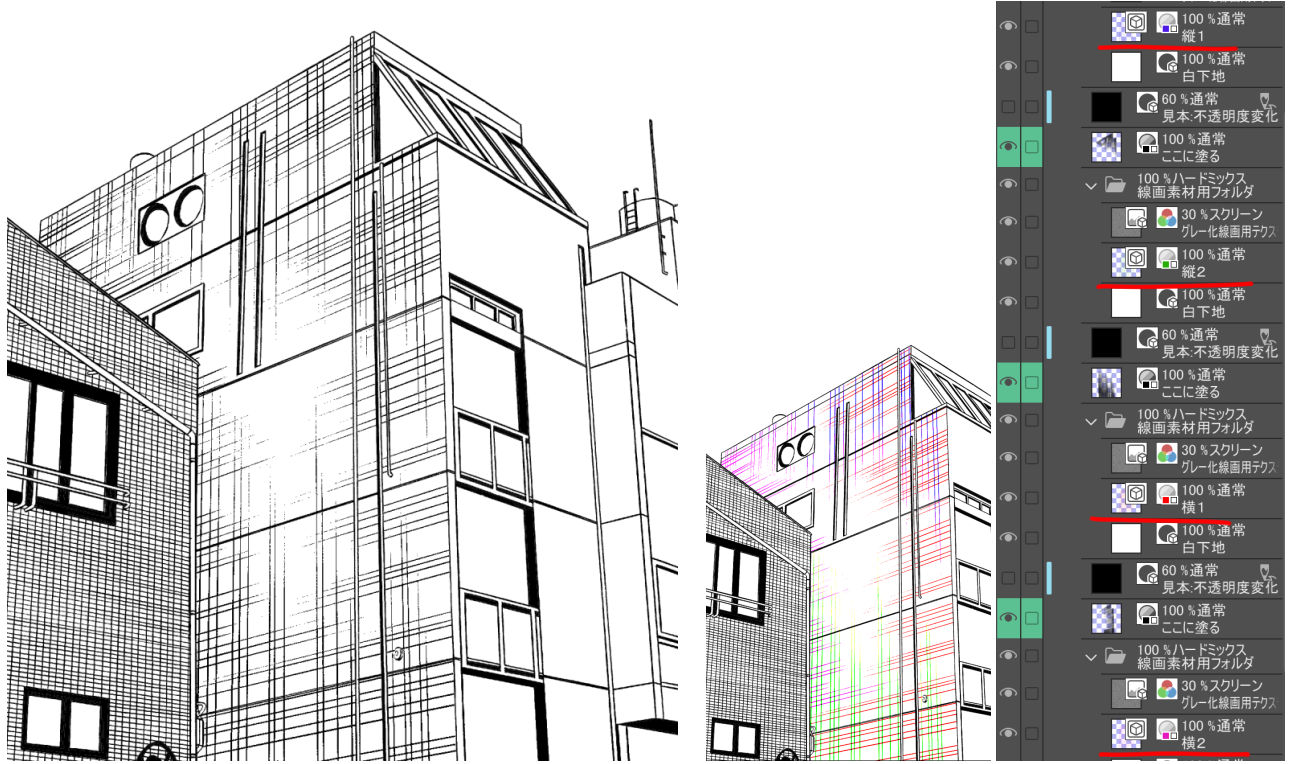

* When the gap of the line is anxious, I draw a line from behind or add, it is good to move to a good feeling in the tool object the line of the line material. (Please be careful of the direction of the line if you are taking a perspective.) )
* If the whole line is thick or thin, adjust the opacity of the fill layer.
※ If you put the "Gray Line drawing material folder" in a different folder, if the layer below becomes blank from that folder, please change the combine mode of the folder to "normal" and "pass".
About ■ auto action

When I draw the canvas after painting, the line flies as shown in the left figure. This is the same phenomenon as the noise tone. The state shown in the 100% display is the state which goes out to print.
However, because it is still hard to see, please execute the auto action ' line drawing folder '.
* Please make sure to select the Material folder and play the action.
However, because it is still hard to see, please execute the auto action ' line drawing folder '.
* Please make sure to select the Material folder and play the action.

This is an example of the case where free transform and mesh transformation are deformed with a lattice frame of 2x2.
"Mesh transformation" does not take the compression of Perth, unlike "free transform".
However, the line may be distorted and should be used carefully.
"Mesh transformation" does not take the compression of Perth, unlike "free transform".
However, the line may be distorted and should be used carefully.

■ Other vector line drawing material to Gray line drawing
The other vector line drawing material can be a original line drawing material for making line drawings with airbrush.
Register the "Streamline line art tool" of the Material Collection sub tool palette.
In the registered select sub tool State, "sub tool detail" is opened, and "register to preset" is made from brush shape.

Prepare the vector material.
I used the "floorboards (rules)" From the sample image ( contents ID: 1687827) .
With the object tool selected, open sub tool detail and change brush shape > apply brush shape, anti-aliasing > strong, and brush size > plump.
The color of the layer property is expressed as gray.

Remove the out-of-line drawings needed for the modified vector and paste them in the free transform along the perspective.

Replace the vector line drawings with the "wire material" layer.
If you hide the Swatch layer and apply the airbrush to the "paint here" layer, the area you painted will be a monochrome line.
※ The bottom right figure is an example of visualizing the fill layer.

The place where the gray line drawing is overlapped might come out thick.
In that case object tool selection, open sub tool detail and change to ink > combine mode: comparison (concentration).

Create and distribute ■ Line-drawing materials
I drew a stone pavement as an example.
Draw a line with a soft touch. When the density is thinned, it is possible to adjust it so that it paints it without being drawn when thinly applying it with the airbrush.
Opacity → drawing 100, textured touch 80, shadow solid 30 created.

You can set the line drawing to a line-drawing material folder and apply it to the fill layer as shown in the figure below.

You can use it to change the thickness representation of a line by transforming the drawing line material you created along the Perth and adjusting the brush opacity in the fill layer and applying it!

※ If you want to distribute the created material, please note that the redistribution, such as texture is violating the terms. I think that it is not a problem to distribute the line drawing material that I created in the state that the texture cannot be reused.
Textures have the effect of gradation the lines and smoothing the changes when the paint is unlikely to occur.
Remove it if you don't need it.
If necessary, combine the line drawings and texture layers.

When you combine layers, you must combine the entire line-art folder.
Make sure to change the combine mode of the folder to "normal" before you merge the layers .

Return the combine mode of the merged layer after the layer join to hard mix.
Please refer to the figure below, such as the state of the layer. I think that it is a problem if it is in this state. )
※ If it is as it is in the white groundwork is full of canvas, please do the clipping and the tiling processing by everyone.
※ Please change the need of the sample layer, unnecessary, layer name, etc.

グレーで塗った部分がモノクロ線になるレイヤー素材です。
壁や地面の影質感表現、またベクター素材のグレー線画化などにもご利用いただけます!パースに沿った影線を手っ取り早く引けるというのがメリットになります。
グレー線で線画を作る or グレー線画素材を配置
↓
エアブラシで塗る
↓
塗った範囲が線画になる
↓
エアブラシで塗る
↓
塗った範囲が線画になる
※動画は線画素材を配置して塗った例です。
この素材集は『グレーで塗る影線(自作用)』です。
別素材集で『グレーで塗る影線(グラデ線)』(コンテンツID:2000509)もあります。
※線の強弱で濃淡をつけたい場合はグラデ線の方が向いています。
ーーーーーーーーーーーーーーーーーーーーーーーーーーーーー
当素材を使用して新たなグレー線画化素材を作成できます。
テクスチャやツールの再配布は不可ですが、テクスチャが再利用できない状態でオリジナルで作成された線画の配布は問題ないと考えています。
詳細は解説下部をご確認ください。
ーーーーーーーーーーーーーーーーーーーーーーーーーーーーー
■素材集内容
グレーで塗る影線レイヤー素材
線画素材 4点
グレー線流線ツール 2点
(以下はグラデ線素材集に入ってるものと同じです)
透明度置換エアブラシ 2点
オートアクション
■グレー線画化素材フォルダの使い方
「線素材」レイヤーにグレー化線画用流線ツールで描画します。
描画した線は見えませんので、見本レイヤーで表示させています。
グレー線画が出来たら見本レイヤーを非表示にして、「ここに塗る」レイヤーにエアブラシで塗ります。
塗った範囲が、作成した線画を反映したモノクロ線画になります。
「グレー化線画用テクスチャ」は線のザラつき用テクスチャです。線がザラつくことにより、細線処理が滑らかになります。(元線画にもよります)
エアブラシの薄い塗り部分がモノクロ線画では細く抜けます。
線画を増やしたい場合は「線画レイヤー追加セット」を「グレー線画化素材」フォルダ内に足してください。
添付のエアブラシは『透明度置換』設定になっています。
これは指定の不透明度の値より濃く塗れないという設定になります。
線の調整にお役立てください。(塗り見本は『グレーで塗る影線(グラデ線)』素材集内『クロスハッチング・ランダム』です。)
※透明度置換傾けはペンタブの傾け機能を利用してブラシカーソルの太さが変わるように設定しています。(傾け機能がついていないタブレットではご利用になれません。)
タブレットに対しペンを垂直に立てるとブラシカーソルが太く、傾けると細くなります。
※ブラシの「ブラシ濃度」の筆圧設定に「ランダム」が入っています。これはベタッと塗ると素材感が出やすいので、あえてムラが出るように入れています。不要でしたらオフにしてください。
これは指定の不透明度の値より濃く塗れないという設定になります。
線の調整にお役立てください。(塗り見本は『グレーで塗る影線(グラデ線)』素材集内『クロスハッチング・ランダム』です。)
※透明度置換傾けはペンタブの傾け機能を利用してブラシカーソルの太さが変わるように設定しています。(傾け機能がついていないタブレットではご利用になれません。)
タブレットに対しペンを垂直に立てるとブラシカーソルが太く、傾けると細くなります。
※ブラシの「ブラシ濃度」の筆圧設定に「ランダム」が入っています。これはベタッと塗ると素材感が出やすいので、あえてムラが出るように入れています。不要でしたらオフにしてください。
■線画素材について
こちらでいくつか線画素材を作成しました。
縦x2・横x2レイヤー入ってるものは、重なりにバリエーションをもたせるために分けています。
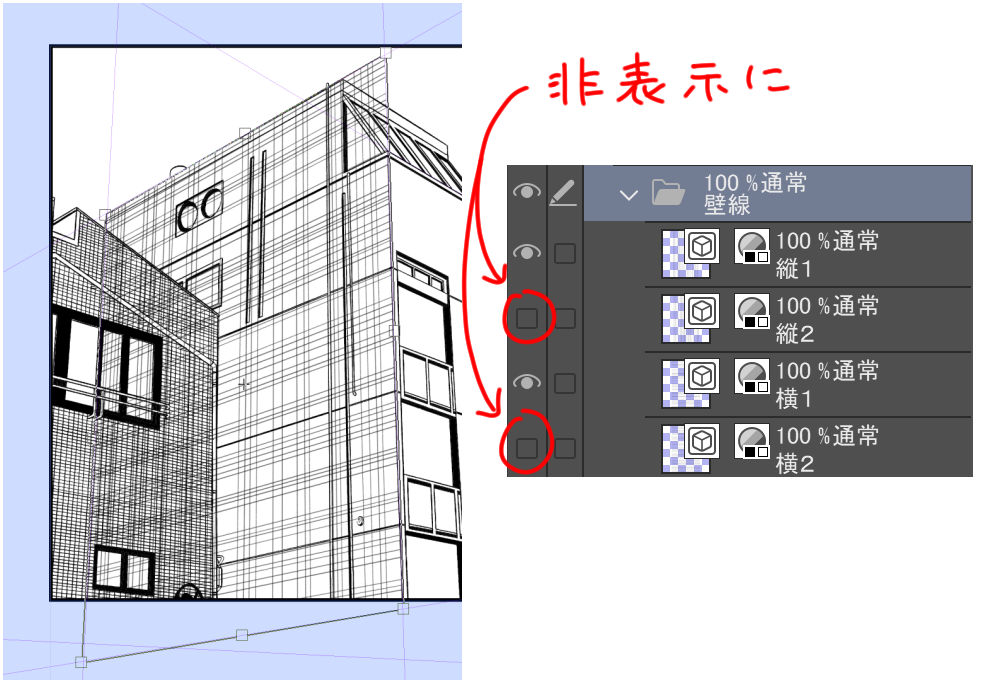
◯壁の上下・左右から伸ばした線が重ならないようにしたい。
◯階段の段差で上下の段の影線が重ならないようにしたい。
というような用途でご利用ください。
線画の使用範囲外を削除して、パースに合わせて自由変形します。
変形する際、縦・横線画の片方を非表示にすると線の間隔を確認しやすいです。
(変形中、変形枠が邪魔に感じた時はスペースキーを押すと変形を確定せずに枠線を非表示にできます。)
線画の数だけ「線画レイヤー追加セット」を追加してください。
変形した線画を各レイヤーセット内の「線素材」レイヤーと入れ替えてください。
このように、上下左右で違う線で描くことができます。
右図は線画素材にレイヤーカラーをつけてみました。
※線の隙間が気になるときは後から線を描き足すか、線素材の線をオブジェクトツールでいい感じに移動すると良いです。(パースがかかってる場合は線の向きにご注意ください。)
※全体的に線が太い・細い場合は、塗りレイヤーの不透明度を調整してください。
※『グレー線画化素材フォルダ』を別のフォルダ内に入れたとき、そのフォルダより下のレイヤーが真っ白になる場合は、そのフォルダの合成モードを「通常」→「通過」と変更してください。
■オートアクションについて
塗った後にキャンバスを引いて見ると、左図のように線が変に飛びます。これはノイズトーンと同様の現象です。100%表示で見た状態が印刷に出る状態です。
しかしやはり見づらいので、オートアクションの『線画化フォルダを結合』を実行してください。
※必ず当素材フォルダを選択してからアクションを再生してください。
しかしやはり見づらいので、オートアクションの『線画化フォルダを結合』を実行してください。
※必ず当素材フォルダを選択してからアクションを再生してください。
「自由変形」と「メッシュ変形」を格子枠2x2で変形をかけた場合の例です。
「メッシュ変形」は「自由変形」と違ってパースの圧縮がかかりません。
ただし線に歪みが出ることもありますので、ご利用の際は慎重に使い分けてください。
「メッシュ変形」は「自由変形」と違ってパースの圧縮がかかりません。
ただし線に歪みが出ることもありますので、ご利用の際は慎重に使い分けてください。
■他のベクター線画素材をグレー線画にする
他のベクター線画素材をエアブラシで線画化するための元線画素材にすることができます。
素材集の『グレー化線画用流線ツール』をサブツールパレットに登録します。
登録したサブツールを選択した状態で「サブツール詳細」を開き、ブラシ形状より「プリセットに登録」をします。
ベクター素材を用意します。
見本画像は『ベクター壁床素材集』 (コンテンツID:1687827) より「床板(規則)」を使用しました。
オブジェクトツールを選択した状態で「サブツール詳細」を開き、「ブラシ形状>ブラシ形状を適用」「アンチエイリアス>強」「ブラシサイズ>太め(お好みで)」を変更します。
レイヤープロパティの表現色を「グレー」にします。
設定を変更したベクター線画の必要範囲外を削除して、パースに添って自由変形で貼り付けます。
ベクター線画を「線素材」レイヤーと入れ替えてください。
見本レイヤーを非表示にして、「ここに塗る」レイヤーにエアブラシで塗ると、塗った範囲がモノクロ線画になります。
※右下の図は塗りレイヤーを可視化した例です。
グレーのベクター線画が重なっているところが太く出てしまうことがあります。
その場合はオブジェクトツール選択、「サブツール詳細」を開いて「インク>合成モード:比較(濃度)」に変更してください。
■線画素材を作成して配布・販売する
例として石畳を描いてみました。
やわらかいタッチで線を描きます。影など濃度を薄くすると、エアブラシで薄く塗ると描画されず濃く塗ると描画されるように調整できます。
不透明度→線画100・質感タッチ80・影ベタ30で作成。
作成した線画を『線画素材用フォルダ』にセットして、塗りレイヤーに塗ると下図のように描画されます。
作成した線画素材をパースに添って変形して、塗りレイヤーでブラシ不透明度を調整して塗ることで線の厚み表現を変化させるというような使い方ができます!
※作成した素材を配布したい場合はテクスチャなど再配布は規約違反になるのでご注意ください。テクスチャを再利用できない状態で自身で作成した線画素材の配布は問題ないと考えています。
テクスチャは線をザラつかせる効果と、塗りでグラデの変化が起きにくいときに変化を滑らかにしてくれる効果があります。
不要な場合は削除してください。
必要な場合は線画とテクスチャのレイヤーを結合してください。
レイヤー結合するときは『線画素材用フォルダ』を丸ごとレイヤー結合してください。
レイヤー結合する前に、必ずフォルダの合成モードを「通常」に変更してください。
レイヤー結合後に結合したレイヤーの合成モードを「ハードミックス」に戻してください。
レイヤーの状態など下図を参考にしてください。(この状態であれば問題ないかと思います。)
※このままだと白下地がキャンバスいっぱいになっているので、切り抜きやタイリングの処理など各自で行ってください。
※見本レイヤーの要・不要やレイヤー名などはお好みで変更してください。
Layer Material レイヤー素材


Drawing line Material 線画素材


Brush action ブラシ・アクション


Other materials by 聖月


Popular “Material catalog” materials


New materials


Badges
-
 MVP ◆This user has contributed greatly to the management of the community, by posting many great responses to the questions asked. Once every three months, MVPs are determined based on the points earned during that period and will be recognized accordingly.
 -
 New Valuable Player (NVP) ◆These are the next-best contributors to the community after MVPs. This is awarded to users who have not yet won an MVP award, based on the number of points they have earned.
 -
 Official Expert ◆Chosen out of all MVP awardees, who are already proof of excellence, this is a testimony of outstanding correspondence in the community. After careful screening, they are appointed by CELSYS and assume their position.Note: Formally called “Evangelists”
 -
 Official Moderator of CELSYS ◆Moderators are official CELSYS staff members who are fluent in Japanese as well as various other languages. Moderators are not experts on the software or illustration, so they are not able to directly answer your questions. However, moderators provide communication and language support to ensure that everyone can smoothly communicate with each other.
 -
 CELSYS official accountThe Official Administrator Account