The number of grids can be freely determined, and two types of frames with a width of 2 mm and a width of 4 mm centered on the same baseline can be drawn at the same time.
* "2mm width and 4mm width" agree with "double track on both sides with a distance of 1mm and 2mm from the baseline".

≫
The 2mm and 4mm wide frames are created on separate layers.
You can duplicate it and put it on another perspective line to grasp the three-dimensional position, or use it to create shadows by fill only the lattice part on a separate layer with [auto select] (4mm width recommended).
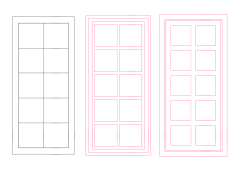
There are five types of lattice designs: A~E.
Each of the three types of baseline, double track distance of 1 mm, and double track distance of 2 mm is divided into three parts: [outer frame], [inner frame], and [lattice].
In the end, it is designed to combine and use each [outer frame], [inner frame], and [lattice].
(The ones in the "Create Set" are combined to save all the hassle.)
You can also combine different lattice sizes and create changing lattices.
(For details, see "+Tips!" below! 》)
Example usage: 2×5 window lattice (using Category 1 window lattice creation set B)
The contents of the set are like this (with a solid white layer in the background)
* The layers in the set are those where [outer frame], [inner frame], and [lattice] are connected.
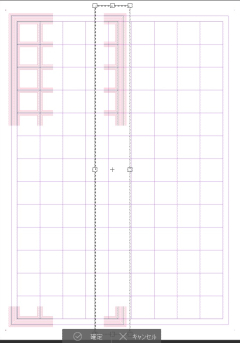
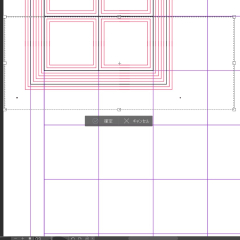
Procedure (1) I want to take 2 squares horizontally and 5 squares vertically, so with the folder selected, cut out unnecessary parts with [Select Range (Rectangle)].
At this time, the cells that become the joint should remain slightly more than half on both sides.
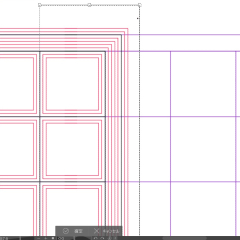
Step (2) Join the right side
Select the remaining part of the right edge and lower right together, and then [Zoom in, reduce, rotate].
Use "Shift + Drag" to move it to the left frame, fine-tune it with the arrow keys (←→), align the purple line with the black line, and confirm [Scale/Rotate].
≫≫
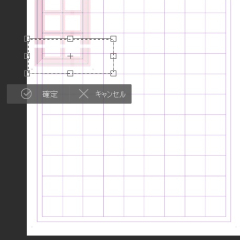
Step (3) Join the underside
Select the range of the remaining part on the lower side, and then [Enlarge, reduce, and rotate].
Use "Shift + Drag" to move it to the left frame, fine-tune it with the arrow keys (↑↓), align the purple line with the black line, and confirm [Zoom in / out / rotate].
≫≫
The 2×5 window lattice is complete!

≫

I think you can copy and arrange them to make a double window, add the [outer frame] of Category 3 and add the frame of the entire window.
《 +Tips! 》
・ If you cut out a part of the [lattice], select only the vertical line part, [Enlarge, reduce, rotate], and stretch the line to the lower frame without fixed aspect, you can change the size of the grid without stress.
・You can also use the baseline of window lattice A as a guide and combine lattices of different sizes.
If you match the outer frame to the finished one and combine the layers of each, you can create a different lattice.
The ones I made for explanation and confirmation here are included in [Sample] of Category 4.
《 Contents 》
Category1:Window lattice creation set (template)
Window lattice creation set A, B, C, D, E
Category2:[Lattice] Various (template)
Window lattice A, B, C, D, E
template breakdown (e.g. A): 6 layers in 1 folder
Window lattice [inner frame] baseline, 1, 2 (common)
Window lattice[lattice] A baseline, A1, A2
Category3:[Outer Frame] (Common) (template)
Window lattice [outer frame] (common)
template Breakdown: 3 layers in 1 folder
Window lattice [outer frame] baseline, 1 and 2 (common)
Category4:【Sample】 (template)
Window lattice [Sample]
格子数を自由に決めて、同一基線を中心とした2mm幅と4mm幅二種類の枠が同時に引けます。
※「2mm幅と4mm幅」は、「基線に対して1mmと2mm距離の両側複線」と同意
≫
2mm幅と4mm幅の枠はそれぞれ別のレイヤーに作成されます。
複製して別のパースラインに乗せることで立体位置を把握したり、[自動選択](4mm幅を推奨)で格子部分のみを別レイヤーで塗りつぶして、影の演出に使用したりもできます。
格子のデザインはA~Eの5種類。
それぞれ基線・複線距離1mm・複線距離2mmの3つを、【外枠】【内枠】【格子】の3つに分けて作成。
最終的にそれぞれの【外枠】【内枠】【格子】を結合して使用するようにデザインしています。
(「作成セット」のものはあらゆる手間を省く目的で結合済みのものを使用しています)
異なる格子サイズの組み合わせや、変わり格子の作成も出来ます。
(詳しくは後述の《+Tips!》にて)
使用例: 2×5窓格子 (Category1の窓格子作成セットBを使用)
セット内容はこうなっています (背景に白ベタレイヤーを置いています)
※セット内のレイヤーは、【外枠】【内枠】【格子】をそれぞれ結合済みのものです
手順① 横に2マス、縦に5マス取りたいので、フォルダを選択した状態で不要部分を[範囲選択(長方形)]で切り取ります
この時、接合部分になるマスは、両側とも半分より少し多く残るようにします
手順② 右側を接合します
右端と右下に残っている部分を一緒に範囲選択し、[拡大・縮小・回転]をします
「Shift+ドラッグ」で左側の枠の方へ持っていき、方向キー(←→)で微調整して紫の線に黒の線を合わせて[拡大・縮小・回転]を確定します
≫≫
手順③ 下側を接合します
下側に残っている部分を範囲選択し、[拡大・縮小・回転]をします
「Shift+ドラッグ」で左側の枠の方へ持っていき、方向キー(↑↓)で微調整して紫の線に黒の線を合わせて[拡大・縮小・回転]を確定します
≫≫
2×5の窓格子の完成です!
≫
複写して並べて両開きの窓にし、Category3の【外枠】を追加して窓全体の枠を付けても良いと思います
《 +Tips! 》
・【格子】の一部を切り取り、縦線部分のみを範囲選択、[拡大・縮小・回転]して、縦横比固定しない状態で線を下の枠まで引き伸ばせば、ストレスなく格子のサイズを変えられます
・窓格子Aの基線をガイドにして、サイズ違いの格子を組み合わせることもできます
完成したものに外枠を合わせ、それぞれレイヤーを結合すれば、一味違った格子の作成も
ここでの説明・確認用に作ったものはCategory4の【Sample】に入っています
《 Contents 》
Category1:窓格子作成セット (テンプレート)
窓格子作成セットA・B・C・D・E
Category2:【格子】各種 (テンプレート)
窓格子A・B・C・D・E
テンプレート内訳(例:A) : 1フォルダに6レイヤー
窓格子【内枠】基線・1・2 (共通)
窓格子【格子】A基線・A1・A2
Category3:【外枠】(共通) (テンプレート)
窓格子【外枠】(共通)
テンプレート内訳 : 1フォルダに3レイヤー
窓格子【外枠】基線・1・2 (共通)
Category4:【Sample】 (テンプレート)
窓格子【Sample】


 ≫
≫


 ≫≫
≫≫
 ≫≫
≫≫
 ≫
≫
 ≫
≫ ≫
≫ ≫
≫


 MVP ◆This user has contributed greatly to the management of the community, by posting many great responses to the questions asked. Once every three months, MVPs are determined based on the points earned during that period and will be recognized accordingly.
 New Valuable Player (NVP) ◆These are the next-best contributors to the community after MVPs. This is awarded to users who have not yet won an MVP award, based on the number of points they have earned.
 Official Expert ◆Chosen out of all MVP awardees, who are already proof of excellence, this is a testimony of outstanding correspondence in the community. After careful screening, they are appointed by CELSYS and assume their position.Note: Formally called “Evangelists”
 Official Moderator of CELSYS ◆Moderators are official CELSYS staff members who are fluent in Japanese as well as various other languages. Moderators are not experts on the software or illustration, so they are not able to directly answer your questions. However, moderators provide communication and language support to ensure that everyone can smoothly communicate with each other.
 CELSYS official accountThe Official Administrator Account