This is a rain anime looped with a key frame using a seamless image in the vertical direction. The created anime layer folder is used as the material. (Some are frame-by-frame)
New anime file
Please prepare a new anime file with default settings. The frame is 1280px x 720px, the resolution is 144dpi, and the frame rate is 24fps.
Since the raindrops are drawn in white, I think it is easier to see the paper in a dark color. You can put fill layers.
File Installation
Seven different rain patterns are available at the moment. Drag and drop the downloaded folder directly onto the layer of the anime file.
The number of frames will be automatic to 24 frames, so match the start frame to 1 and the end frame to 24. If the start position of the anime folder is misaligned, align it with the position of Frame 1.
About each rain material
By showing and hiding each anime folder, you can use it alone or in combination.
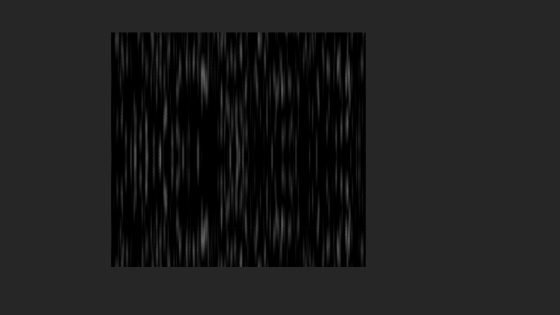
【Medium rain】Raindrops are large and density is low. The movement speed is 1 second from the top edge of the display frame to the bottom edge.
【Drizzle】It is a fine, dense rain. The speed of movement is half that of a medium rain, from the top edge to the lower edge in 2 seconds.
【Medium + Drizzle】If you view two layers at the same time, it will be quite dense rain. It also gives a sense of depth.
【Diagonal rain】Rain falls from the upper left to the lower right. The movement speed is 1 second from top edge to bottom edge.
【Rain when looking up at the sky】This is a 3-frame frame-by-frame shoot. It can also be used when looking up at the shower.
【Rain falling at the end】This is also a 3-frame frame-by-frame. It seems to be used in situations where you are heading towards rain or storms.
【Thin Rain】It is a thin and sharp rain that falls slowly.
【Rain passing in front of me】Large drops of rain fell at high speed (3x speed). I aimed for an effect like raindrops spilling from under the eaves.
How to use, application
I made it for the production of rainy scenes, mainly with the intention of placing it in front of the background. "Rain passing in front of you" may be placed in front of the character to create a sense of depth.
Resize(1)
I received a question about resizing. The default rain fills the screen, but if you're looking out of a window, for example, you'll want it to rain in a small window.
If the density and speed of the rain are the same, apply layer mask only to the part where you want the rain to fall. For example, if you want "medium rain" to fall on an area of about 600X600px, create a dark box of about 600X600px size and mask the rain layer.
Part of the rain that fills the screen frame is cut out, but even if it is cut out, the seamless state is maintained. This method is applicable to all rain substrates.
Resize(2)* Not recommended method
You may want to change the size of the rain at the same time as resizing the display area. I will give you an example of "heavy rain", but I do not recommend it because it is difficult to adjust.
For example, if you want to halve the size of the rain, set the size of the rain pattern to 50%. The image material pasted into the cells of the anime layer becomes the rain pattern.
The original size of the "Medium Rain" pattern is 1280X1440px. Make this 640X720px. Once the key frame is released, it is reduced to 50% by deformation and scaling.
If the start point of the key frame is at any location, the end point is half the height of the graphic from the desired position. (The location of the end point depends on the rain pattern)
Align the bottom edge of the rain pattern with the starting point and hit the key on frame 1.
Move to frame 25(*) and align the top edge of the rain pattern with the end point.
If you apply layer mask in the area where you want to display rain, you will get the following anime.
This method may be difficult because the number of frames of CLIP STUDIO PRO is limited to 24. Verification is currently not possible because EX is used.
**************************
Creating a loop image itself isn't that difficult, but good or bad quality is a coincidence. Since the materials uploaded this time are ready, we believe that they need to be improved in terms of quality. In the future, we would like to improve the quality and gradually increase the number of types.


 MVP ◆This user has contributed greatly to the management of the community, by posting many great responses to the questions asked. Once every three months, MVPs are determined based on the points earned during that period and will be recognized accordingly.
 New Valuable Player (NVP) ◆These are the next-best contributors to the community after MVPs. This is awarded to users who have not yet won an MVP award, based on the number of points they have earned.
 Official Expert ◆Chosen out of all MVP awardees, who are already proof of excellence, this is a testimony of outstanding correspondence in the community. After careful screening, they are appointed by CELSYS and assume their position.Note: Formally called “Evangelists”
 Official Moderator of CELSYS ◆Moderators are official CELSYS staff members who are fluent in Japanese as well as various other languages. Moderators are not experts on the software or illustration, so they are not able to directly answer your questions. However, moderators provide communication and language support to ensure that everyone can smoothly communicate with each other.
 CELSYS official accountThe Official Administrator Account