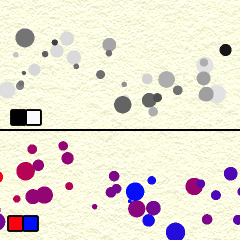
I set a simple shape brush such as a circle and a square to reflect two colors of a main color sub color!
Because it is a two-color reflection, I correspond to a gradient map .
It is usually a two-color deployment between main color and sub color, but you can use gradient map, which is a function replace color, to reflect multiple colors.
Because it can be used as an effect as a decoration, please try to play customize various ♪
* Gradient map can only be used with "PRO/EX".
▼ gradient map Use example
I can process it to look at various colors with one brush ♪
Detailed usage is described below use example ↓.
▼ Details of each brush
You can see the detail screen and the use example and the arrangement example of each brush when I click it.
▼ Category Contents
-"Simple"
The mixed condition of the two colors is a random brush in a constant brush size.
-"Pressure-sensitive"
Brush that is reflected pressure to brush size and mixing condition.
-"Scatter"
A brush that is scattered like a spray. The brush size (the range being sprayed) is constant, the mixing condition and the size of the particle are random.
* About the customize of the "scatter" category brushes
Because the spraying effect is on
The size of the grains of each pattern does not change in the brush size.
If you want to change the size of the grain, you can modify the particle size in spraying effect.
The stroke is the distance setting between the particles, so if you want to fill the particles, lower the number.
If only the brush size is large, the size of the grains will not change and the range will be sprayed.
Because the impression changes considerably according to the resolution of the canvas that you are making spraying effect, please try to customize according to your preference.
-"Dusting Pressure"
A brush that is scattered like a spray.
The pressure is reflected in the brush size (range to be sprayed), the mixing condition, and the size of the particle.
The more pressure is applied, the more the range is sprayed, the stronger the main color, the larger the particle size.
* About the customize of the "Scatter pressure" category brushes
To refine the grain → reduce the number of "particle size" of "spraying effect".
To reduce the spray range → reduce the brush size.
I want to severely the rose and lower the number of "stroke" to a small brush size.
-"Bonus"
Extra brushes.
The other brushes have a "normal" color combine mode, but this is just a "multiplication".
Because the color of the overlapping part changes, I think that it is interesting because there is a change.
■ gradient map use ■ = = = = = = = = = =
If you use it as it is, you can only expand the two colors of the main color sub color, but you can use the gradient map function to replace the shades of black and white with various colors to reflect multiple colors.
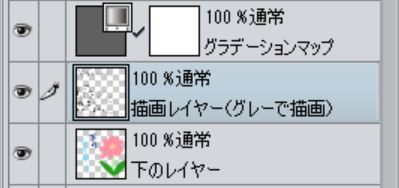
① main color: black, sub color: drawn in white
② Select "Layers" → "new correction layer" → "gradient map".
Choose your favorite gradient set and "OK"
※ It is OK in the selection for the time being because the color can be changed later.
The ③ gray tint replaces the color set in the gradient map.
Note
If you just put the gradient layer, it will convert all layer below colors.
In this case →
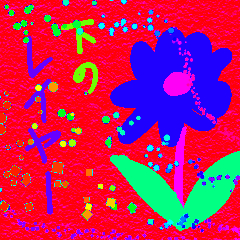
It becomes it so.
In that case, if you put the layer you want to gradient map and gradient map into a folder, only things in the folder will be reflected.
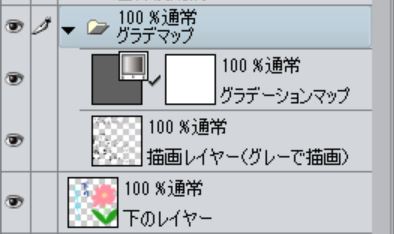 This is →
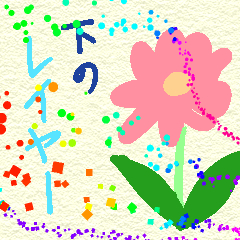
丸や四角などシンプルな形のブラシをメインカラー・サブカラーの2色が反映するように設定しました!
2色反映ですのでグラデーションマップにも対応します。
通常だとメインカラー・サブカラーの間の2色間の展開になりますが色の置き換え機能であるグラデーションマップを使えば複数色を反映させることが出来ます。
装飾としても、効果としても利用できますので色々カスタマイズして遊んでみて下さい♪
※グラデーションマップは「PRO/EX」のみ使用できます。
▼グラデーションマップ使用例
ひとつのブラシでいろんな色に見えるように加工できます♪
詳しい使用方法は使用例下部↓に記載。
▼各ブラシ詳細
クリックすると各ブラシの詳細画面と使用例・アレンジ例がご覧頂けます。
▼カテゴリ内容
・「シンプル」
一定のブラシサイズで2色混合具合はランダムなブラシ。
・「筆圧対応」
ブラシサイズと混色具合に筆圧が反映されるブラシ。
・「散布」
スプレーのように模様が散らばるブラシ。ブラシサイズ(スプレーされる範囲)は一定、混色具合と粒子の大きさはランダムです。
※「散布」カテゴリブラシのカスタマイズについて
散布効果がオンになっていますので
ブラシサイズでは各模様の粒の大きさは変化しません。
粒の大きさを変える場合は「散布効果」内の「粒子サイズ」を変更願います。
「ストローク」は粒子の間の距離設定ですので粒子の間を詰めたい場合は数値を下げて下さい。
ブラシサイズのみ大きくした場合、粒の大きさは変わらずにスプレーされる範囲が広がります。
散布効果は作成しているキャンバスの解像度によって印象がかなり変わるようなのでお好みにあわせてカスタマイズしてみて下さい。
・「散布筆圧」
スプレーのように模様が散らばるブラシ。
ブラシサイズ(スプレーされる範囲)・混色具合・粒子の大きさに筆圧が反映されます。
筆圧がかかるとスプレーされる範囲が広がり、メインカラーが強くなり、粒子の大きさが大きくなります。
※「散布筆圧」カテゴリブラシのカスタマイズについて
粒を細かくしたい→「散布効果」の「粒子サイズ」の数値を下げる。
スプレーされる範囲を小さくしたい→「ブラシサイズ」を下げる。
バラけずみっちりさせたい→「ストローク」の数値を下げてブラシサイズを小さめで。
・「おまけ」
おまけのブラシ。
他のブラシは色の合成モードが「通常」なのですがこれだけは「乗算」になっています。
その為重なった部分の色が変わるので変化があって面白いと思います。
■グラデーションマップでの使用■==========
そのままの使用だとメインカラー・サブカラーの2色間の展開しか出来ませんが、白黒の濃淡をいろんな色に置き換えるグラデーションマップ機能を使うと複数の色を反映させることが出来ます。
①メインカラー:黒、サブカラー:白で描画
②「レイヤー」→「新規色調補正レイヤー」→「グラデーションマップ」を選択。
お好みのグラデーションセットを選択して「OK」
※後から色は変更できますのでとりあえずの選択でもOKです。
③グレーの濃淡がグラデーションマップで設定された色に置き換わって表示されます。
※注意
グラデーションレイヤーをそのままかけるとそれより下のレイヤー全ての色を変換してしまいます。
この場合→
こうなってしまいます。
その場合はグラデーションマップとグラデーションマップをかけたいレイヤーをフォルダに入れるとフォルダ内の物のみに反映します。
こうなります→


 In this case →
 This is →


 MVP ◆This user has contributed greatly to the management of the community, by posting many great responses to the questions asked. Once every three months, MVPs are determined based on the points earned during that period and will be recognized accordingly.
 New Valuable Player (NVP) ◆These are the next-best contributors to the community after MVPs. This is awarded to users who have not yet won an MVP award, based on the number of points they have earned.
 Official Expert ◆Chosen out of all MVP awardees, who are already proof of excellence, this is a testimony of outstanding correspondence in the community. After careful screening, they are appointed by CELSYS and assume their position.Note: Formally called “Evangelists”
 Official Moderator of CELSYS ◆Moderators are official CELSYS staff members who are fluent in Japanese as well as various other languages. Moderators are not experts on the software or illustration, so they are not able to directly answer your questions. However, moderators provide communication and language support to ensure that everyone can smoothly communicate with each other.
 CELSYS official accountThe Official Administrator Account