

It is a set of Morning Glory that was produced in canvas of 600dpi, two types of line drawings and tone four colors color. 600dpiのキャンバスで制作した、カラー3色・線画2タイプ・トーン4パターンのアサガオブラシセットです
[Morning Glory Brush]
The base line drawing brush with sub color correspondence
A type without touch, B type has become a touch and specification


Morning Glory put on top of A or B brush (multiply or convert brightness to opacity the layer mode)
In two shades, simple A type, B type has become a gradient specification
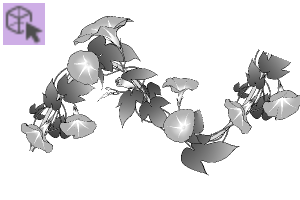
The sample image is a tone effect not applied to compare the shading

① one of the [Morning glory tones] as a tool from the material
② "sub tool detail" and "register to preset" by "brush shape" item

④ duplicate vector layer above. Do the rest of the work for duplicated layers
Select the ⑤ object tool and apply the registered presets to the "brush shape" item

Multiply ⑥ layer mode or rasterize layer to convert brightness to opacity
Turn the tone effect from the ⑦ layer property
※ If you sharpen the tone, please work with a transparent brush and eraser after rasterize and convert brightness to opacity.
It is a brush to do the vine of the Morning Glory.
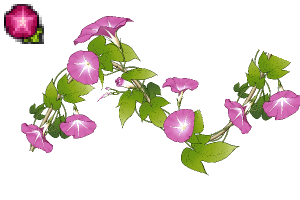
Three colors of blue, purple, peach × in the vine only two species, is a total of six types
It has a color on the main line and the color is good even if it is a dark background color.

This is an item for customize
600dpi, paste and edit on the 2400 × 4800 canvas
Since the main lines of the flower, the leaf, and the prop are vector layer, it is possible to:
-To enlarge or shrink without degrading the line, to perform the deformation
Adjusting the line width separately
If you want to adjust the whole batch, change the number brush size in the object tool.
If you want to make a partial change, tweak it with the correct line width brush in the line correction tool.
Change the pen touch (brush shape) to any
Apply any preset from the "brush shape" item in the object tool
* Depending on the brush shape, you may need to adjust the line width.
Hide unwanted lines
Because it consists of five layers, such as the main line and the veins, hide any unnecessary lines by layer.
■ Other considerations
If you want to change the vector material to monochrome, please rasterize and change expression color.
【アサガオブラシ】
サブカラー対応の下地つき線画ブラシです
Aタイプはタッチなし、Bタイプはタッチあり仕様となっております
アサガオブラシAまたはBの上に重ねて使います(レイヤーモードを乗算にするか、輝度を透明度に変換して下さい)
濃淡2種で、Aタイプはシンプル、Bタイプはグラデーション仕様となっております
サンプル画像は濃淡比較のため、トーン効果未適用の状態です
①素材からいずれかの【アサガオトーン】をツールとして読み込む
②「サブツール詳細」を表示し、「ブラシ形状」の項目にて「プリセットに登録」を行う
④上記のベクターレイヤーを複製する。以降の作業は複製したレイヤーに対して行う
⑤オブジェクトツールを選択し、「ブラシ形状」の項目にて、登録したプリセットを適用する
⑥レイヤーモードを乗算にするか、レイヤーをラスタライズして輝度を透明度に変換する
⑦レイヤープロパティからトーン効果をONにする
※トーンを削る場合、ラスタライズして輝度を透明度に変換してから透明色のブラシや消しゴムで作業を行って下さい
アサガオのつるを加筆するためのブラシです
青・紫・桃の3色×支柱あり・つるのみ2種で、合計6種類です
主線に色がついており、暗い背景色でも良い感じに色が出ます
こちらはカスタマイズ向けのアイテムです
600dpi、2400×4800のキャンバスに貼り付けて編集して下さい
花・葉・支柱の主線はそれぞれベクターレイヤーなので、以下のことが可能です
●線を劣化させずに拡大や縮小、変形を行う
●線幅を個別に調節する
全体を一括で調整したい場合、オブジェクトツールの「ブラシサイズ」の数値を変更して下さい
部分的に変更したい場合、線修正ツールにある線幅修正ブラシにて微調整して下さい
●ペンタッチ(ブラシ形状)を任意のものに変更する
オブジェクトツールの「ブラシ形状」の項目から任意のプリセットを適用して下さい
※ブラシ形状によっては線幅の調整などが必要になる事があります
●不要な線を非表示にする
主線や葉脈など、5つのレイヤーで構成されているので、不要な線はレイヤーごと非表示にして下さい
■その他の注意点
・ベクター素材をモノクロに変更する場合、ラスタライズしてから表現色の変更を行って下さい
Monochrome モノクロ


Color カラー


vector layer ベクターレイヤー


Other materials by 冬堂一花


Popular “Material catalog” materials


New materials


-
 MVP ◆This user has contributed greatly to the management of the community, by posting many great responses to the questions asked. Once every three months, MVPs are determined based on the points earned during that period and will be recognized accordingly.
 -
 New Valuable Player (NVP) ◆These are the next-best contributors to the community after MVPs. This is awarded to users who have not yet won an MVP award, based on the number of points they have earned.
 -
 Official Expert ◆Chosen out of all MVP awardees, who are already proof of excellence, this is a testimony of outstanding correspondence in the community. After careful screening, they are appointed by CELSYS and assume their position.Note: Formally called “Evangelists”
 -
 Official Moderator of CELSYS ◆Moderators are official CELSYS staff members who are fluent in Japanese as well as various other languages. Moderators are not experts on the software or illustration, so they are not able to directly answer your questions. However, moderators provide communication and language support to ensure that everyone can smoothly communicate with each other.
 -
 CELSYS official accountThe Official Administrator Account