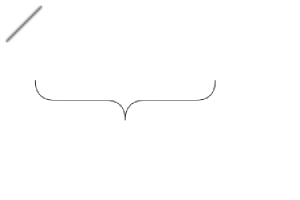

Curly braces ({} ← These parentheses) are brushes that draw easily. 中括弧({}←こういう括弧)を簡単に描けるブラシです。

* Basically, any brush can be drawn in the same way as when drawing a straight line.
1. Curly brace brushes ({1)
2. Braces brushes ({2)
3. Braces brushes ({3)
4. Braces brushes ({4)
5. Curly braces ({5)
7. Curly brace brushes ({} 1)
8. Braces brushes ({} 2)
9. Braces brushes ({} 3)
10. Curly braces brushes ({} 4)
11. Curly braces Brushes ({} 5)
(1) auto action "Create selection from layer & expand selected area (1px) & advanced fill (Black) & Remove selection"... As shown in the name, it is necessary to use it only because the following operation is done. (If you don't know how to use auto action or don't want to register, you can do it manually. )1. Create a selection from layer2. expand selected area (1px)3. advanced fill (Black)4. Release selection
【 2 】 Actual usage (Part 1)
(1) Add a normal layer and draw braces with the curly braces brush ({3) tool.

(2) Use the selection tool > rectangle tool to move the lower part of the curly brace to any location.

(3) Use the selection tool > rectangle tool to select the straight section below the remaining parts of the launcher, select "Zoom In/out" of the launchers, uncheck "fixed aspect" in "tool property", extend the line to the part moved down, and select "Finalize".

(4) The upper part of the braces and the part that moves down are connected.

(5) in the "Curly braces for brush auto action" set, auto action "Create selection from layer & expand selected area (1px) & advanced fill (Black) & Selection" is completed by adjusting the line width to any thickness.


More

※基本的にどのブラシも直線を描くときと同じように描けます。
1.中括弧ブラシ({1)
2.中括弧ブラシ({2)
3.中括弧ブラシ({3)
4.中括弧ブラシ({4)
5.中括弧ブラシ({5)
7.中括弧ブラシ({}1)
8.中括弧ブラシ({}2)
9.中括弧ブラシ({}3)
10.中括弧ブラシ({}4)
11.中括弧ブラシ({}5)
(1)オートアクション「レイヤーから選択範囲を作成&選択範囲を拡張(1px)&高度な塗りつぶし(黒)&選択範囲を解除」…名前の通り、以下の操作を行っているだけですので、必要に応じてご使用ください。(オートアクションの使用方法がよくわからない、登録したくないといった場合は手動で同じ操作を行えばよいだけです。)1.レイヤーから選択範囲を作成2.選択範囲を拡張(1px)3.高度な塗りつぶし(黒)4.選択範囲を解除
【2】実際の使い方(その1)
(1)通常レイヤーを追加し、「中括弧ブラシ({3)」ツールで中括弧を描きます。

(2)「選択範囲」ツール>「長方形選択」ツールを使用して、中括弧の下の部分を任意の場所に移動します。

(3))「選択範囲」ツール>「長方形選択」ツールを使用して、上に残った部分の下の直線部分を選択し、ランチャーの「拡大・縮小・回転」を選択し、「ツールプロパティ」で「縦横比固定」のチェックを外して、下に移動した部分まで直線を延ばして「確定」を選択します。

(4)中括弧の上の部分と下に移動した部分がつながります。

(5)「中括弧ブラシ用オートアクション」セット内のオートアクション「レイヤーから選択範囲を作成&選択範囲を拡張(1px)&高度な塗りつぶし(黒)&選択範囲を解除」で、線の太さを任意の太さに調整して完成です。


以上
1. Braces brushes ({) 1.中括弧ブラシ({)
2. Curly braces brushes ({}) 2.中括弧ブラシ({})
3. Braces for brush auto action 3.中括弧ブラシ用オートアクション
Update history
2023/04/12 create new
2023/04/14 for a fee
2023/04/15 "CLIP STUDIO PAINT DEBUT" was removed from Target software.
2023/04/12 新規作成
2023/04/14 有償化
2023/04/15 対象ソフトから「CLIP STUDIO PAINT DEBUT」を外した
Old version


