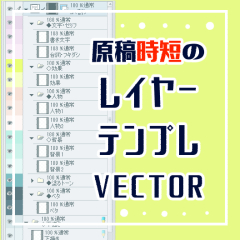
Layer shorter of manuscript (原稿時短のレイヤーテンプレ) 原稿時短のレイヤーテンプレ

Content ID:1822802

  • 24,026
  • Free
This material collection includes materials that can be used in Studio Mode. (What is Studio Mode?)

This is a set of layers for the purpose of shorter the manuscript.
I think that I try to be easy to see anyway and a little fun work environment, palette color has changed.
Please use it while arranging it according to oneself variously.

[2021.2 UP DATE]
-I added a layer for line drawing to vector ver.
I lowered the concentration of the draft layer a little.
I replaced the explanation image of the new UI.
原稿の時短を目的としたレイヤーセットです。
どうせなら見やすくてちょっと楽しい作業環境にしようと思い、パレットカラーが変更してあります。
自分に合わせていろいろアレンジしながらご利用ください。


【2021.2 UP DATE】
・線画用レイヤーをベクターにしたver.を追加しました。
・下描きレイヤーの濃度をちょっとだけ下げました。
・解説画像を新UIのものに差し替えました。


600dpi/Printing manuscripts (regardless of size) are made assuming.
The normal version of all raster layer, only the layers for line drawings are recorded two types of vector version that is vector layer.

All other than the draft layer are set to gray.
(Draft layer is RGB)

The six Layer folder in the split-frame folder
+ Is divided into the bottom draw folder.


How to use this material

① when you create a manuscript canvas of any size, check the template item
Select the layer ② and click OK
, You can create a canvas with the layer set intact.
Or
The layer set is generated when you drag and drop it from the material palette onto the canvas on the active canvas.


Roughly use it in this kind of flow.

When the is finished, the first thing to do is make a frame with frame border tool and start drawing.
(It is a mask in whole folder, you can not draw anything before you make a frame border )


When you create a frame border, you start with a split folder selected.
Select "Add to Selected folder" for the How to add of the frame.

The tone is layer mask the part that I painted becomes the tone as it is.
I work on the image that the same concentration of tones is pasted at a dash.
The default tone setting is a tint of the 60.0 line and 30/0 noise, but it is a toning layer so you can change it freely.

600dpi/印刷用の原稿(サイズ不問)を想定して作っています。
 すべてラスターレイヤーの通常版と、線画用のレイヤーのみベクターレイヤーになっているベクターの2種類を収録しています。

下描きレイヤー以外は全てグレースケールに設定しています。
 (下描きレイヤーはRGBです)

コマ割りフォルダーの中に6つのレイヤーフォルダー
 +下描きフォルダーに分かれています。


【 この素材の使い方 】

①任意のサイズの原稿キャンバスを作成時、[テンプレート]項目にチェック
②レイヤーテンプレを選択して[OK]
すると、レイヤーがそのままセットされたキャンバスが作成できます。
もしくは
作業中のキャンバスに、素材パレットからキャンバスにドラッグ&ドロップすると、レイヤーセットが生成されます。


ざっくりこんな感じの流れで使います。

下描きが終わったら、最初にコマ枠ツールでコマを作って描き始めます。
 (フォルダまるごとマスクになっているので、コマ枠を作る前だと何も描けません


コマ枠を作成するときは、コマ割りフォルダーを選択した状態で作成を開始します。
 コマの追加方法は「選択中のフォルダーに追加」を選んでおいてください。

トーンは塗った部分がそのままトーンになるレイヤーマスクになっています。
 同じ濃度のトーンを一気に貼っていくイメージで作業します。
デフォルトのトーン設定は60.0線円と30/0ノイズの濃淡ですが、トーン化レイヤーなので自由に変更できます。

Manuscript shorter 原稿時短テンプレ

Old version

Content ID:1822802

Published : 3 years ago

Last updated : 3 years ago

27pt's profile Go to profile

◾︎趣味で作った素材ですが、楽しく使っていただけたら嬉しいです◎  ◾︎更新おしらせTwitter@27pttt  ◾︎素材の規約(商用利用などのルール)については、ASSETSの利用規約をご確認ください。 ◾︎一部の素材は有償に移行する予定です。不具合が無いか確認するため1年以上の無料期間を設けています。 ◾︎ I use Japanese. For messages in other languages, I will use a translator to reply :)