

This is a auto action that uses the "Auto Shadow" function of the CLIP STUDIO to automatically create shadows, highlights, rim lights, etc. with one click. クリスタの「自動陰影」機能を使って、1クリックで自動で影付け・ハイライト・リムライトなどを作成するオートアクションです。
The color tress of the line art is also performed automatically.
Save time and improve efficiency!


(1) Status of the underfill layer and the lineart layer
(2) Result of executing the "Auto Shadow++" auto action
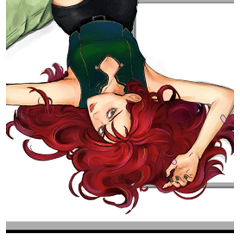
(3) The result of adding about 10 minutes
Like a painting assistant, it is an action that significantly reduces the amount of work.
- Bright areas
- Dark areas
- 2 types of rim lights
- Diffused light
- Color Torres Main Line
is created in separate layers, making it easy to modify them later.
Also, do not make any changes to the original line art and fill layer.

The final layer configuration is
- Auto Shading ++ folder (masked with lineart + fill range)
- Line art (first main line layer created, hided)
- Diffused light (the effect of glowing softly throughout)
- Line art (color tress)
- Rim light (yellowish light from behind)
- Rim light (reflection) (bluish light from behind)
- Bright part (bright part)
- Dark areas (dark areas)
- Fill (folder or layer)
After performing the action, you can merge everything and paint it thickly from above, or apply it individually by taking advantage of the effect of each layer.
Since the rim light, light part, and dark part are only fill in one color, you can easily change the color using the "lock transparent pixel" function.

There are four types of paints.
"Warm color, light source upper left"
"Warm color, light source upper right"
"Cool color, light source upper left"
"Cool color, light source upper right"
It's not that strict, so you can choose whether the light source is right or left.
Preparation
* Please save or back up the file before executing.
* The automatic shadow function cannot be performed if more than 250 colors are used in the line art layer and fill layer combined.
Try to keep within 250 colors as much as possible.
①
- "Line art" layer with main lines drawn
- Primed or filled "fill" layers (or folders that put them together)
Prepare.
②
[set as reference layer] the "line art" layer with the main line drawn.
That's all.

For the time being, it's at the top of the auto action.
[Change layer name to "Line Art"] to the main line layer,
Please execute [Change layer name to "Fill"] on the undercoat / fill layer.
* [Change layer name to "filling"] andThere is [Changed the layer folder name to "Fill"]There is no difference in how it works.I just thought it was hard to understand intuitively.
All that's left is to run your favorite Auto Shading++ auto action!


It is OK if it is in this state.
Please note that if there are multiple layers or folders with the same name as "Line art" and "Fill", it may not end normally!
Adjust automatic shading

If you want to adjust the automatic shadow by yourself, turn on the setting switching check of "Auto shadow", which is the only one in the middle of the auto action, and let it show log the dial.

You can also make it look like this kind of anime paint.
Experiment and have fun!
線画の色トレスも自動で行います。
時短・効率化に!
①下塗りレイヤーと線画レイヤーの状態
②「自動陰影++」オートアクションを実行した結果
③10分くらい加筆した結果
塗り作業のアシスタントのように、作業量をかなり軽減してくれるアクションです。
- 明るい部分
- 暗い部分
- リムライト2種
- 拡散光
- 色トレス済主線
がレイヤーを分けて作成されるため、あとから手修正するのも簡単です。
また、元の線画・塗りレイヤーには変更を加えません。
最終的なレイヤー構成は
- 自動陰影++フォルダ(線画+塗りの範囲でマスキングされる)
- 線画(最初に作った主線レイヤー・非表示になる)
- 拡散光(全体にふわっと光るような効果)
- 線画(色トレス)
- リムライト(黄色っぽい後ろからの光)
- リムライト(反射)(青みがかった後ろからの光)
- 明部(明るい部分)
- 暗部(暗い部分)
- 塗り(フォルダまたはレイヤー)
アクション実行後は、すべて統合して上から厚塗りしたり、レイヤーごとの効果を活かして個別に塗ったり自由にできます。
リムライト・明部・暗部は1色で塗りつぶしてあるだけなので、「透明ピクセルをロック」機能を利用して色を変えたりも簡単にできます。
塗りは4種類。
「暖色・光源左上」
「暖色・光源右上」
「寒色・光源左上」
「寒色・光源右上」
それほど厳密なものではないので、光源が右か左かくらいで選んでOKです。
下準備
※実行前にファイルを保存する・バックアップを取るなどしておいてください。
※自動陰影機能は、線画レイヤーと塗りレイヤーで合わせて250色以上使用していると実行できない仕様です。
なるべく250色以内になるようにしてください。
①
- 主線の描かれた「線画」レイヤー
- 下塗りまたは塗り分けされた「塗り」レイヤー(または、それらをまとめたフォルダ)
を用意します。
②
主線の描かれた「線画」レイヤーを【参照レイヤーに設定】します。
以上です。
とりあえず、オートアクションの上の方にある
【レイヤー名を「線画」に変更】を主線レイヤーに、
【レイヤー名を「塗り」に変更】を下塗り・塗り分けレイヤーに実行してください。
※【レイヤー名を「塗り」に変更】と【レイヤーフォルダ名を「塗り」に変更】がありますが動作の内容に違いはありません。直感的に分かりづらいかなと思っただけ。
あとはお好きな自動陰影++のオートアクションを実行するだけです!
この状態になっていればOKです。
「線画」「塗り」と同じ名前のレイヤーやフォルダが複数あった場合、正常終了しないことがありますので注意してください!
自動陰影の調整
ご自身で自動陰影の調整をしたい場合、オートアクション内の真ん中あたりに一つだけある「自動陰影」の設定切り替えチェックをONにして、ダイアログを表示させてください。
こういうアニメ塗りっぽい感じにもできます。
いろいろ試して楽しんでください!


Other materials by めにけ


Popular “Auto Action” materials


New materials


Badges
-
 MVP ◆This user has contributed greatly to the management of the community, by posting many great responses to the questions asked. Once every three months, MVPs are determined based on the points earned during that period and will be recognized accordingly.
 -
 New Valuable Player (NVP) ◆These are the next-best contributors to the community after MVPs. This is awarded to users who have not yet won an MVP award, based on the number of points they have earned.
 -
 Official Expert ◆Chosen out of all MVP awardees, who are already proof of excellence, this is a testimony of outstanding correspondence in the community. After careful screening, they are appointed by CELSYS and assume their position.Note: Formally called “Evangelists”
 -
 Official Moderator of CELSYS ◆Moderators are official CELSYS staff members who are fluent in Japanese as well as various other languages. Moderators are not experts on the software or illustration, so they are not able to directly answer your questions. However, moderators provide communication and language support to ensure that everyone can smoothly communicate with each other.
 -
 CELSYS official accountThe Official Administrator Account