
Set to speed line art _ parallel lines (線画をスピード線化するセット_平行線) 線画をスピード線化するセット_平行線
Content ID:2043704
-
231

This is a material set that allows you to turn line drawings into speed lines (parallel lines).
It becomes a powerful speed line in a short time and can be adjusted quite a bit.
Eventually, the expression color will be monochrome.
線画をスピード線(平行線)にできる素材セットです。
短時間で迫力あるスピード線になって調整も結構できます。
最終的には表現色はモノクロになります。
layer template
・Line art_Speed line_For horizontal parallel lines_B4_600dpi
・Line art_Speed line_For vertical parallel lines_B4_600dpi
・Line art_Speed line_For _B4_600dpi upward parallel lines
・Line art_Speed line_For _B4_600dpi downward parallel lines
auto action
・Line art_Speed line_Parallel line
That's a set of 5 pieces.
Buildings, people, and accessories are easily impressive.
Basically CLIP STUDIO we use official materials.


A radial version is also available.
https://assets.clip-studio.com/ja-jp/detail?id=2043698
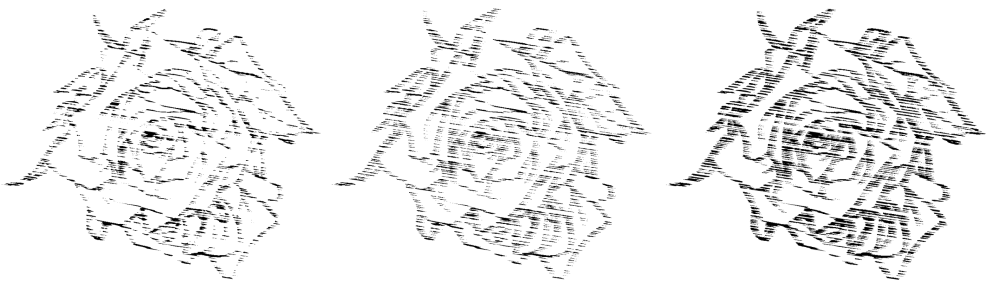
↓ Original image
I'm using an image of a rose brush in CLIP STUDIO.
←Left figure: After auto action execution
The speed line will be a starting and ending line.
→Right/Add with fingertip tool
It easily increases the power.
I will explain how to speed up the line.
At a high level, it looks like this:
・Paste "Line drawing_Speed line_Parallel line_B4_600dpi (layer template)" on the canvas.
・ Put the line drawing you want to speed line in the "Insert original line drawing" folder.
・ When adjusting the angle of parallel lines, rotate the layer folder "Line drawing_Speed line_Parallel line" to adjust.
- Execute auto action (line drawing_speed line_parallel line)
That's all.
After that, please adjust and add to your liking.
The following is a detailed explanation.
I think it is the influence of streamlined lines, but it is because the operation is heavy when pasting the material.
If it is a computer with good performance, it may not bother you.
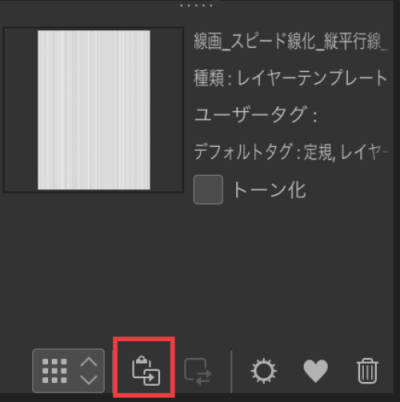
Paste "Line Art_Speed Lines_Parallel Lines_B4_600dpi (layer template)" on the canvas.
Horizontal (0 degrees), vertical (90 degrees), right up (45 degrees), and right down (-45 degrees) are available.
Choose a suitable one.
If you want to rotate it to the desired angle, it is easier to paste the horizontal (0 degrees) to the canvas when entering the blur angle.
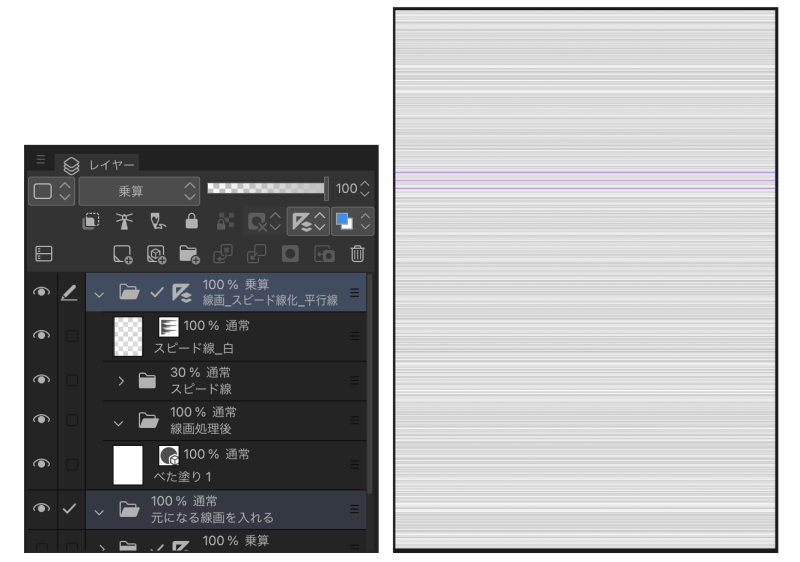
↓ The layer (left figure) and canvas (right figure) will look like this.
An example is horizontal parallel lines.
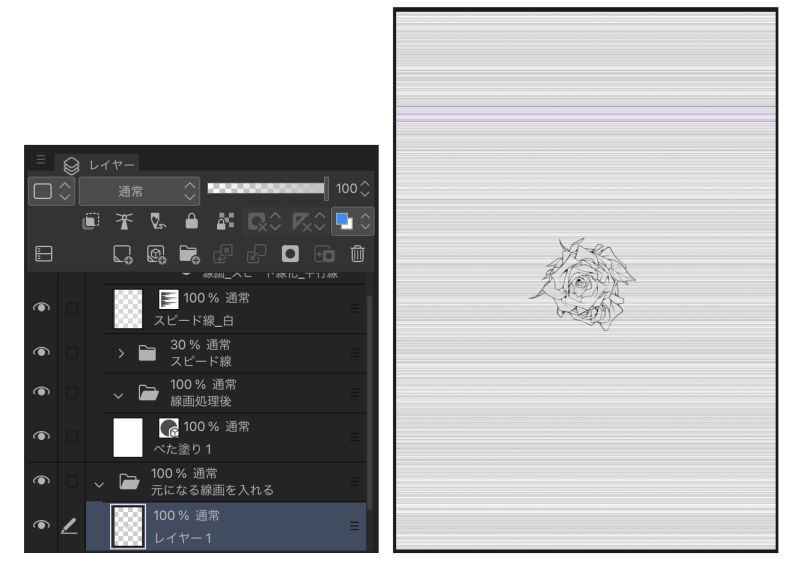
Put the line art you want to convert in the "Insert original line art" folder.
The lineart can be a layer folder, vector layer raster layer anything is fine.
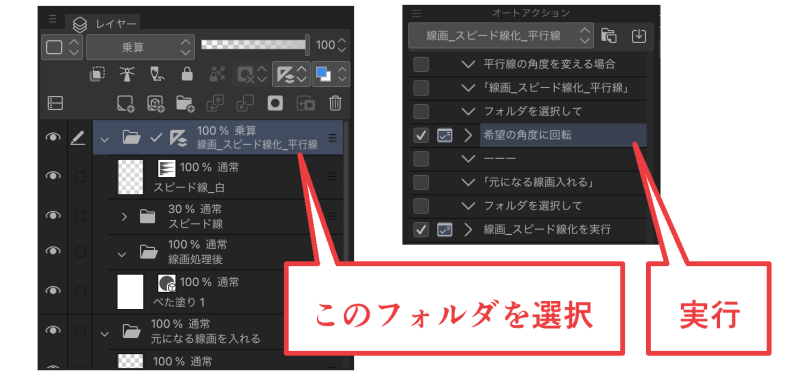
If you want to adjust the angle, select the "Line Art_Speed Line_Parallel Lines" folder and rotate the entire layer folder.
Perform the "Rotate to the desired angle" of the auto action and "Rotate" the deformation.

When rotating, the movement is sloppy.
Check the value of the rotation angle.
There will be an angle input later.
When the angle alignment is complete, run the auto action.
At that time, select the layer folder "Insert original line art" and make sure it is in the same state as the layer shown on the left.
If the "Speed Lines" folder is open, the auto action may not run properly.
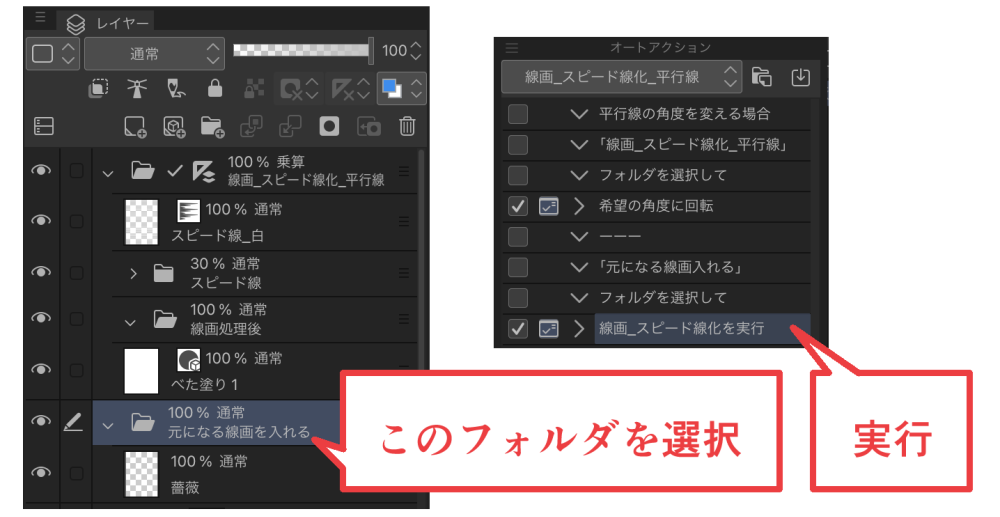
Execute "Execute line art_speed line".
When executed, a movable blur dialog appears.
Match the blur angle to the angle of the parallel lines.
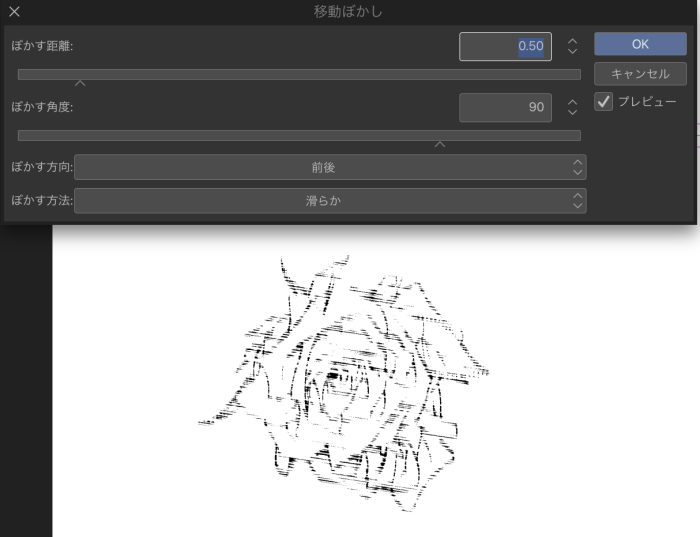
Please change the numbers etc. while checking the preview to make it look good.
You cannot enter a blur angle as a number after the decimal point.
If you are adjusting the angle, enter a value close to the rotated angle as a reference.

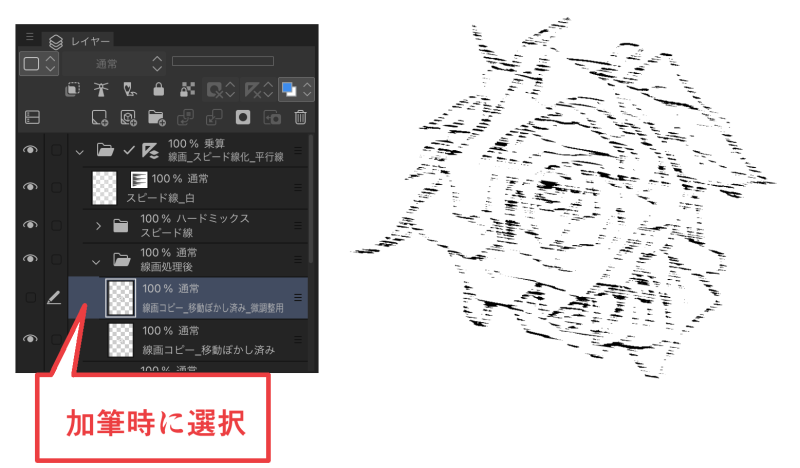
When the auto action is complete, please make adjustments and additions as necessary.
As for addition, if you do it with the fingertip tool on the "Line art copy_movable blur fine-tune" layer, the power will increase.
The fingertip tool follows the parallel line ruler by checking "→sub tool detail", "Correction" → "able to snap".
←The figure on the left is before addition.
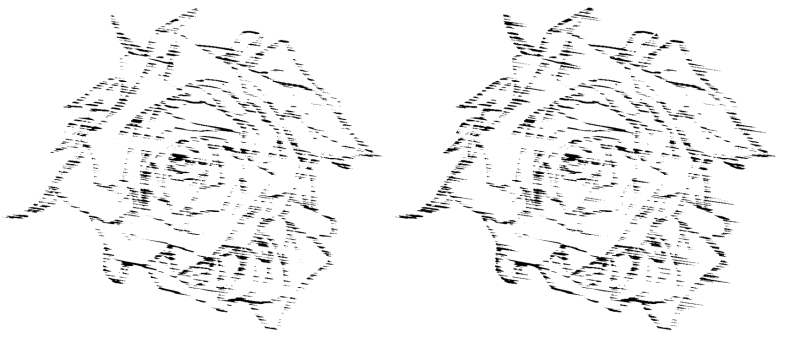
→The figure on the right is after addition.
↓ It is an example of a radial speed line, but you can add it like this with the fingertip tool.
↓ Adjustment can change quite a bit just by changing the transparency of the layer.
Try changing "Copy Line Drawing_movable blur Fine-Tune" or "Speed Line 1~3" in the "Speed Lines" folder.
The "Speed Lines 1~3" in the "Speed Lines" folder have a fairly high degree of freedom because you can change the brush size and spacing of the saturated line.
I think that the optimal setting will change depending on the size of the line drawing to be speeded, so please try various things.
Adjustments are reflected even after adding with the fingertip tool.
"Adjustment _Speed Line_White" is also included, so you can display it as necessary and adjust it.
If you put the one fill in gray in the "After lineart processing" folder, it will also be the tone of the speed line.
↓ Original image
I'm using an image of a rose brush in CLIP STUDIO.

←Left figure: After auto action execution
The speed line will be a starting and ending line.

→Right/Add with fingertip tool
It easily increases the power.
I will explain how to speed up the line.
At a high level, it looks like this:
・Paste "Line drawing_Speed line_Parallel line_B4_600dpi (layer template)" on the canvas.
・ Put the line drawing you want to speed line in the "Insert original line drawing" folder.
・ When adjusting the angle of parallel lines, rotate the layer folder "Line drawing_Speed line_Parallel line" to adjust.
- Execute auto action (line drawing_speed line_parallel line)
That's all.
After that, please adjust and add to your liking.
The following is a detailed explanation.
I think it is the influence of streamlined lines, but it is because the operation is heavy when pasting the material.
If it is a computer with good performance, it may not bother you.

Paste "Line Art_Speed Lines_Parallel Lines_B4_600dpi (layer template)" on the canvas.
Horizontal (0 degrees), vertical (90 degrees), right up (45 degrees), and right down (-45 degrees) are available.
Choose a suitable one.
If you want to rotate it to the desired angle, it is easier to paste the horizontal (0 degrees) to the canvas when entering the blur angle.
↓ The layer (left figure) and canvas (right figure) will look like this.
An example is horizontal parallel lines.

Put the line art you want to convert in the "Insert original line art" folder.
The lineart can be a layer folder, vector layer raster layer anything is fine.

If you want to adjust the angle, select the "Line Art_Speed Line_Parallel Lines" folder and rotate the entire layer folder.
Perform the "Rotate to the desired angle" of the auto action and "Rotate" the deformation.


When rotating, the movement is sloppy.
Check the value of the rotation angle.
There will be an angle input later.
When the angle alignment is complete, run the auto action.
At that time, select the layer folder "Insert original line art" and make sure it is in the same state as the layer shown on the left.
If the "Speed Lines" folder is open, the auto action may not run properly.

Execute "Execute line art_speed line".
When executed, a movable blur dialog appears.
Match the blur angle to the angle of the parallel lines.

Please change the numbers etc. while checking the preview to make it look good.
You cannot enter a blur angle as a number after the decimal point.
If you are adjusting the angle, enter a value close to the rotated angle as a reference.

When the auto action is complete, please make adjustments and additions as necessary.
As for addition, if you do it with the fingertip tool on the "Line art copy_movable blur fine-tune" layer, the power will increase.
The fingertip tool follows the parallel line ruler by checking "→sub tool detail", "Correction" → "able to snap".

←The figure on the left is before addition.

→The figure on the right is after addition.
↓ It is an example of a radial speed line, but you can add it like this with the fingertip tool.

↓ Adjustment can change quite a bit just by changing the transparency of the layer.

Try changing "Copy Line Drawing_movable blur Fine-Tune" or "Speed Line 1~3" in the "Speed Lines" folder.
The "Speed Lines 1~3" in the "Speed Lines" folder have a fairly high degree of freedom because you can change the brush size and spacing of the saturated line.
I think that the optimal setting will change depending on the size of the line drawing to be speeded, so please try various things.
Adjustments are reflected even after adding with the fingertip tool.
"Adjustment _Speed Line_White" is also included, so you can display it as necessary and adjust it.
If you put the one fill in gray in the "After lineart processing" folder, it will also be the tone of the speed line.

I think it is convenient to use the tone created by LT conversion (turn off the toning).
When used in the background, it gives a sense of speed.
I think that using 3D materials and LT conversion will save time.
↓ After auto action execution

↓ Adjust the transparency of the speed line layer, add it with the fingertip tool, put the duplicated tone layer in the "After line drawing processing" folder and make it a speed line

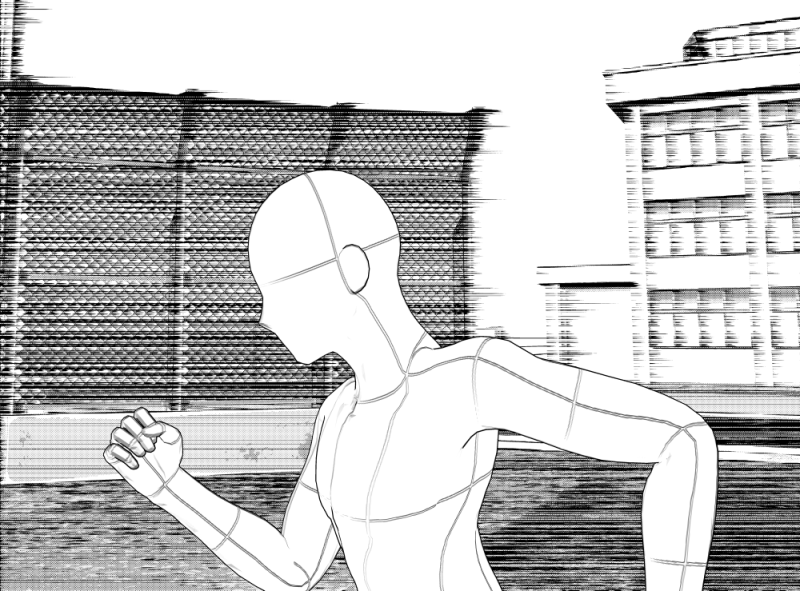
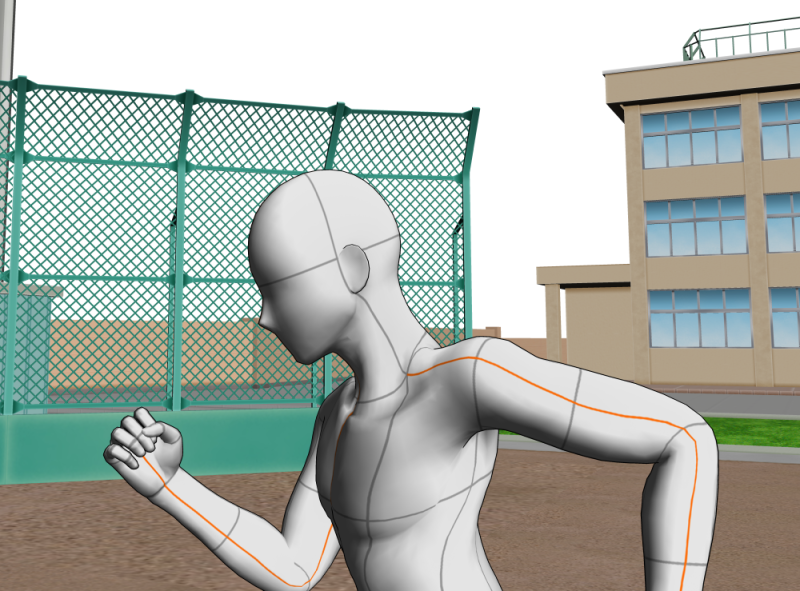
↓ You can also speed people up.

↓ It is also good for running trains.

↓ You can easily drop things.

Beer cans use this 3D material.

Beer 3D set for the time being - 230117 update
https://assets.clip-studio.com/ja-jp/detail?id=1976891
You can also make adjustments, so please try various conversions.
I think it can be used conveniently for action scenes.
You can add power to such scenes as running, fighting, and falling.
レイヤーテンプレート
・線画_スピード線化_横平行線_B4_600dpi用
・線画_スピード線化_縦平行線_B4_600dpi用
・線画_スピード線化_右上がり平行線_B4_600dpi用
・線画_スピード線化_右下がり平行線_B4_600dpi用
オートアクション
・線画_スピード線化_平行線
以上5点のセットです。
建物も人も小物も簡単に迫力が出ます。
作例は基本的にクリスタ公式素材を使わせてもらっています。
・線画_スピード線化_横平行線_B4_600dpi用
・線画_スピード線化_縦平行線_B4_600dpi用
・線画_スピード線化_右上がり平行線_B4_600dpi用
・線画_スピード線化_右下がり平行線_B4_600dpi用
オートアクション
・線画_スピード線化_平行線
以上5点のセットです。
建物も人も小物も簡単に迫力が出ます。
作例は基本的にクリスタ公式素材を使わせてもらっています。
放射状バージョンも出品しています。
https://assets.clip-studio.com/ja-jp/detail?id=2043698
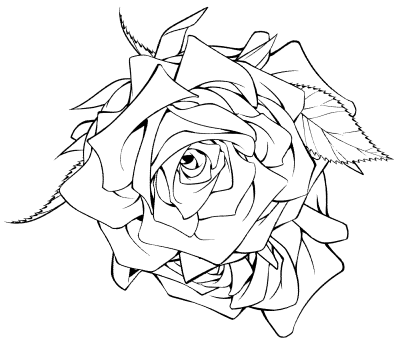
↓元の画像
クリスタの薔薇ブラシの画像を使用しています。
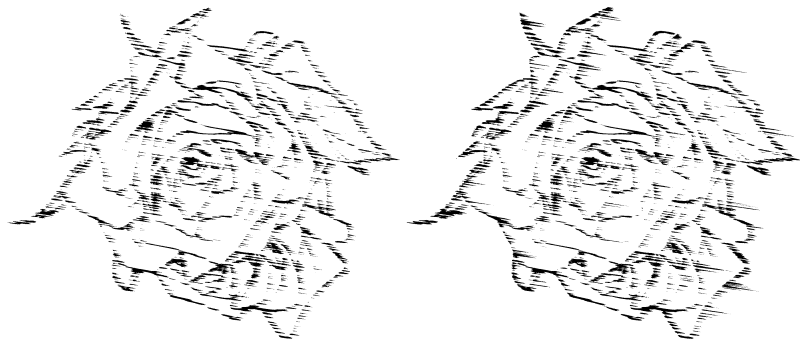
←左図/オートアクション実行後
スピード線は入り抜きのある線になります。
→右図/指先ツールで加筆
簡単に迫力が増します。
スピード線化するやり方を説明します。
大まかには以下のようになります。
・キャンバスに「線画_スピード線_平行線_B4_600dpi用(レイヤーテンプレート)」を貼り付ける。
・「元になる線画を入れる」フォルダにスピード線化したい線画を入れる。
・平行線の角度を調整する場合はレイヤーフォルダ「線画_スピード線化_平行線」を回転させて調整する。
・オートアクション(線画_スピード線化_平行線)を実行
以上です。
その後お好みに合わせて調整、加筆をしてください。
下記は細かめな説明です。
流線の影響かと思いますが素材の貼り付け時などに動作が重ためになります。
性能のいいパソコンですと気にならないのかもしれません。
キャンバスに「線画_スピード線_平行線_B4_600dpi用(レイヤーテンプレート)」を貼り付けます。
横(0度)・縦(90度)・右上がり(45度)・右下がり(-45度)を用意しています。
適したものを選んでください。
希望の角度に回転させる場合には横(0度)をキャンバスに貼り付けるとぼかしの角度入力時にやりやすいです。
↓レイヤー(左図)とキャンバス(右図)はこんな感じになります。
例は横平行線です。
変換したい線画を「元になる線画を入れる」フォルダに入れてください。
線画はレイヤーフォルダでもベクターレイヤー、ラスターレイヤーなんでも大丈夫です。
角度を調整したい場合には「線画_スピード線化_平行線」フォルダを選択し、レイヤーフォルダを丸ごと回転させます。
オートアクションの「希望の角度に回転」の実行や変形の「回転」を行ってください。
回転時には動作がモサっとします。
回転角の数値は確認しておいてください。
後ほど角度の入力があります。
角度合わせが完了したらオートアクションを実行します。
その時、レイヤーフォルダ「元になる線画を入れる」を選択し、左図のレイヤーと同じ状態にしてください。
「スピード線」フォルダが開いた状態になっていたりするとオートアクションがうまく実行できない場合があります。
「線画_スピード線化を実行」を実行してください。
実行すると移動ぼかしのダイアログが出ます。
ぼかす角度は平行線の角度に合わせてください。
プレビューを確認しながら数値等を変更し、いい感じにしてください。
ぼかす角度は小数点以下の数値は入力できません。
角度調整を行っている場合は回転させた角度を参考に近い数値を入れてください。
オートアクションが完了したら必要に応じて調整、加筆をしてください。
加筆については「線画コピー_移動ぼかし済み_微調整用」レイヤーに指先ツールで行うと迫力が増します。
指先ツールは「サブツール詳細」→「補正」→「スナップ可能」にチェックを入れると平行線定規に沿います。
←左図は加筆前
→右図は加筆後
↓放射状のスピード線での例ですが指先ツールでこんな感じに加筆できます。
↓調整はレイヤーの透明度を変更するだけでも結構変わります。
「線画コピー_移動ぼかし済み_微調整用」や「スピード線」フォルダ内の「スピード線1~3」を変更してみてください。
「スピード線」フォルダ内の「スピード線1~3」は集中線のブラシサイズ、間隔の変更等もできるので自由度は結構高いと思います。
スピード線化する線画の大きさによっても最適な設定は変わってくるかと思いますのでいろいろ試してみてください。
指先ツールで加筆後でも調整が反映されます。
「調整用_スピード線_白」も入っているので必要に応じて表示し、調整してみてもいいと思います。
グレーで塗りつぶしたものを「線画処理後」フォルダに入れるとスピード線のトーンにもなります。
↓元の画像
クリスタの薔薇ブラシの画像を使用しています。
←左図/オートアクション実行後
スピード線は入り抜きのある線になります。
→右図/指先ツールで加筆
簡単に迫力が増します。
スピード線化するやり方を説明します。
大まかには以下のようになります。
・キャンバスに「線画_スピード線_平行線_B4_600dpi用(レイヤーテンプレート)」を貼り付ける。
・「元になる線画を入れる」フォルダにスピード線化したい線画を入れる。
・平行線の角度を調整する場合はレイヤーフォルダ「線画_スピード線化_平行線」を回転させて調整する。
・オートアクション(線画_スピード線化_平行線)を実行
以上です。
その後お好みに合わせて調整、加筆をしてください。
下記は細かめな説明です。
流線の影響かと思いますが素材の貼り付け時などに動作が重ためになります。
性能のいいパソコンですと気にならないのかもしれません。
キャンバスに「線画_スピード線_平行線_B4_600dpi用(レイヤーテンプレート)」を貼り付けます。
横(0度)・縦(90度)・右上がり(45度)・右下がり(-45度)を用意しています。
適したものを選んでください。
希望の角度に回転させる場合には横(0度)をキャンバスに貼り付けるとぼかしの角度入力時にやりやすいです。
↓レイヤー(左図)とキャンバス(右図)はこんな感じになります。
例は横平行線です。
変換したい線画を「元になる線画を入れる」フォルダに入れてください。
線画はレイヤーフォルダでもベクターレイヤー、ラスターレイヤーなんでも大丈夫です。
角度を調整したい場合には「線画_スピード線化_平行線」フォルダを選択し、レイヤーフォルダを丸ごと回転させます。
オートアクションの「希望の角度に回転」の実行や変形の「回転」を行ってください。
回転時には動作がモサっとします。
回転角の数値は確認しておいてください。
後ほど角度の入力があります。
角度合わせが完了したらオートアクションを実行します。
その時、レイヤーフォルダ「元になる線画を入れる」を選択し、左図のレイヤーと同じ状態にしてください。
「スピード線」フォルダが開いた状態になっていたりするとオートアクションがうまく実行できない場合があります。
「線画_スピード線化を実行」を実行してください。
実行すると移動ぼかしのダイアログが出ます。
ぼかす角度は平行線の角度に合わせてください。
プレビューを確認しながら数値等を変更し、いい感じにしてください。
ぼかす角度は小数点以下の数値は入力できません。
角度調整を行っている場合は回転させた角度を参考に近い数値を入れてください。
オートアクションが完了したら必要に応じて調整、加筆をしてください。
加筆については「線画コピー_移動ぼかし済み_微調整用」レイヤーに指先ツールで行うと迫力が増します。
指先ツールは「サブツール詳細」→「補正」→「スナップ可能」にチェックを入れると平行線定規に沿います。
←左図は加筆前
→右図は加筆後
↓放射状のスピード線での例ですが指先ツールでこんな感じに加筆できます。
↓調整はレイヤーの透明度を変更するだけでも結構変わります。
「線画コピー_移動ぼかし済み_微調整用」や「スピード線」フォルダ内の「スピード線1~3」を変更してみてください。
「スピード線」フォルダ内の「スピード線1~3」は集中線のブラシサイズ、間隔の変更等もできるので自由度は結構高いと思います。
スピード線化する線画の大きさによっても最適な設定は変わってくるかと思いますのでいろいろ試してみてください。
指先ツールで加筆後でも調整が反映されます。
「調整用_スピード線_白」も入っているので必要に応じて表示し、調整してみてもいいと思います。
グレーで塗りつぶしたものを「線画処理後」フォルダに入れるとスピード線のトーンにもなります。
LT変換で作成されたトーン(トーン化はオフにする)を利用すると便利かと思います。
背景に使用すると疾走感が出ます。
3D素材とLT変換を利用すると時短になると思います。
↓オートアクション実行後
↓スピード線レイヤーの透明度調整、指先ツールで加筆、複製したトーンレイヤーも「線画処理後」フォルダに入れてスピード線化
↓人をスピード線化もできます。
↓電車を走らせるのにもいいです。
↓ものを落下させたりも気軽にできます。
ビール缶はこちらの3D素材を使用しています。
とりあえずビール3Dセット-230117更新
https://assets.clip-studio.com/ja-jp/detail?id=1976891
調整もできるのでいろいろ変換してみてください。
アクションシーン等に便利に使えるかと思います。
走ったり喧嘩したり落下したりそんなシーンに迫力が足せます。
Set to speed line art _ parallel lines 線画をスピード線化するセット_平行線
-
Line art_Speed line_For horizontal parallel lines_B4_600dpi 線画_スピード線化_横平行線_B4_600dpi用
-
Line Art_Speed Line_For _B4_600dpi Vertical Parallel Lines 線画_スピード線化_縦平行線_B4_600dpi用
-
Line art_Speed line_For _B4_600dpi upward parallel lines 線画_スピード線化_右上がり平行線_B4_600dpi用
-
Line art_Speed line_For _B4_600dpi downward parallel lines 線画_スピード線化_右下がり平行線_B4_600dpi用
-
Line Art_Speed Lines_Parallel Lines 線画_スピード線化_平行線


Other materials by ldl


Popular “Material catalog” materials


New materials


Badges
-
 MVP ◆This user has contributed greatly to the management of the community, by posting many great responses to the questions asked. Once every three months, MVPs are determined based on the points earned during that period and will be recognized accordingly.
 -
 New Valuable Player (NVP) ◆These are the next-best contributors to the community after MVPs. This is awarded to users who have not yet won an MVP award, based on the number of points they have earned.
 -
 Official Expert ◆Chosen out of all MVP awardees, who are already proof of excellence, this is a testimony of outstanding correspondence in the community. After careful screening, they are appointed by CELSYS and assume their position.Note: Formally called “Evangelists”
 -
 Official Moderator of CELSYS ◆Moderators are official CELSYS staff members who are fluent in Japanese as well as various other languages. Moderators are not experts on the software or illustration, so they are not able to directly answer your questions. However, moderators provide communication and language support to ensure that everyone can smoothly communicate with each other.
 -
 CELSYS official accountThe Official Administrator Account