

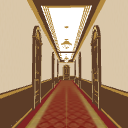
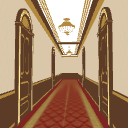
It is a corridor model of the aristocratic mansion.
"Brown system", "white system" two species can be switched.
You can use it for luxury hotels and luxury apartments.
All seven doors can be opened and closed with movable type.
However, there is no room beyond that.
貴族の屋敷の廊下モデルです。
「ブラウン系」「ホワイト系」2種切り替え可能。
高級ホテル、高級マンションなどにもお使いいただけます。
7つのドアは全て可動式で開閉可能。
ただしその先の部屋はありません。


You can also place the pose puppet of real scale, by drag and drop.
It is easy to render freely.


It is recommended that you adjust the " Perth" to a level of 5 to 15 .


Because the screen becomes noisy when you overdo it, please use it to adjust.
In conjunction with environmental light, parallel light 1, parallel light 2, etc.
When fiddling with the direction of the light, it becomes the expression of a good feeling.


(I use the example of the sofa)

② [3D] → [pose] → Drag any pose to the screen,
The model can be placed on the same axis.
(Drag the Reference model as you touch it when placing the object)
* If there is a cartoon coma, it is necessary to drop it inside the frame.
Please adjust the pose to your liking after ③.
リアルスケールのポーズ人形を、ドラッグ&ドロップで配置することも出来ます。
自由にレンダリングしやすくなっています。
「パース」を「5~15」程度に調整されることをお勧めします。
やりすぎると画面がうるさくなりますので、加減してお使いください。
併せて環境光、平行光1、平行光2など
ライトの方向もいじると、いい感じの表現になります。
(ソファの作例を使用しています)
②『3D』→『ポーズ』→任意のポーズを画面にドラッグすると、
同一座標軸にモデルを配置することが出来ます。
(オブジェクトを配置する際も同様に基準モデルを触った状態でドラッグ)
※漫画のコマ割りがある場合、そのコマの内側にドロップする必要があります。
③あとはお好みでポーズを調整してください。
Material マテリアル
-
Brown series ブラウン系
-
White system ホワイト系

disposition 配置
-
default layout 初期レイアウト

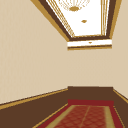
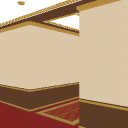
Angle アングル
-
Initial position 初期位置
-
Oku before 奥扉前
-
Back door 奥扉内
-
Hallway Door Front 01 廊下扉前01
-
Hallway Door 02 廊下扉前02
-
Gallery lower corner 01 廊下角01
-
Gallery lower corner 02 廊下角02


pose parts 可動パーツ
-
Oku 奥扉
-
Back Door _ Knob 奥扉_ノブ
-
Door _ Right 3 ドア_右3
-
Door _ Right 3_ Knob ドア_右3_ノブ
-
Door _ Right 2 ドア_右2
-
Door _ Right 2_ Knob ドア_右2_ノブ
-
Door _ Right One ドア_右1
-
Door _ Right 1_ Knob ドア_右1_ノブ
-
Door _ One Left ドア_左1
-
Door _ Left 1_ Knob ドア_左1_ノブ
-
Door Left 2 ドア_左2
-
Door _ Left 2_ Knob ドア_左2_ノブ
-
Door Left 3 ドア_左3
-
Door _ Left 3_ Knob ドア_左3_ノブ


Other materials by よしのみ(吉巳)


Popular “3D object” materials


New materials


-
 MVP ◆This user has contributed greatly to the management of the community, by posting many great responses to the questions asked. Once every three months, MVPs are determined based on the points earned during that period and will be recognized accordingly.
 -
 New Valuable Player (NVP) ◆These are the next-best contributors to the community after MVPs. This is awarded to users who have not yet won an MVP award, based on the number of points they have earned.
 -
 Official Expert ◆Chosen out of all MVP awardees, who are already proof of excellence, this is a testimony of outstanding correspondence in the community. After careful screening, they are appointed by CELSYS and assume their position.Note: Formally called “Evangelists”
 -
 Official Moderator of CELSYS ◆Moderators are official CELSYS staff members who are fluent in Japanese as well as various other languages. Moderators are not experts on the software or illustration, so they are not able to directly answer your questions. However, moderators provide communication and language support to ensure that everyone can smoothly communicate with each other.
 -
 CELSYS official accountThe Official Administrator Account