Because I do not know whether there is a demand, I tried to make a trial version. It is useful for me personally.
I chose the katakana characters that I think are often used in the experiment. (It is a part, so comp)
It is not possible to use it in this state, but it is made for the purpose that it is possible to transform into the shape of my liking and to edit and to save it as one of onomatopoeia.

All of them are made with a callout tool . Therefore, the quality of the material with the resolution and the size change is not affected very much.
See Tool Property For more information on the material configuration.
To zoom in and out, press Shift while working on the handles.
Of course, the expansion, the reduction, and the rotation tool can control it.
Or even one character can be a plural parts. (There are exceptions, but according to the order of writing) ↓
☆ Let's make it to the onomatopoeia, such as the .
Drag the mosquitoes, dakuten, or buttons from the material to place them.
As you see, it is big. This is not the first time because it is a specification.
Please adjust it by yourself.
☆ When adjusting, so that you select the whole when you check the layer of onomatopoeia, it is easy to shorten while Shift hold the handle as it is.

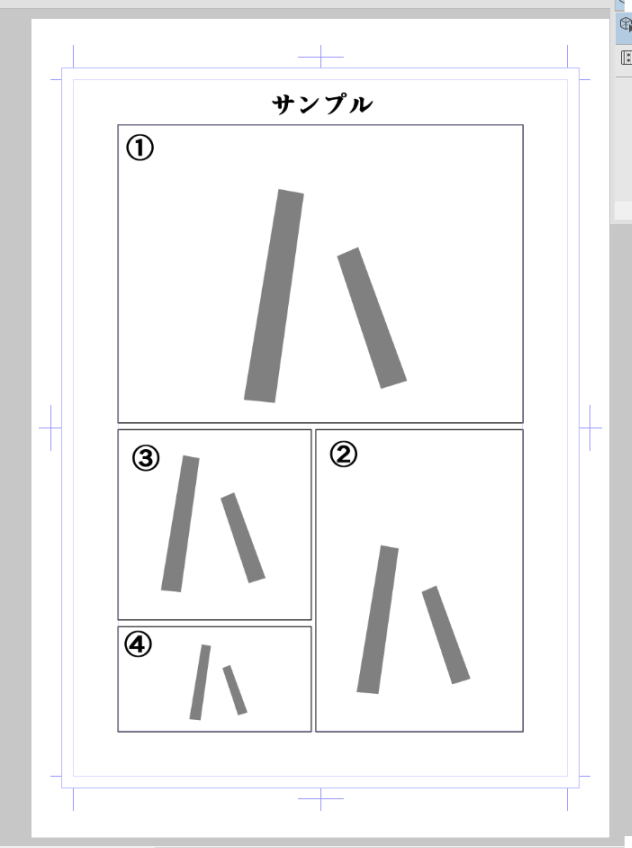
As an aside, the size of the characters are proportional to the sizes of the pieces.
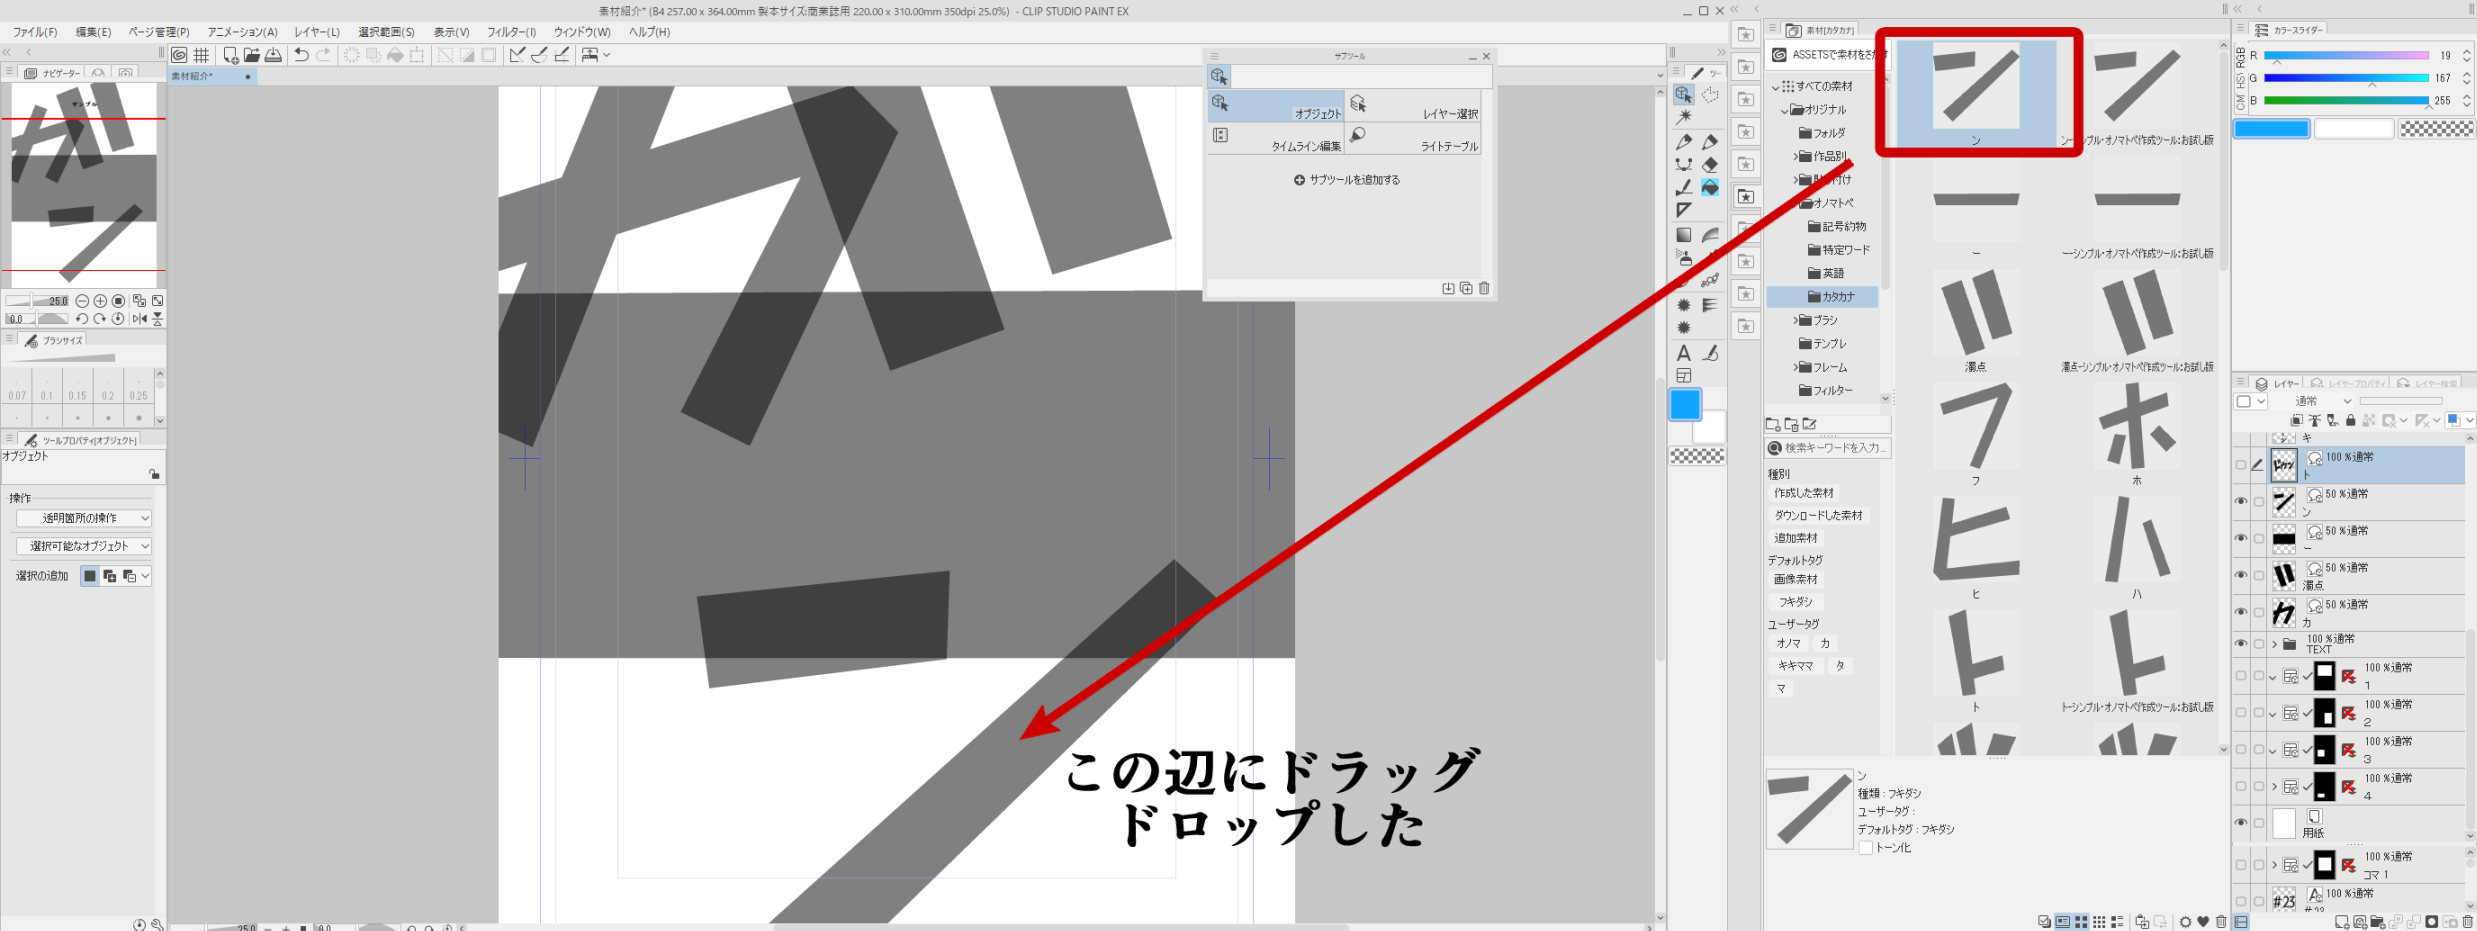
If you do not pay in the scene is reflected in a large canali like the top, drag drop in the scene is like this
It fits in the frame.
Sample ↓

And the translucent...
They make their sound effect easy to trespass. Also, when you trace the parts of onomatopoeia with a tool called "change cubic Bezier Line" , the part changes to the cubic Bezier line. When I change my mind, I return by CtrlZ or returning.
But you can also make beautiful curves if you make a cubic bezier.
But there are points to be aware of!
When it remains translucent even if combined tool property
Please make 100 degrees of transparency of the groundwork.
I was knocked down by this kind of feeling.
It becomes one character material to combine to layer below from the top.
☆ There is also a way that does not bind, and to avoid it because the material is attached to each other is a way of filing in the state "put".
Like a fence on the right side to join ↓
I have made so simple that I thought that I could use those who are not used to handling cubic bezier lines. Once you get used to it, you can easily make your own favorite onomatopoeia by increasing or shaving control points.
Tool properties [Object] You can also change the color of the line and line width to your liking. The default is black. Can also be expressed, such as Kuroki whitewashed.
Because it is a callout tool, the part which is crossed is automatically white without it.
The bottom right side of the enclosure tool property
The same
☆ Easy Recap
☆ When you register the material as an onomatopoeia, it is always better to put it in a folder . Otherwise, the size of the character size and the place of the layer become small because it grows smaller, and it is troublesome to fiddle with the sizes later.
Finally, this is a technique unique to the tool, the first vector line of the onomatopoeia made by this, so you can choose anywhere.
Then you can drag the control point and drag all the characters while Holding Down shift and look at the how to transform to make special transformations such as free transform and perspective distortion .
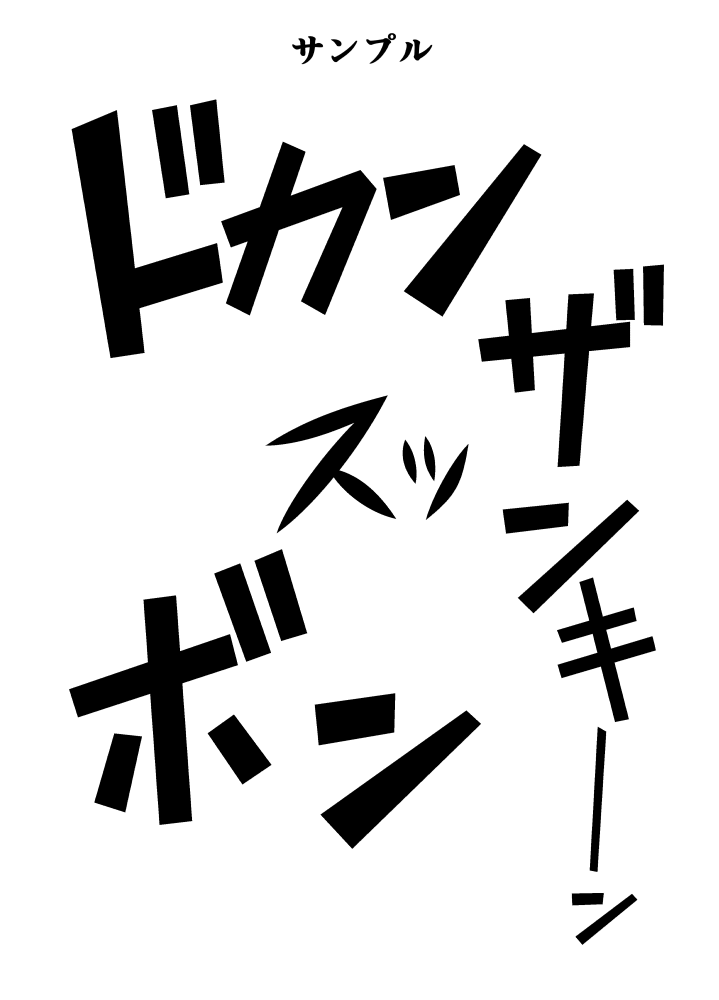
It becomes the sound effect with the impact in such a way.
↑ Tool PropertyYou can transform a line into whatever shape you like at the how to transform.
For example, you can sound like this.
It is convenient to fairly peaceful and can also be easy!!
I have uploaded the complete version now, thank you.
The contents of the complete version contains all katakana characters, dakuten, Han and stretched rods and cubic bezier conversion tools.
需要があるのかわかりませんのでお試し版を作ってみました。わたし個人としては重宝しています。
試しによく使われると思うカタカナ文字を選びました。(一部ですが、お試し版なので)
この状態でも使えなくもないですが、自分好みの形に変形させて編集し一つの擬音として保存できることを目的として作ってあります。

すべて吹き出しツールで作ってあります。よって解像度やサイズの変更にともなった素材の品質はほとんど影響は受けません。
素材構成の詳しくはツールプロパティで確認してください。
拡大、縮小するときはShiftを押しながらハンドルを操作すれば等倍で操作できます。
むろん拡大、縮小、回転ツールでもコントロールできます。
一文字でも複数パーツでできていたりします。(例外もありますが書き順に準じています)↓
☆例えばガーンといった擬音にしてみましょう。
素材からカ、濁点、ー、ンをドラッグして置きます。
見ての通りデカイです。これは仕様ですので初めての場合は仕方ありません。
自分で調節してください。
☆調節の際は擬音のレイヤーにチェックを入れると全体を選択してくれますので、そのままハンドルをShift押しながら縮めていくと楽です。

余談ですが、文字の大きさはコマのサイズに比例しています。
もしも、コマに納めない状態でしたら上のようにカナリ大きく反映されますが、コマ内にドラッグドロップするならこんな感じです
コマの中に納まるようになっています。
サンプル↓

半透明なのは…
自分の描き文字とかをトレスしやすいようにしてあります。また、一緒に入っている「3次ベジェ線に変更」というツールで擬音のパーツをなぞるとそのパーツが3次ベジェ線に変わります。気が変わって戻すときはCtrlZか戻すで戻ります。
ですが、3次ベジェにすればきれいな曲線も作れます。
ただし注意点があります!
結合しても半透明なままの時はツールプロパティより
下地の透明度を100にしてください
ガーンですが、こんな感じでまとめてみました。
上から下のレイヤーに結合してくと一つの文字素材になります。
☆敢えて結合しないやり方もあります、結合してしまうと素材同士がくっついてしまうのでそれを回避するために「乗せて置く」状態でファイリングするというやり方です。
結合すると右側の囲いのように↓
シンプルにしてあるのは、3次ベジェ線の扱いに慣れてない方も使えるかな~と思ってそうしました。慣れたら、制御点を増やしたり削ったりして自分なりの好みの擬音が簡単に作れると思います。
ツールプロパティー[オブジェクト]のところで線の太さとか線の色なども自分好みに変更できます。デフォルトは黒にしています。が、黒淵白塗りといった表現もできます。
吹き出しツールなので、交差している部分は自動で白抜きにしてくれます!!
右下の囲みのところがツールプロパティ
です。
☆簡単なおさらい
☆オノマトペとして素材登録するときは必ずフォルダに入れて登録したほうがいいです。そうしないと文字サイズがコマの大きさやレイヤーの場所とかで大きくなった小さくなったりしてしまいますので、後でサイズをいじるのが面倒だったりします。
最後に、このツールならではの技ですが、これで作ったオノマトペのベクター線をまずはどこでもいいので選択します。
そして、制御点を一括ドラッグ[Shift押しながら文字をすべてドラッグする]して変形方法の項目を見ると、自由変形や遠近ゆがみといった特殊な変形が可能になります。
こんな風にインパクトのある描き文字になります。
↑ツールプロパティの変形方法のところで好きな形に線を変形させることができます
例えばこういう感じの擬音ができます↓
慣れればとても便利ですし楽もできます!!
現在完全版もアップロードしてありますのでよろしくお願いします。
完全版の内容はカタカナ全文字と濁点、半濁点と伸ばし棒と3次ベジェ変換ツールが入っています。


