

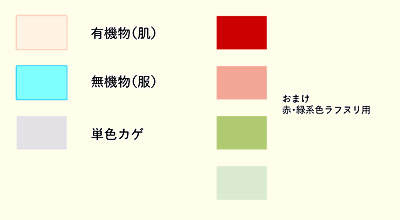
A shadow-specific color palette is ported to a layer (folder) based on collaboration with RETAS STUDIO.
RETAS STUDIOとの連携作業を前提とした影指定カラーパレットをレイヤー(フォルダ)に移植したものです。
Applications
- It is an action to summarize the Nuri of the shadow specified color by switching the drawing layer by making the edge layer color display setting in the Layer folder.
- Only layer configuration. We provide flexible support for different campus sizes and resolutions depending on the environment.
- After creating a new campus and performing actions to create a layer configuration of your choice, "register layers template..." The next time you embark to work at the "New file..." ⇔ "template" selection.
------------
CLIP STUDIO → handing over to other software
Photoshop Format (PSD)
The shadow line is not takethe even if it rasterize.
Create a copy of the original clip file and export it to PSD after merging it with each layer folder.
TVPaint Animation
"Add color" to "include perimeter lines when filling (fill: Include Borders)" Palette
TRACEMAN-PAINTMAN Shadow designation color set (in CLIP Assets)
Just register the HTML color code (#半角英数字6桁) you want.
You will be able to set up the TVPaint side, such as the include perimeter lines when filling target and excluded.
opentoonz
rasterize for each color layer folder after backing up the work CLIP file
Please perform "file" → "animation Export" → "OpenToonz scene file Export".
* For CLIP STUDIO EX only
Official guide "How to OpenToonz CLIP STUDIO drawing Data"
https://howto.clip-studio.com/library/page/view/clipstudiopaint_animation_opentoonz_01
RETAS (PAINTMAN)
Rasterize Layer folder and then perform "PAINTMAN format export"
※ CLIP STUDIO EX only support,
Official online Help " animation cels output "
Http://www.clip-studio.com/site/gd/csp/manual/userguide/csp_userguide/
500_menu/500_menu_save_anime_cell. htm
——————
Use
- The layer generated by this action draws only the color specified by setting the Layer folder color. Please use the brush color as "white (RGB 255, 255, 255)" .
- Layers that are painted and painted are rasterize by selecting the folder "consolidate selected layers."
- You can easily change the drawing (display) color by swapping the layers to the layers folder of any color.
- If you remove the border of watercolor option, the border (sub color) drawing is turned off.
- There is a benefit to not having subtle color margin.
- Nuri color reflects the select Layer folder → layer color → sub color.
- Let's cut it with a transparent color after taking a rough shape with the first "lasso fill" tool for Nuri. It is also a good idea to put a mask on the Layer layer folder.
- When passing to RETAS STUDIO, please enable "Export animation layer" → "Output for Paintman".
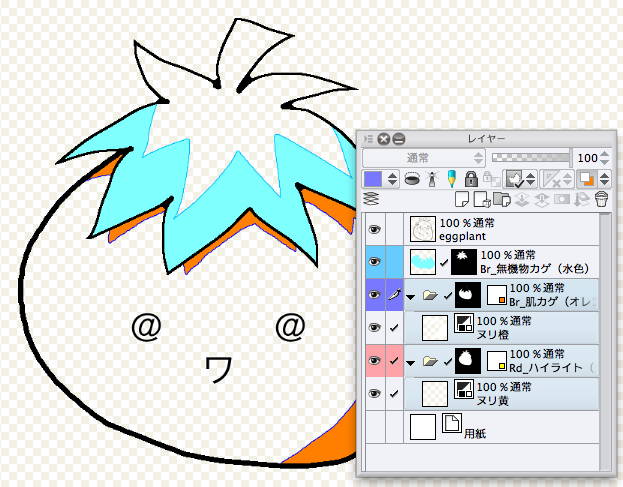
- All of the layers generated by this action are raster layer .
- If you need vector layer to edit the main line or shadow specification , register the layer configuration with the following settings template.
- Change and save the Create new layer for each action to create new vector layer
- Manually converting vector layer raster →
1
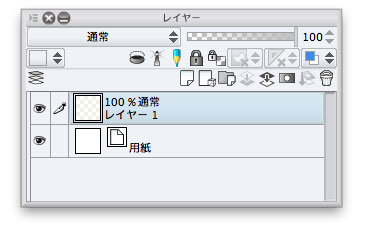
Illustration, comic printing of fanzine, all Comics show settings animation (Pro's ' ila ') create a new file.
It is usually generated with layer 1 selected.

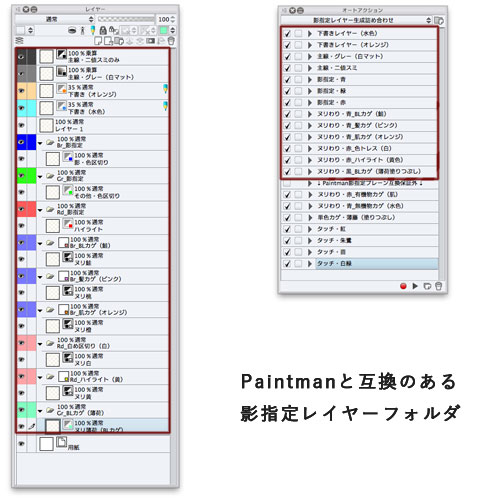
2
With Layer 1 selected, auto action is from the top of the list to the bottom of the draft layer and the main line. Please execute only the necessary one from the shadow specification and Nuri.


3
Let's start drawing with the brush that changed the main color to white.
- Setting the mask selection in the Layers folder Nuri without worrying about the overflow.
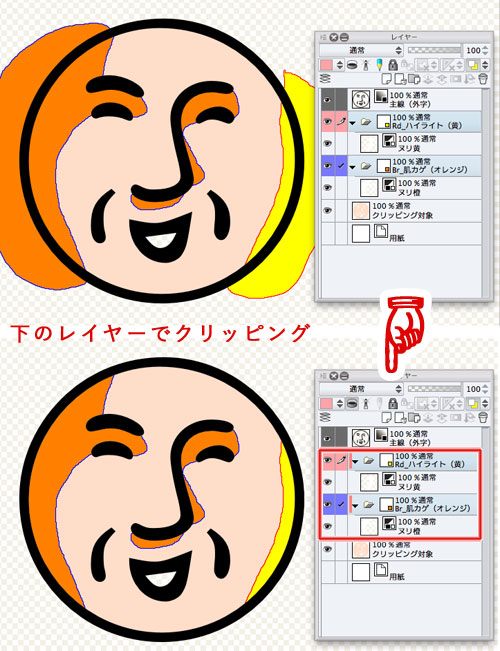
- If you want to color a large number of cells (waste time to cut the mask), " Lasso fill ", " clipping to layer below " and " Close and fill " function are effective
selection if you cut the mask

layer settings → layer below using clipping function

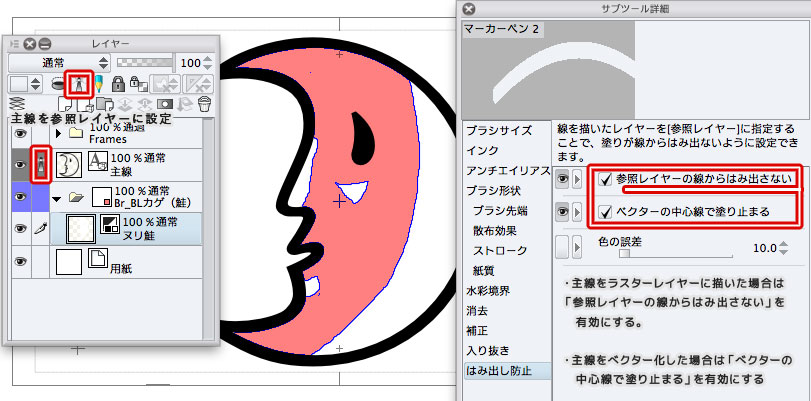
When using the reference layer function (anti-overflow-enabled)
* The main line must be drawn on the vector layer.

The include perimeter lines when filling
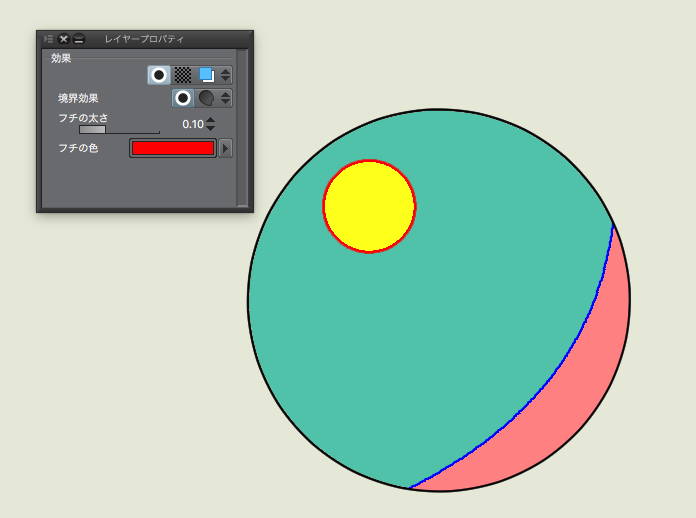
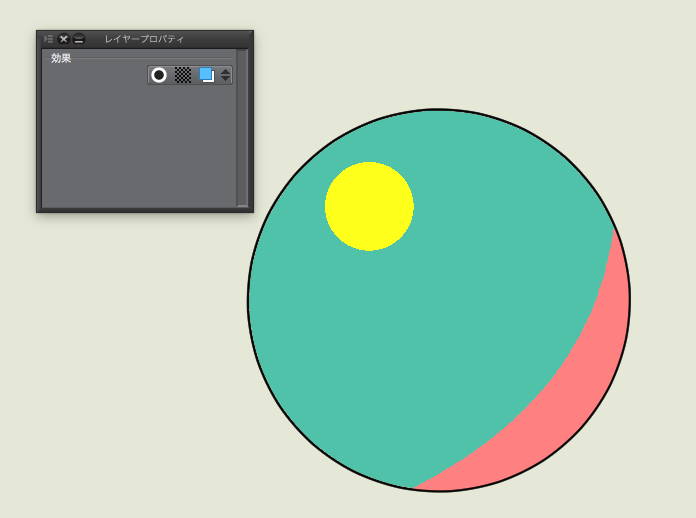
The shadow-designated layer sets the color fill in the Layer folder itself, and the color Torres layer property "border effect " is drawn.

So,
If the border effect is turned off, the color Torres line disappears, andIt is revived if you turn on.
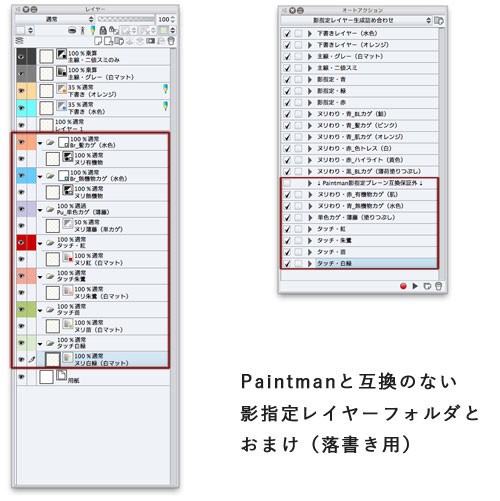
Drawback
- Border effect can't pass it To Paintman Opentoonz .
- The CLIP STUDIO PAINT must be painted and painted separately.
We hope that it will help you to reduce the hassle of color-coded layers and masks, as well as PAINTMAN the CLIP STUDIO PAINT Bucket tool to the equivalent of "include perimeter lines when filling (processing a cross line with no colored Torres line)" option.

Bonus
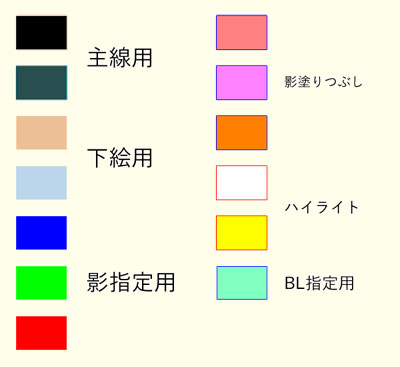
- CLIP STUDIO PAINT shortcut (main color: Black sub color: white and transparent color)
- Main color sub color switch... X Key
- Switching main & sub color transparent color... C Key
- Move layer to edit... Option or ALT + 〕 (Top/bottom)
- If you change the drawing color to transparent in the 1bit transparent raster layer, you can use the brush you are using as the eraser brush at that time.
【用途】
- レイヤーフォルダにフチ・レイヤーカラー表示設定を行うことにより、描画レイヤーの切り替え・影指定カラーのヌリわけをまとめるアクションです。
- レイヤー構成のみ行います。環境によって異なるキャンパスサイズ・解像度に対し柔軟に対応します。
- 新規キャンパスを作成し好みのレイヤー構成になるようアクションを実行したあと「レイヤーをテンプレートに登録…」すると次回からは「新規ファイル…」⇔「テンプレート」選択の一回で作業に取り掛かれます。
------------
クリスタ→他ソフトへの受け渡しについて
Photoshop形式(PSD)
ラスタライズしても影指定線は持ち出せません。
元clipファイルの複製を作りレイヤーフォルダごとに統合してからPSDに書き出して下さい。
TVPaint Animation
「含み塗り(fill: Include Borders)」パレット「色を追加(add color)」に
TRACEMAN・PAINTMAN用影指定カラーセット(CLIP Assetsにあります)の
HTMLカラーコード(#半角英数字6桁)を必要なぶんだけ登録してください。
含み塗り対象・対象外などの設定をTVPaint側で行えるようになります。
OpenToonz
作業CLIPファイルのバックアップを取ってから色レイヤーフォルダごとにラスタライズを行い
「ファイル」→「アニメーション書き出し」→「OpenToonzシーンファイル書き出し」を実行して下さい。
※クリスタEXのみ対応
公式ガイド「クリスタの作画データをOpenToonzで彩色する手順」
https://howto.clip-studio.com/library/page/view/clipstudiopaint_animation_opentoonz_01
RETAS(PAINTMAN)
レイヤーフォルダのラスタライズを行ってから「PAINTMAN形式書き出し」を実行
※クリスタEXのみ対応、
公式オンラインヘルプ「アニメーションセル出力」
http://www.clip-studio.com/site/gd/csp/manual/userguide/csp_userguide/
500_menu/500_menu_save_anime_cell.htm
——————
【使い方】
- このアクションで生成されたレイヤーは「レイヤーフォルダカラーの設定」によって指定された一色のみ描画します。ブラシカラーを「白(RGB 255, 255, 255)」にしてご利用下さい。
- 描き&塗り終わったレイヤーはフォルダを選択肢「選択したレイヤーを統合」することでラスタライズされます。
- 任意色のレイヤーフォルダにレイヤーを入れ替えることで簡単に描画(表示)色を変更できます。
- 「水彩境界」オプションを外すと境界線(サブカラー)描画がオフになります。
- 微妙な色の誤差が発生しなくなるメリットがあります。
- ヌリわけ色はレイヤーフォルダを選択→レイヤーカラー→サブカラーを反映しています。
- ヌリわりは最初「投げなわ塗り」ツールでおおまかな形をとってから透明色で削りましょう。レイヤー・レイヤーフォルダにマスクをかけておくのも有効です。
- RETAS STUDIOに渡すときは「アニメーションレイヤーの書き出し」→「Paintman向けに出力」を有効にして下さい。
- このアクションで生成されるレイヤーはすべてラスターレイヤーです。
- 主線や影指定の編集にベクターレイヤーを必要とされる場合は以下の設定を行ったレイヤー構成をテンプレート登録して下さい。
- 各アクションの「新規レイヤー作成」を「新規ベクターレイヤーを作成」に変更・保存する
- 手動でラスター→ベクターレイヤー変換する
(1)
イラスト・コミック・同人誌入稿・すべてのコミック設定を表示・アニメーション(Proでは『うごイラ』)新規ファイルを作成します。
通常は「レイヤー1」を選択した状態で生成されます。
(2)
「レイヤー1」を選択したままオートアクションをリストの上から下へ、下書きレイヤー・主線。影指定・ヌリわり(わけ)から必要なものだけ実行して下さい。
(3)
メインカラーを白に変更したブラシで描きはじめましょう。
- レイヤーフォルダに選択範囲マスクを設定するとはみ出しを気にせずヌリわけられます
- 大量のセル(コマ)を彩色する(マスクを切っている時間がもったいない)場合は「投げなわ塗り」「下のレイヤーにクリッピング」「囲って塗る」機能が有効です
選択範囲マスクを切った場合
レイヤー設定→下のレイヤーでクリッピング機能を利用した場合
参照レイヤー機能(『はみ出し防止』有効)を利用する場合
※主線をベクターレイヤー上に描画する必要があります
【なんちゃって含み塗り】
当『影指定レイヤー』はレイヤーフォルダそのものに塗りつぶしカラーを設定、色トレス線はレイヤープロパティ「境界効果」が描画しています。
よって
境界効果をOFFにすれば色トレス線が消え、ONにすれば復活します。
【欠点】
- 境界効果はPAINTMAN・OpenToonzに渡すことが出来ません。
- CLIP STUDIO PAINT単体で彩色・仮色塗り分けを行う必要があります。
CLIP STUDIO PAINTバケツツールにPAINTMAN同等の「含み塗り(色トレス線を含む・含まない・交差線の処理)」オプションがつくまでの代替策、色分けレイヤー・マスク制作上の手間の軽減に少しでも役立てば幸いです。
【おまけ】
- CLIP STUDIO PAINTショートカット(メインカラー:黒・サブカラー:白・透過色とする)
- メインカラー・サブカラー切り替え…Xキー
- メイン&サブカラー・透過色の切り替え…Cキー
- 編集対象レイヤー移動…OptionまたはAlt+〕・〔 (上・下)
- 1bit透過ラスターレイヤーで描画色を透明に変更すると、その時点で利用しているブラシが消しゴムブラシとして利用できます。
Old version


Other materials by 信州林檎


Popular “Auto Action” materials


New materials


Badges
-
 MVP ◆This user has contributed greatly to the management of the community, by posting many great responses to the questions asked. Once every three months, MVPs are determined based on the points earned during that period and will be recognized accordingly.
 -
 New Valuable Player (NVP) ◆These are the next-best contributors to the community after MVPs. This is awarded to users who have not yet won an MVP award, based on the number of points they have earned.
 -
 Official Expert ◆Chosen out of all MVP awardees, who are already proof of excellence, this is a testimony of outstanding correspondence in the community. After careful screening, they are appointed by CELSYS and assume their position.Note: Formally called “Evangelists”
 -
 Official Moderator of CELSYS ◆Moderators are official CELSYS staff members who are fluent in Japanese as well as various other languages. Moderators are not experts on the software or illustration, so they are not able to directly answer your questions. However, moderators provide communication and language support to ensure that everyone can smoothly communicate with each other.
 -
 CELSYS official accountThe Official Administrator Account