
[Anime function] The assortment of shadow-designated layers (【アニメ機能】影指定レイヤー生成詰め合わせ) 【アニメ機能】影指定レイヤー生成詰め合わせ
Content ID:1645688
-
28

It is a collection of work layer action collections that are released a little from the management of the call/switch and history of repeated main & sub color. 繰り返されるメイン&サブカラーの呼び出し・切り替え・履歴の管理からちょっとだけ解放される作業用レイヤー生成アクション集です。
Please read first.
- CLIP STUDIO PAINT auto action for EX Pro 1.5. x or later.
Applications
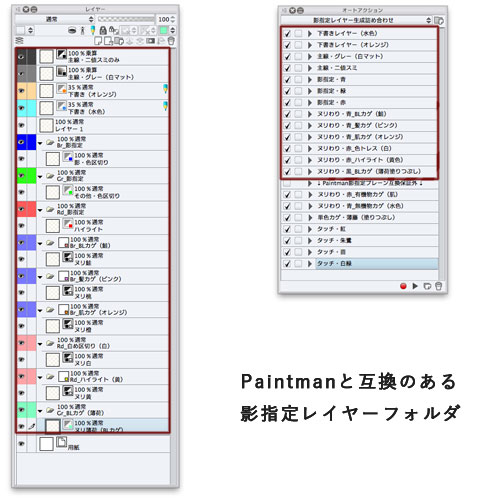
- It is an action of the edge-layer color display setting in the Layer folder to do the Nuri of the selection of the transition of the drawing layer and the shadow specified color together.
- Only layer configuration. We provide flexible support for campus size and resolution that varies depending on the user and environment.
- Perform the action in order to be a layer configuration of preference on the new canvas, "register the layer template..." From the next time "new file..." From "template" embark to work.
Use
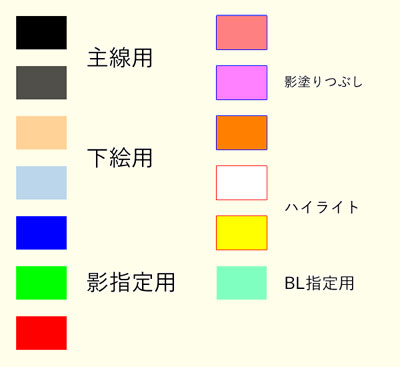
- The generated layer will only draw a specific color by setting layer color. Draw the brush color by setting it to "white (RGB 255, 255, 255)" .
- Brush Color "Black (RGB 0, 0, 0)" or lower brightness/saturation color is displayed in the state that has been converted to solid black
- You can proceed with the color of your choice by selecting and rasterize the layer folder you have painted.
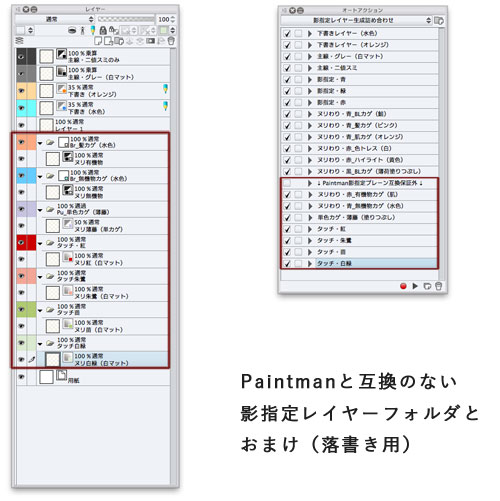
- You can change the specified area at once by swapping layers to any layer folder.
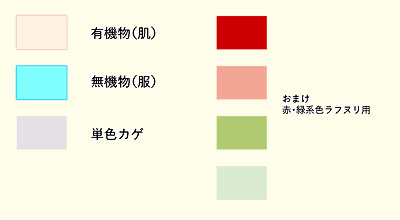
- Nuri color is controlled by the Layer folder "sub color".
- Because there is no anti-aliasing disable option in the Layers folder, the color edge is a little anti-aliasing.
- If you do not want to use the animation layer export function "output for Paintman", use the brush tool to enlarge the fill area from the reference information of the boundary line (main line).
- All of the work layers that are generated in this auto action are raster layer . If you need vector layer for major lines or shadow-specific line drawings, please do the following before you register template.
- Recombine "Create new layer" for each action to "new vector layer..."
- Manually "convert layer... → Vector conversion
1
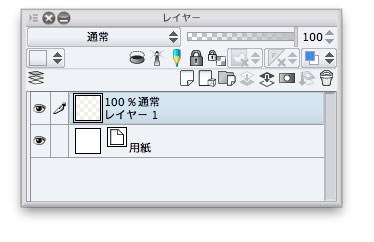
Illustration, comics, printing of fanzine, all Comics show settings animation (Pro ' ila ') create a new file in either format.
Typically, you choose Layer 1.

2
Please execute the auto action of the required layer from the draft layer → main line → shadow specification → Nuri → (bonus) and the bottom order from the top as it is.


—


—
3
When you switch your favorite brush tool main color to White (RGB 255, 255, 255) , let's start painting and applying.
The drawing layer is generated in monochrome 1bit mode (transparent layer). If you set the brush color to transparent color, you can use eraser instead.
Bonus
CLIP STUDIO PAINT shortcut (main color: Black sub color: white and transparent color)
- Toggle between main color ⇔ sub color... X Key
- Switching between main sub drawing color ⇔ transparent color... C Key
- Move layer to edit... Layer above:option or ALT +]Layer below:option or ALT + [
In the 1bit transmission raster layer, the eraser is used for the transparent color comparatively .
It saves time switching to the eraser tool which can erase it with the brush tool writing taste and the drawing size.
To fill the layer, you can work with the bucket tool as well as with the Lasso fill or the enclosed paint tool.
【最初にお読み下さい】
- CLIP STUDIO PAINT EX・Pro 1.5.x以降用オートアクションです。
【用途】
- レイヤーフォルダにフチ・レイヤーカラー表示設定を行うことにより、描画レイヤーの切り替え・影指定カラーの選択とヌリわけを一緒に片づけてしまおうというアクションです。
- レイヤー構成のみ行います。ユーザーや環境によって変化するキャンパスサイズ・解像度に対し柔軟に対応します。
- 新規キャンバス上に好みのレイヤー構成になるよう上から順番にアクションを実行し「レイヤーをテンプレートに登録...」すれば、次回からは「新規ファイル…」→「テンプレート」からの呼び出し一回で作業に取り掛かれます。
【使い方】
- 生成されるレイヤーは「レイヤーカラーの設定」によって特定の色のみ描画するようになっています。ブラシカラーを「白(RGB 255, 255, 255)」に設定して描画して下さい。
- ブラシカラー「黒(RGB 0, 0, 0)」または明度・彩度の低い色は黒一色に変換された状態で表示してしまいます
- 塗り終わったレイヤーフォルダを選択・ラスタライズすればお好みの色で作業を進められます。
- 任意のレイヤーフォルダにレイヤーを入れ替えることで指定領域を一括変更できます。
- ヌリわけ色はレイヤーフォルダ「サブカラー」が管理しています。
- レイヤーフォルダにはアンチエイリアス無効化オプションがないため「色フチ」には僅かですがアンチエイリアスがかかっています。
- アニメーションレイヤー書き出し機能「Paintman向けに出力」を利用しない場合は境界線(主線)参照情報から塗りの領域を拡大するブラシツールを使用して下さい。
- このオートアクションで生成される作業レイヤーは全てラスターレイヤーです。主線や影指定線描画にベクターレイヤーを必要とする場合はテンプレート登録前に以下の処理を行って下さい。
- 各アクションの「新規レイヤー作成」を「新規ベクターレイヤー…」に組み換える
- 手動で「レイヤーの変換…→ベクター」変換を行う
(1)
イラスト・コミック・同人誌入稿・すべてのコミック設定を表示・アニメーション(Proは『うごイラ』)いずれの形式で新規ファイルを作成します。
通常は「レイヤー1」を選択しています。
(2)
そのまま下書きレイヤー→主線→影指定→ヌリわけ(り)→(おまけ)と上から下の順に必要なレイヤーのオートアクションを実行して下さい。
—
—
(3)
お好みのブラシツールのメインカラーを白(RGB 255, 255, 255)に切り替えたら描き・塗り始めましょう。
描画レイヤーはモノクロ1bitモードで生成されます(透過レイヤー)。ブラシカラーを透過色に設定すると消しゴム代わりに使えます。
【おまけ】
CLIP STUDIO PAINTショートカット(メインカラー:黒・サブカラー:白・透過色とする)
- メインカラー⇔サブカラーの切り替え…Xキー
- メイン・サブ描画色⇔透過カラーの切り替え…Cキー
- 編集対象レイヤー移動…上のレイヤー:Optionまたはalt+]・下のレイヤー:Optionまたはalt+[
1bit透過ラスターレイヤーでは消しゴムがわりに透過色を利用します。
ブラシツールの書き味や描画サイズのまま消去可能でき消しゴムツールに切り替える手間も省けます。
塗りわけ(り)レイヤーはバケツ塗りツールのほか投げ縄塗りや囲い塗りツールで作業すると便利です。


Other materials by 信州林檎


Popular “Auto Action” materials


New materials


Badges
-
 MVP ◆This user has contributed greatly to the management of the community, by posting many great responses to the questions asked. Once every three months, MVPs are determined based on the points earned during that period and will be recognized accordingly.
 -
 New Valuable Player (NVP) ◆These are the next-best contributors to the community after MVPs. This is awarded to users who have not yet won an MVP award, based on the number of points they have earned.
 -
 Official Expert ◆Chosen out of all MVP awardees, who are already proof of excellence, this is a testimony of outstanding correspondence in the community. After careful screening, they are appointed by CELSYS and assume their position.Note: Formally called “Evangelists”
 -
 Official Moderator of CELSYS ◆Moderators are official CELSYS staff members who are fluent in Japanese as well as various other languages. Moderators are not experts on the software or illustration, so they are not able to directly answer your questions. However, moderators provide communication and language support to ensure that everyone can smoothly communicate with each other.
 -
 CELSYS official accountThe Official Administrator Account