



3D Tail Asset for Characters and Webtoons 3D Tail Asset for Characters and Webtoons
Speed up your drawing process for webtoons, manhwa, comics or illustrations!
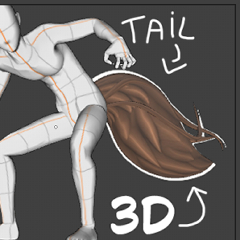
This 3D tail asset is designed to help you quickly set up character poses and overcome tricky perspective angles.

Key Features:
Workflow: Easily pose and reference tails in any scene.
Angle and Perspective: Perfect for consistent tail shapes from difficult camera angles.
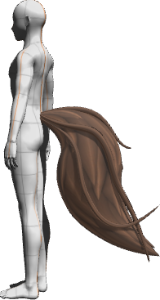
Ready-to-Use Preset: Includes a pre-configured layer with the tail already attached to the standard 3D body mannequin!
Ideal for Fantasy and Webtoons: Great for fox, wolf, or any character designs.
SIMPLE TUTORIAL
How to Attach the Tail to a 3D Character
1. Drag the 3D body mannequin onto your canvas, then drag the 3D Tail asset onto the same 3D layer.
2. Select the tail and click the Object Launcher bar below the model (or open the Sub Tool Detail palette -> Pose / Attachment).
3. Set the attachment point to Hip (Pelvis).
4. Move and rotate the tail so it sits naturally at the back of the waist/hips.
(you can also scale the tail to fit your own character better)
Now, whenever you change the character's pose, the tail will move along with the body.

Note: This asset includes the 3D tail model. The body shown in the preview is the standard Clip Studio Paint 3D mannequin used for reference.
Speed up your drawing process for webtoons, manhwa, comics or illustrations!
This 3D tail asset is designed to help you quickly set up character poses and overcome tricky perspective angles.
Key Features:
Workflow: Easily pose and reference tails in any scene.
Angle and Perspective: Perfect for consistent tail shapes from difficult camera angles.
Ready-to-Use Preset: Includes a pre-configured layer with the tail already attached to the standard 3D body mannequin!
Ideal for Fantasy and Webtoons: Great for fox, wolf, or any character designs.
SIMPLE TUTORIAL
How to Attach the Tail to a 3D Character
1. Drag the 3D body mannequin onto your canvas, then drag the 3D Tail asset onto the same 3D layer.
2. Select the tail and click the Object Launcher bar below the model (or open the Sub Tool Detail palette -> Pose / Attachment).
3. Set the attachment point to Hip (Pelvis).
4. Move and rotate the tail so it sits naturally at the back of the waist/hips.
(you can also scale the tail to fit your own character better)
Now, whenever you change the character's pose, the tail will move along with the body.
Note: This asset includes the 3D tail model. The body shown in the preview is the standard Clip Studio Paint 3D mannequin used for reference.
3D Object 3D Object
Preset Preset


Other materials by Horry baby


Popular “Material catalog” materials


New materials


Badges
-
 MVP ◆This user has contributed greatly to the management of the community, by posting many great responses to the questions asked. Once every three months, MVPs are determined based on the points earned during that period and will be recognized accordingly.
 -
 New Valuable Player (NVP) ◆These are the next-best contributors to the community after MVPs. This is awarded to users who have not yet won an MVP award, based on the number of points they have earned.
 -
 Official Expert ◆Chosen out of all MVP awardees, who are already proof of excellence, this is a testimony of outstanding correspondence in the community. After careful screening, they are appointed by CELSYS and assume their position.Note: Formally called “Evangelists”
 -
 Official Moderator of CELSYS ◆Moderators are official CELSYS staff members who are fluent in Japanese as well as various other languages. Moderators are not experts on the software or illustration, so they are not able to directly answer your questions. However, moderators provide communication and language support to ensure that everyone can smoothly communicate with each other.
 -
 CELSYS official accountThe Official Administrator Account