
Grungetone auto action that leaves the existing tone layer (modified) (기존 톤레이어가 남는 그런지톤 오토액션(수정)) 기존 톤레이어가 남는 그런지톤 오토액션(수정)
Content ID:2262903
-
5,953

The auto action I made #전에 was blurry at 600 dpi, so I added a new auto action. In addition, I found that there was an error where the gradient was broken, so I fixed that part as well.


The tones used in the description used 85 dots.
[There are a total of 5 auto actions in the auto action set.]
1. Auto Actions Before Change
2. Jaggle
3. Boodle
4. Moderate
5. 600dpi Auto Action (Please set the Perlin Noise level to your liking in this Auto Action.)
When you start an auto action from a tone layer (or folder), the existing tone will be alive underneath invisible. If you need to modify the tone later, delete the layer created by the auto action, edit it to the existing tone (folder), and run the auto action again.
*It works smoothly for folders, but if the tone setting is turned on for the layers in the folder, the effect will not work well.
When used for folders, the layers inside the folder must not be toned.
*The default tone in Clip Studio can be lighter than the gray tone, but this auto action used the brightness/contrast function to try to match the brightness of the existing layer as much as possible.
If you want to make the dot size or shape different, divide it into different layers/folders.

Description written in the photo:
Red text: Errors when applying auto actions to gradients (from existing auto actions) are gone.
Black Letter: If you want a larger grunge effect, please check the perlined noise effect you want. If the effect seems too strong, you can check the blurring effect.

ᅳᅳᅳᅳᅳᅳᅳᅳᅳᅳᅳᅳᅳᅳᅳᅳᅳᅳᅳᅳᅳᅳᅳᅳᅳᅳᅳᅳᅳᅳᅳᅳᅳᅳᅳᅳᅳᅳ
[1. Explanation of the first auto action before modification]

[2. Explanation of Auto Actions after Modification]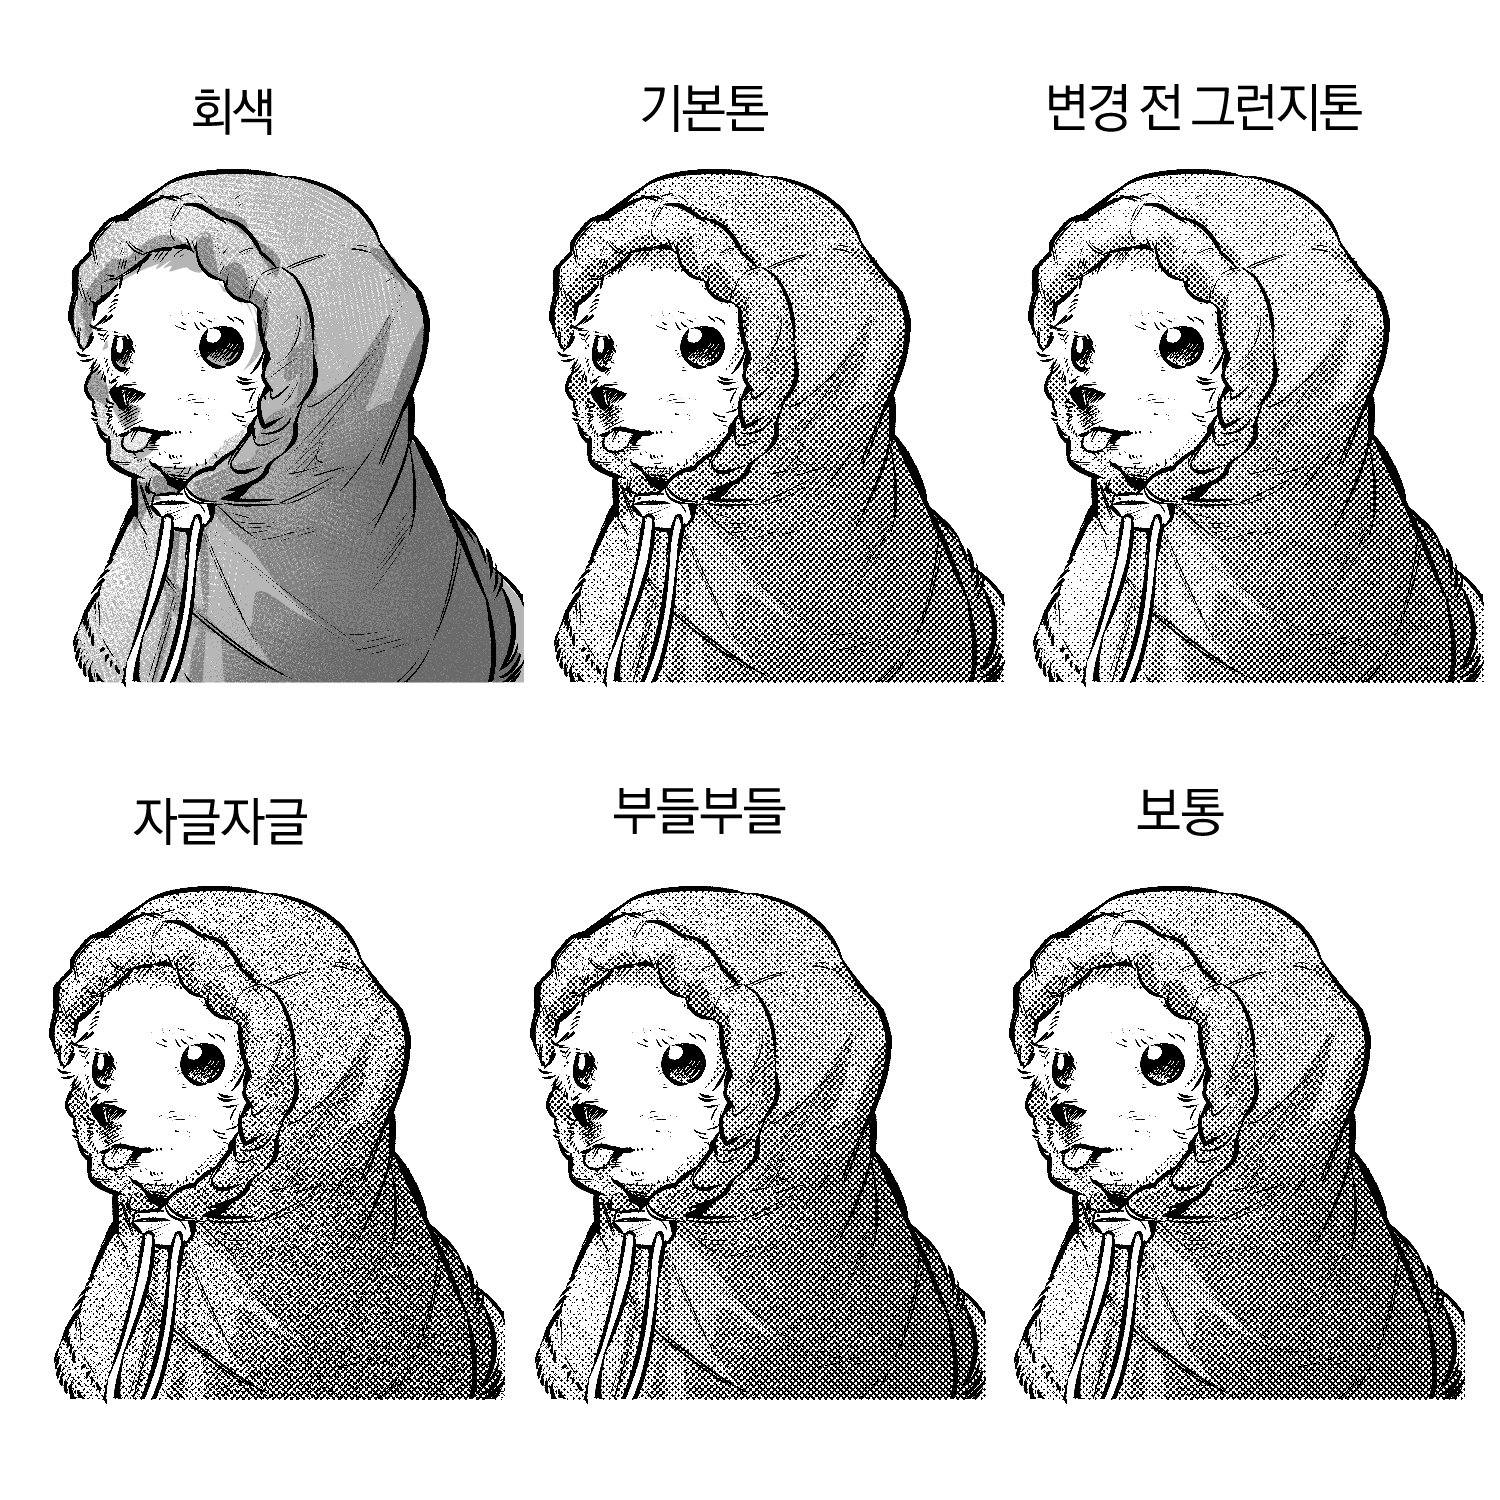


#전에 만들었던 오토액션은 600dpi에서 그런지 효과가 흐릿하게 나타났기 때문에 새로운 오토액션을 추가했습니다. 추가로 그라데이션이 끊기는 오류가 있었던 것을 발견해 그 부분도 수정했습니다.
설명하면서 사용된 톤은 85 망점을 사용했습니다.
[오토액션 세트 안에는 총 5개의 오토액션이 들어있습니다.]
1. 변경 전 오토액션
2. 자글자글
3. 부들부들
4. 보통
5. 600dpi 오토액션 ( 이 오토액션 안에 펄린 노이즈 단계를 원하는 대로 설정해주세요.)
오토액션을 톤 레이어(혹은 폴더)에서 시작하면 기존 톤은 보이지 않는 상태로 밑에 살아있게 됩니다. 뒤늦게 톤을 수정해야 한다면 오토액션으로 만들어진 레이어를 삭제한 뒤 기존 톤(폴더)에 수정하신 뒤 다시 오토액션을 실행해주세요.
*폴더에도 원활히 사용되나 폴더 안의 레이어가 톤 설정이 켜져 있으면 그런지 효과가 잘 작동하지 않습니다.
폴더에 사용할 경우 폴더 안에 있는 레이어가 톤화 되어 있으면 안 됩니다.
*클립 스튜디오의 기본 톤은 회색 톤보다 밝아지는 경우가 있는데, 이 오토액션은 밝기/대비 기능을 사용해 최대한 기존 레이어의 명도와 맞추려고 노력했습니다.
망점 크기나 모양을 다르게 하고 싶다면 다른 레이어/ 폴더에 나눠주세요.
사진에 쓰여져 있는 설명문:
붉은 글씨: (기존 오토액션에서) 그라데이션에 오토액션을 적용할 때 생기는 오류가 사라집니다.
검은 글씨: 더 큰 그런지 효과를 원하신다면 원하는 펄린 노이즈 효과를 체크해주시기 바랍니다. 너무 그런지 효과가 강한 것 같으면 흐리기 효과를 체크해주시면 됩니다.
ㅡㅡㅡㅡㅡㅡㅡㅡㅡㅡㅡㅡㅡㅡㅡㅡㅡㅡㅡㅡㅡㅡㅡㅡㅡㅡㅡㅡㅡㅡㅡㅡㅡㅡㅡㅡㅡㅡ
[1. 수정 전 첫번째 오토액션 설명]
[2. 수정 후 오토액션 설명]
Old version


Other materials by 계차백


Popular “Auto Action” materials


New materials


Badges
-
 MVP ◆This user has contributed greatly to the management of the community, by posting many great responses to the questions asked. Once every three months, MVPs are determined based on the points earned during that period and will be recognized accordingly.
 -
 New Valuable Player (NVP) ◆These are the next-best contributors to the community after MVPs. This is awarded to users who have not yet won an MVP award, based on the number of points they have earned.
 -
 Official Expert ◆Chosen out of all MVP awardees, who are already proof of excellence, this is a testimony of outstanding correspondence in the community. After careful screening, they are appointed by CELSYS and assume their position.Note: Formally called “Evangelists”
 -
 Official Moderator of CELSYS ◆Moderators are official CELSYS staff members who are fluent in Japanese as well as various other languages. Moderators are not experts on the software or illustration, so they are not able to directly answer your questions. However, moderators provide communication and language support to ensure that everyone can smoothly communicate with each other.
 -
 CELSYS official accountThe Official Administrator Account