

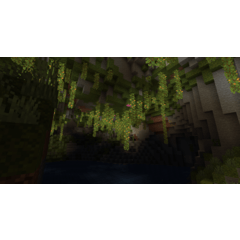
Applies the effect of enlarging the screen of a CRT TV or liquid crystal to the entire screen auto action 画面全体にブラウン管テレビや液晶などの画面を拡大したような効果をかけるオートアクション
It is a auto action that applies the effect of enlarging the screen of a CRT TV or liquid crystal to the entire screen.
All colors are broken down into RGB colors, and their flickering represents the original color.
We simulated the mechanism of delivering color to the eyes using additive color mixing.
Converts the original layer by making a copy of the display layer.
When viewed up close, it looks dark, but when viewed from a distance with the monitor brightly lit and the room darkened, it looks original color.
【Notes】
- It is a auto action with many processes. We recommend that you save the canvas before running the auto action.
- Do not change the check box displayed in the auto action if you do not know its purpose.
- "~ cannot run, do you want to continue?" pop-up, be sure to press "Yes" to continue.
- If you press cancel in the middle, delete the folder in the process of creation and run the auto action again.
- If the auto action is canceled in the middle, the canvas resolution has been changed to 72 dpi. You can restore the resolution manually or follow the same auto action as the original DPI to completion.


【How to use】
- Display only the layers you want to convert.
- Save the canvas.
- Perform a auto action of the resolution you have set for the canvas. During the auto action, the DPI will be temporarily changed, but it will return to the DPI specified at the end of the auto action. If you are working at a resolution that is not specified, use the one that says Free dpi.
画面全体にブラウン管テレビや液晶などの画面を拡大したような効果をかけるオートアクションです。
全ての色がRGB各色に分解され、その明滅で元の色を表現します。
加法混色を利用して目に色を届ける仕組みを擬似的に再現しました。
元のレイヤーはそのまま、表示レイヤーのコピーを作って変換します。
近くで見ると暗く見えますが、モニターを明るく点灯し、部屋を暗くして遠くから見ると元の色に見えます。
【注意事項】
- 工程が多いオートアクションです。オートアクションの実行前にキャンバスを保存しておくことをおすすめします。
- オートアクションに表示されているチェックボックスは、用途がわからない場合は変更しないでください。
- 「~は実行できません。続行しますか?」のポップアップが出る場合、必ず「はい」を押して続行してください。
- 途中でキャンセルを押してしまった場合は作成途中のフォルダを消し、オートアクションを再び実行してください。
- オートアクションが途中でキャンセルされた場合、キャンバスの解像度が72dpiに変更されています。解像度を元に戻すには手動で行うか、元のdpiと同じオートアクションを最後まで実行してください。
【使い方】
- 変換したいレイヤーのみ表示させます。
- キャンバスを保存します。
- キャンバスに設定している解像度のオートアクションを実行します。オートアクション中は一時的にdpiが変更されますが、オートアクションの最後に指定したdpiに戻ります。指定にない解像度で作業している場合は、Free dpiと書かれているものを使ってください。


Other materials by あいおい暦


Popular “Auto Action” materials


New materials


-
 MVP ◆This user has contributed greatly to the management of the community, by posting many great responses to the questions asked. Once every three months, MVPs are determined based on the points earned during that period and will be recognized accordingly.
 -
 New Valuable Player (NVP) ◆These are the next-best contributors to the community after MVPs. This is awarded to users who have not yet won an MVP award, based on the number of points they have earned.
 -
 Official Expert ◆Chosen out of all MVP awardees, who are already proof of excellence, this is a testimony of outstanding correspondence in the community. After careful screening, they are appointed by CELSYS and assume their position.Note: Formally called “Evangelists”
 -
 Official Moderator of CELSYS ◆Moderators are official CELSYS staff members who are fluent in Japanese as well as various other languages. Moderators are not experts on the software or illustration, so they are not able to directly answer your questions. However, moderators provide communication and language support to ensure that everyone can smoothly communicate with each other.
 -
 CELSYS official accountThe Official Administrator Account