

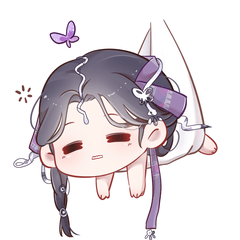
Convert a layer to water droplets auto action レイヤーを水滴に変換するオートアクション
It is a collection of auto action that makes it easier to draw water droplets. Only 4~5 layers are created, so you can easily redraw them later.
I made it to omit the sweat drawing, but it's cute even if you use it for writing.
Step1~2 is a auto action to easily create the shape of a water droplet, and Step3 is a auto action to convert it into the appearance of the water droplet itself.
【Notes】
- It is a auto action with many processes. We recommend that you save the canvas before running the auto action.
- Do not change the check box displayed in the auto action if you do not know its purpose.
- "~ cannot run, do you want to continue?" pops up several times. Make sure to press "Yes" to continue.
- If you press cancel in the middle, delete the folder in the process of creation and run the auto action again.
- To reduce file size, there are steps in the gradient. If you are worried, please apply a smoothing.

【How to use】
〈step1、step2:A〉
Omitted because the procedure is simple
〈step2:B〉
- Prepare a layer that integrates only the parts you want to make into water droplets. Make the layer as completely opaque as possible. It can be a color layer or a monochrome layer. It is also carried out as it is text layer. In the case of vector layer, it is better to leave it rasterize to ensure that it will be executed.
- Save the canvas.
- Select the layer you want to convert and perform the auto action.
- Use a gaussian blur to melt the contours.
〈step3:A~C〉
- Prepare a layer that integrates only the parts you want to make into water droplets. Only the tint of the opacity is reflected in the result. So you can use a color layer or a monochrome layer. It is also carried out as it is text layer. In the case of vector layer, it is better to leave it rasterize to ensure that it will be executed.
- Save the canvas.
- Select the layer you want to convert and perform your preferred auto action. When using selection, take a wider selection than the part you want to convert.
- There will be several pop-ups along the way.
- movable blur: Do not change parameters other than distance and angle. The first movable blur determines the length of the shadow. The light source is determined by the blur angle, so set it to the same value.
- (step3: B only) perlin noise: We recommend changing only the scale.
- correct line width: Determine the size of the highlights. By default, it is set to the numerical value for the auto action of step 1.
〈layer color Adjustment Tip: About linear light Layers〉
All RGB 128 (gray in the middle) hardly changes the color underneath. It is a layer mode that rides brighter if it is brighter and darker than this. By default, main color set the sub color to gray, which is close to RGB 128, respectively.
水滴を描くのが楽になるオートアクション集です。作られるのはレイヤー4~5枚のみなので、後から簡単に描き直せます。
汗の描画を省略するために作ったのですが、文字に使っても可愛いです。
step1~2は水滴の形を楽に作るオートアクションで、step3は水滴そのものの見た目に変換するオートアクションです。
【注意事項】
- 工程が多いオートアクションです。オートアクションの実行前にキャンバスを保存しておくことをおすすめします。
- オートアクションに表示されているチェックボックスは、用途がわからない場合は変更しないでください。
- 「~は実行できません。続行しますか?」のポップアップが何回か出ます。必ず「はい」を押して続行してください。
- 途中でキャンセルを押してしまった場合は作成途中のフォルダを消し、オートアクションを再び実行してください。
- ファイルサイズ軽減のため、グラデーションに段があります。気になる場合はスムージングなどをかけてください。
【使い方】
〈step1、step2:A〉
手順が単純なので省略
〈step2:B〉
- 水滴にしたい部分だけを統合したレイヤーを用意します。なるべく完全に不透明なレイヤーにしてください。カラーレイヤーでも、モノクロレイヤーでも大丈夫です。テキストレイヤーのままでも実行されます。ベクターレイヤーの場合、ラスタライズしておくと確実に実行されます。
- キャンバスを保存します。
- 変換するレイヤーを選択し、オートアクションを実行します。
- ガウスぼかしを使って輪郭を溶かします。
〈step3:A~C〉
- 水滴にしたい部分だけを統合したレイヤーを用意します。不透明度の濃淡のみ結果に反映します。なのでカラーレイヤーでも、モノクロレイヤーでも大丈夫です。テキストレイヤーのままでも実行されます。ベクターレイヤーの場合、ラスタライズしておくと確実に実行されます。
- キャンバスを保存します。
- 変換するレイヤーを選択し、好みのオートアクションを実行します。選択範囲を使う場合は、変換したい部分より広めに選択範囲を取ってください。
- 途中で何回かポップアップが出ます。
- 移動ぼかし:距離・角度以外のパラメータを変更しないでください。最初の移動ぼかしは影の長さを決めます。ぼかす角度で光源を決めるので、同じ数値に設定してください。
- (step3:Bのみ)パーリンノイズ:スケールのみの変更をおすすめします。
- 線幅修正:ハイライトの大きさを決めます。デフォルトではstep1のオートアクション用の数値に設定されています。
〈レイヤーカラー調整時ヒント:リニアライトレイヤーについて〉
RGBが全て128(真ん中のグレー)は下の色をほぼ変えません。これより明るければ明るく、暗ければ暗く乗るレイヤーモードです。デフォルトではメインカラー、サブカラーをそれぞれRGB128に近いグレーに設定しています。


Other materials by あいおい暦


Popular “Auto Action” materials


New materials


-
 MVP ◆This user has contributed greatly to the management of the community, by posting many great responses to the questions asked. Once every three months, MVPs are determined based on the points earned during that period and will be recognized accordingly.
 -
 New Valuable Player (NVP) ◆These are the next-best contributors to the community after MVPs. This is awarded to users who have not yet won an MVP award, based on the number of points they have earned.
 -
 Official Expert ◆Chosen out of all MVP awardees, who are already proof of excellence, this is a testimony of outstanding correspondence in the community. After careful screening, they are appointed by CELSYS and assume their position.Note: Formally called “Evangelists”
 -
 Official Moderator of CELSYS ◆Moderators are official CELSYS staff members who are fluent in Japanese as well as various other languages. Moderators are not experts on the software or illustration, so they are not able to directly answer your questions. However, moderators provide communication and language support to ensure that everyone can smoothly communicate with each other.
 -
 CELSYS official accountThe Official Administrator Account