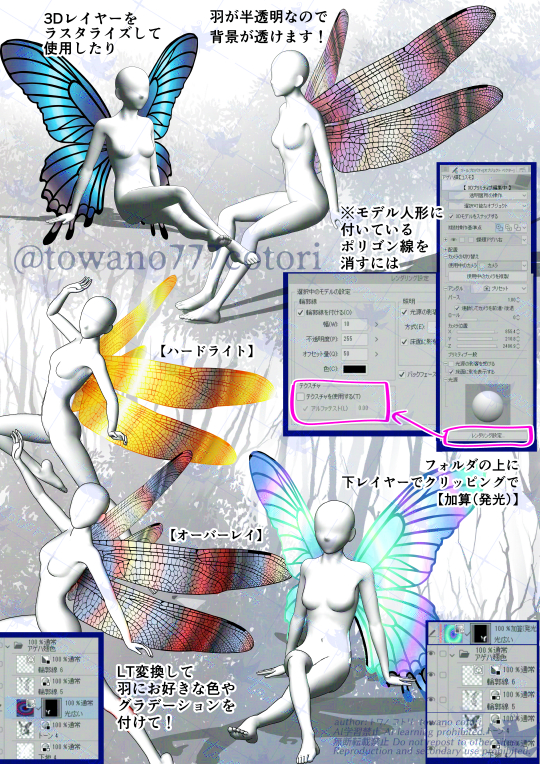
Since it is a fairy wing, I try to make the feathers and background over there show through faintly.
You can easily use the fairy pose to draw fairies and elves.

Please combine the 3D models by yourself.
Attach the feather primitive material to the canvas, and then drag the 3D model doll into it.
(For the time being, the height is set to match the height of the default upright female model)
* If the order is different, it will be placed on a different layer.
If you set the 3D material to a parent-child relationship, the wings will follow you even if you change the pose!
(Functions in Ver.2.2.0 or later)
After that, you can use the combined fairy by "registering as a material".
Official explanation of the 3D parent-child relationship
https://tips.clip-studio.com/ja-jp/articles/8416
Towanokatori 3D parent-child relationship explanation video https://youtu.be/tW9wpXiZ40c?si=49tOyhUzJTw_6cVI
For earlier versions, when the wings are separated, manually move them closer.
(How to do it is explained in the last image)
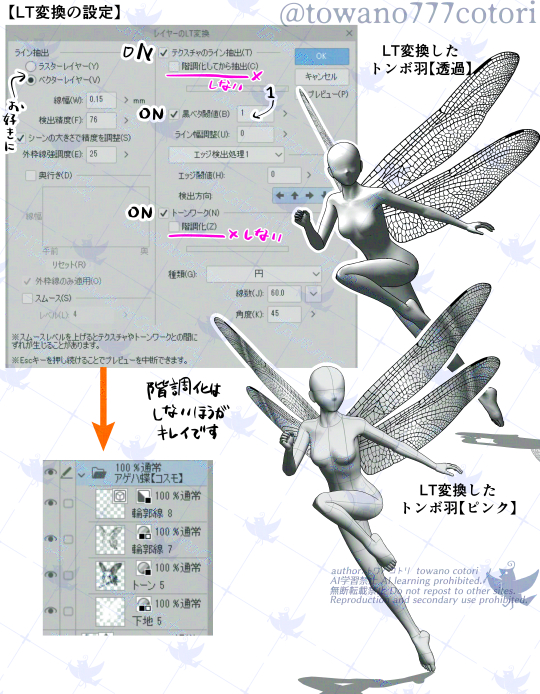
Even with LT conversion, the pattern of the blade line will appear beautifully at any angle! !!
(Our CLIP STUDIO is Ver.3.0.4.) I haven't experimented with whether it comes out beautifully with the previous version)

It's fun to rasterize the 3D layer as it is, or convert it to LT to change the color!
* To erase the polygon line of the human body model...
Uncheck "Texture" in "rendering settings".

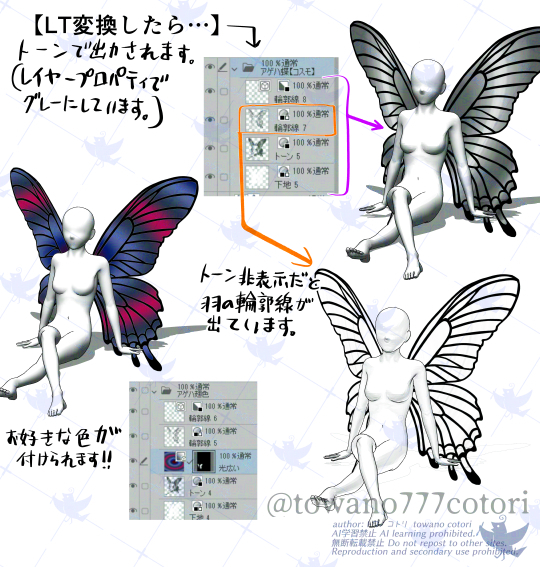
Paint the shape of the feathers with a "close and fill tool" and color it with layer mask.
Overlay colors and gradients on top of tone layers
Even if you change the "combine mode" of the color layer, you can enjoy various colors!

When changing the direction of feathers
Each wing is a different primitive, so you can move it freely.
Keep it straight up, adjust the degrees of the angle memory, and then move it back and forth to get closer.
You can hide the model doll and use it to draw butterflies and dragonflies.
If the registered "Fairy 3D model with combined wings" cannot be combined with other background 3D materials, please see this note article.
https://note.com/avaka10_rkan/n/n69872b534f94
I hope you enjoy it (#^^#)/
妖精の羽なので、向こうの羽根や背景がうっすら透けるようにしています。
妖精ポーズを使い簡単に妖精やエルフの描画にお使いいただけます。
3Dモデルをご自身で合体させてお使いください。
羽のプリミティブ素材をキャンバスに貼ってから、3Dモデル人形をドラックして入れてください。
(一応デフォルトの直立した女性モデル背丈に合う高さにしています)
※順番が違うと別レイヤーに配置させられてしまいます。
3D素材を親子関係に設定すると、ポーズを変えても羽が一緒についてきます!
(Ver.2.2.0以降の機能)
その後、合体させた妖精を「素材登録」をしてお使い頂けます。
3D親子関係の公式解説
https://tips.clip-studio.com/ja-jp/articles/8416
トワノコトリ3D親子関係解説動画 https://youtu.be/tW9wpXiZ40c?si=49tOyhUzJTw_6cVI
それ以前のバージョンの場合は、羽が離れたら手動で近づけてください。
(やり方は最後の画像で説明しています)
LT変換しても、どの角度でもキレイに羽根の線の模様が出ます!!
(当方のクリスタはVer.3.0.4です。以前のバージョンでキレイに出るかは実験していません)
3Dレイヤーをそのままラスタライズしたり、LT変換して色を変えて頂くのも楽しいです!
※人体モデルのポリゴン線を消すには…
「レンダリング設定」の「テクスチャ」のチェックを外してください。

「囲って塗るツール」などで羽の形に塗つぶし、レイヤーマスクで色を付けたり
トーンのレイヤーの上に色やグラデーションを重ねて
色レイヤーの「合成モード」変えても・・・様々な色が楽しめます!

羽の方向を変える場合
片羽づつ別のプリミティブなので、自由に動かせます。
真上にして、角度のメモリの度数を合わせてから前後で動かし近づけてください。
モデル人形を非表示にして、蝶やトンボの描画にもお使い頂けます。
登録した「羽を合体させた妖精の3Dモデル」が他の背景3D素材と合体出来ない場合の対処法は、こちらのnote記事をご覧ください。
https://note.com/avaka10_rkan/n/n69872b534f94
楽しんで頂けたら嬉しいです(#^^#)/


