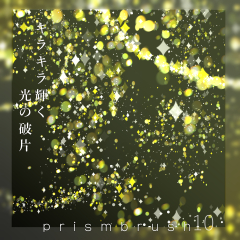
Prism Brush 10/HJ (プリズムブラシ10/HJ) プリズムブラシ10/HJ

Content ID:2046957

  • 223
You can use this material with Clip Studio Paint Ver. 1.10.10 and newer. ( Download the latest version here )

Glittering prism brush. The 10th bullet, which has evolved further, has particles of various shapes. There is also a part where the color can be changed from the palette. キラキラ輝くプリズムブラシ。さらに進化した第10弾はいろいろな形の粒子がザクザク。パレットから色変更できる部分もあり。

Glittering prism brush. In the 10th bullet, the particles of various shapes are crunchy. There is also a part where the color can be changed from the palette.


A prism brush with shards of light.
You can draw rainbow lights instantly.

By making the brush dual brush this time
We made it possible to depict small and large grains in one shot.
In addition, you can specify the color from some palettes.

Descriptive Movie

The size of the particles can be changed by changing the particle size.
The sample is usually depicted on a layer, but it is also beautiful when depicted on a luminous layer.

It's cuter to use it smaller, but if you use it bigger, I think it's cute if you blur it with a filter or lower the layer transparency.

If you feel that the color is light, it will be darker if you duplicate layer the depiction.


〈Dual Brush brush settings〉

This time, it is a dual brush (a brush that can set two brushes with one brush).


There are many setting items,
【Grain size is from particle size】 If you remember [brush size is larger than particle size", I think it is difficult to get lost in the setting.

〈! More points! 〉

* You can use it even if you skip reading, supplement to those who want to be more particular about it.

・Particle density
As the name suggests, it determines the density of particles.
The more you go to the right, the more it increases.

・spray deviation
Adjust the spread.
The farther to the left brush size the wider it spreads to MAX
The more you go to the right, the more you gather in the center.

・Interval
Determine the spacing between the particles.
The distance is narrower as you go to the left.
By the way, even with the density setting, the spacing of the particles changes.
When the density is thickened by particle density, even if the spacing between particles is widened,
Particles overlap.
If you don't want to stack particles too much, set the density to 1 (far left),
If you adjust the interval to your liking, it will fit.

――――...


Other glitter materials are also being released!
Try searching for HJ.

If you have any questions or requests about using HJ's materials, please feel free to contact us on Twitter! You can send DMs without following them.


キラキラ輝くプリズムブラシ。第10弾はいろいろな形の粒子がザクザク。パレットから色変更できる部分もあり。


光の欠片がザクザクかけるプリズムブラシ。
虹色の光を瞬時に描けます。

今回ブラシをデュアルブラシにすることで
一発で小さな粒と大きな粒を描写できるようにしました。
さらに一部パレットから色指定ができます。

描写ムービー

粒子の大きさは粒子サイズを変更していただくと変更できます。
サンプルは通常レイヤーに描写していますが、発光レイヤーに描写してもきれいです。

小さめで使うほうが可愛いですが、大きく使う場合はフィルターでぼかしたり、レイヤー透明度を下げていただくと可愛いと思います。

色が薄いと感じる場合、描写したレイヤーを複製していただくと濃くなります。


〈デュアルブラシのブラシ設定について〉

今回デュアルブラシ(1つのブラシで2つ分のブラシ設定ができるブラシの事)となっています。


設定項目が多いですが、
【粒のサイズは粒子サイズから】【ブラシサイズは粒子サイズより大きく】を覚えていると設定迷子になりづらいと思います。

〈!さらにポイント!〉

※読み飛ばしても使えます、さらにこだわりたい方へ補足。

・粒子密度
 その名の通り粒子の密度を決めます。
 向かって右にいくほど増える。

・散布偏向
 広がり具合を調整します。
 向かって左に行くほどブラシサイズMAXまで広がり
 向かって右に行くほど中心に集まります。

・間隔
 粒子の間隔を決めます。
 向かって左に行くほど間隔が狭いです。
 ちなみに、密度設定でも粒子の間隔が変わりますが
 粒子密度で密度を濃くした場合、粒子間隔で間隔を広くしても
 粒子と粒子が重なってしまいます。
 粒子と粒子をあまり重ねたくない場合、密度を1(一番左)にし、
 間隔で好みの間隔に調節したらしっくりきます。

――――…


ほかにもキラキラ素材を公開中!
HJで検索してみてくださいね。

HJの素材の使用感や疑問点、リクエスト等ご意見はツイッターからお気軽にどうぞ!フォローしなくてもDMを送れます。


Update history

Content ID:2046957

Published : 5 months ago

Last updated : 5 months ago

HJ*'s profile Go to profile

Twitterで最新情報を呟いています、よろしくお願い致します。