
Ultimate auto action Set 2023/7/5 update (究極オートアクションセット 2023/7/5更新) 究極オートアクションセット 2023/7/5更新
Content ID:2014210
-
4,356

It is an updated version of the auto action that I arranged some auto action convenient for finishing. 仕上げなどに便利なオートアクションをいくつか揃えたオートアクションの更新版です。
The set contents of this auto action are as follows (the number is not shaken in the body, but the order is the same.)
① Drawn ★ Change
② Line drawing Layer ★ Modified
③ Color Fill Layer ★ Modified
④ Outline ★ have been changed
⑤ Soft Shadow
⑥ Soft Shadow (part only)
⑦ gaussian blur 15
⑧ gaussian blur 30
⑨ the whole Blur
⑩ Glow Effect
⑪ Chromatic Aberration
⑫ chromatic aberration (selection layer only)
⑬ Finish Gradient ★ Modified
□ ■ □
① Drawn ★ Change

In this auto action, a line-drawing layer is generated on top of the drawing .
It is for people who draw the bottom draw with a dark color first, and change color later.
After auto action Run, the black is selected color, so you can start drawing in the line drawing layer as it is.
Changes are palette color additions and layer color changes.
② Line drawing Layer ★ Modified
It is only a drawing layer of "① under Drawing".
③ Color Fill Layer ★ Modified
A raster layer with a yellow palette color will be added.
④ Outline ★ have been changed

Takes an outline from a layer.
⑤ Soft Shadow

First, Please prepare a shadow painted in a dark color as much as possible in another layer. It may have a tint, but the adjustment is recommended after auto action execution because a detailed tint cannot be reflected .
This auto action auto action to drop the shadow gradient into the gradient map. During auto action execution, it defaults to allow you to select the width of the scale and the strength of the gaussian blur and the gradient map. The wider the width of the extension, the more flexible the shadow reflecting gradient map colors, the more smooth the gradient Gaussian blur.
I think that the gradient map of the empty system that other one was exposed is good for the gradient map.
⑥ Soft Shadow (part only)
You can auto action only shadows in the selection that surround the shadow that you want to be shaded.
⑦ gaussian blur 15/⑧ gaussian blur 30

The selected layer (only one layer) multiplies the gaussian blur by the strength of 15 or 30.
⑨ the whole Blur

It is the auto action that joins duplicate layer displayed and gaussian blur to the whole. The blur can be changed during auto action run.
After the action is performed, the image will look like the left. After that, please clear the place you want to stand out with your hand (such as a face) with a soft eraser . It is for people who want to cheat without drawing much detail on the edge of the screen.
⑩ Glow Effect

It is a auto action that brings out the glow effect. The bright part is made more light.
⑪ Chromatic Aberration

It is auto action to perform chromatic aberration (RGB shift). I can adjust the position to stagger in the middle, but I do a small shift as 1px even if I run it without adjusting it. Layers remain even after the run, you can adjust to whatever you want.
If you do not see the background and run it on a transparent background, chromatic aberration will be transmitted through the transmission. If you have a lot of background layers, you can use the following "⑫ chromatic aberration (selection layer only)":
It is recommended that you shift a little bit larger, and then consolidate three chromatic aberration layers and erase only the areas you want to stand out with a soft eraser.
If you want to use both chromatic aberration and overall blur, I think that it works when I hang the whole blur after chromatic aberration.
⑫ chromatic aberration (selection layer only)
Auto action to put chromatic aberration on selected layers only. If you select multiple layers, such as a person's drawn layer (or a single selection), the chromatic aberration is multiplied while the background is passed through.
⑬ Finish Gradient ★ Modified

The soft light of the gradient you chose from the gradient map. It is for finishing.
Sample

このオートアクションのセット内容は以下になります(本体には番号は振ってありませんが、順番は同じです)
①下描き ★変更有
②線画レイヤー ★変更有
③色塗りレイヤー ★変更有
④アウトライン取り ★変更有
⑤やわらかい影
⑥やわらかい影(部分のみ)
⑦ガウスぼかし 15
⑧ガウスぼかし 30
⑨全体ぼかし
⑩グロー効果
⑪色収差
⑫色収差(選択レイヤーのみ)
⑬仕上げグラデーション ★変更有
□■□
①下描き ★変更有
このオートアクションでは、下描きの上に線画レイヤーが生成されます。
最初に下描きを濃い色で描いて、後から色替えする人向けです。
オートアクション実行後、黒が選択色となっているので、そのまま線画レイヤーに描き始めることが可能です。
変更点はパレットカラーの追加とレイヤーカラーの変更です。
②線画レイヤー ★変更有
「①下描き」の線画レイヤーのみです。
③色塗りレイヤー ★変更有
黄色のパレットカラーが付いたラスターレイヤーが追加されます。
④アウトライン取り ★変更有
レイヤーからアウトラインを取ります。
⑤やわらかい影
まず、なるべく濃い色で塗った影を別レイヤーに用意してください。濃淡があっても構いませんが、細かい濃淡は反映できないのでオートアクション実行後に調整がおすすめです。
このオートアクションは影のグラデーションをグラデーションマップに落とし込むオートアクションとなります。オートアクション実行中に、「拡張幅の広さ」と「ガウスぼかしの強さ」、「グラデーションマップ」を選択できるようにデフォルトでなっています。「拡張幅の広さ」を広くするほどグラデーションマップの色を反映したやわらかい影に、「ガウスぼかし」を強く掛けるほど滑らかなグラデーションになります。
グラデーションマップについては、他の方の公開されている空系のグラデーションマップなどがいいと思います。
⑥やわらかい影(部分のみ)
グラデーションを掛けたい影を囲った選択範囲内の影だけにオートアクションが掛けられます。
⑦ガウスぼかし 15/ ⑧ガウスぼかし 30
選択中のレイヤー(1レイヤーのみ)に、ガウスぼかしを15または30の強さで掛けてくれます。
⑨全体ぼかし
表示されているレイヤーを複製・結合し、全体にガウスぼかしを掛けるオートアクションです。ぼかしはオートアクション実行中に変更可能です。
アクション実行後、画像左のようになります。その後、自分の手で目立たせたい箇所(顔など)をやわらかめの消しゴムなどで消してください。画面端の細かい部分をあまり描かずに誤魔化したい人向けです。
⑩グロー効果
グロー効果を出してくれるオートアクションです。明るい部分をより発光させます。
⑪色収差
色収差(RGBずらし)を行ってくれるオートアクションです。途中ずらす位置を調整できますが、調整せずにそのまま実行しても1pxほどの小さいずらしをやってくれます。実行後もレイヤーが残っているので、好きに調整可能です。
背景を見えないように設定し、透過背景の上で実行すれば、透過されて色収差が起こります。背景レイヤーが多い場合は、次の「⑫色収差(選択レイヤーのみ)」を使用すると便利です。
少し大きめにずらしてから、色収差レイヤー3枚を統合して、目立たせたい箇所だけをやわらかめの消しゴムで消す方法がおすすめです。
色収差と全体ぼかしを両方使いたい場合は、色収差後に全体ぼかしを掛けるとうまくいくと思います。
⑫色収差(選択レイヤーのみ)
色収差を選択したレイヤーのみにかけてくれるオートアクションです。人物の描かれたレイヤーなどを複数選択した場合(一枚のみの選択でも可)に実行すると、背景を透過したまま色収差が掛けられます。
⑬仕上げグラデーション ★変更有
グラデーションマップから選んだグラデーションがソフトライトでかかります。仕上げ用です。
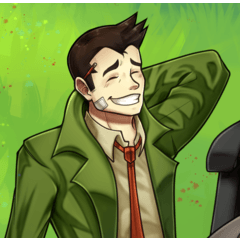
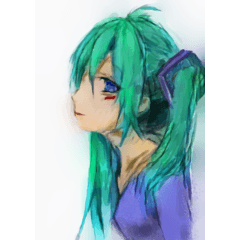
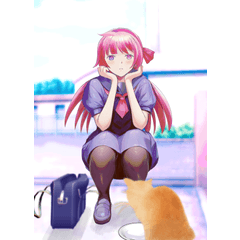
【作例】
Ultimate auto action Set (updated version) 究極オートアクションセット(更新版)

Old version


Other materials by Schaum


Popular “Material catalog” materials


New materials


Badges
-
 MVP ◆This user has contributed greatly to the management of the community, by posting many great responses to the questions asked. Once every three months, MVPs are determined based on the points earned during that period and will be recognized accordingly.
 -
 New Valuable Player (NVP) ◆These are the next-best contributors to the community after MVPs. This is awarded to users who have not yet won an MVP award, based on the number of points they have earned.
 -
 Official Expert ◆Chosen out of all MVP awardees, who are already proof of excellence, this is a testimony of outstanding correspondence in the community. After careful screening, they are appointed by CELSYS and assume their position.Note: Formally called “Evangelists”
 -
 Official Moderator of CELSYS ◆Moderators are official CELSYS staff members who are fluent in Japanese as well as various other languages. Moderators are not experts on the software or illustration, so they are not able to directly answer your questions. However, moderators provide communication and language support to ensure that everyone can smoothly communicate with each other.
 -
 CELSYS official accountThe Official Administrator Account