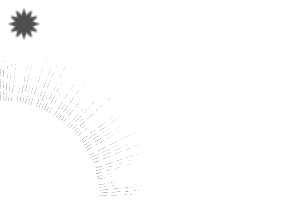

A dashed saturated line tool that can be used for background and bubble balloons.
To express Halo and joy.
To express Halo and joy.

I have prepared three types for reference.

Dashed flash A: Dashed dash length is irregular
Dashed flash B: The dash length of a dashed line will gradually shorten
Dashed flush C: The line starts in a ragged position
Dashed flash B: The dash length of a dashed line will gradually shorten
Dashed flush C: The line starts in a ragged position
It is also possible to reverse the starting and ending.
In the extra bonus, the straight tool version for those who draw with a ruler.

Dashed line A: The dash length is irregular
Dashed line B: The length of the dash is gradually shortened.
Dashed line B: The length of the dash is gradually shortened.
Drawing interval, drawing position and other treats are not the same as normal saturated line
Please change it in your favorite.
Please change it in your favorite.
The following is a set of unique special settings.
1. Length of pause
Brush size affects the length of broken lines.

2. Line width
You can adjust the line width by the thickness of the brush tip.
It is necessary to take it into consideration because the fold of "brush size" of the above-mentioned one doubles, and the line width is doubled.
You can adjust the line width by the thickness of the brush tip.
It is necessary to take it into consideration because the fold of "brush size" of the above-mentioned one doubles, and the line width is doubled.

In addition, when adjusting the line width,
The dual-brush "2-brush size" also needs to be changed.
The dual-brush "2-brush size" also needs to be changed.

I have a role to clear the lines that overhang.
If this is not equivalent to line width
The edge of the line is angular, and the line width becomes thin.
If this is not equivalent to line width
The edge of the line is angular, and the line width becomes thin.
3. Dash length
The stroke interval affects the dash length of the dashed line.
Because the mechanism is as shown in the figure below,
The upper limit is 25, and the lower limit is 15.
The stroke interval affects the dash length of the dashed line.
Because the mechanism is as shown in the figure below,
The upper limit is 25, and the lower limit is 15.

However, by design, there is a problem that the dash length of the start is shorter than expected when the limit is below 25.
We recommend fixing the interval to 25.
We recommend fixing the interval to 25.
Figures below 25 will be used in the next paragraph.
4. Dash length Amplitude
"Random" in "interval" or
By checking the "spacing" of the starting and ending
The length of the dash is changed.
"Random" in "interval" or
By checking the "spacing" of the starting and ending
The length of the dash is changed.

The minimum value at this time is the number specified by the "interval" of the above 3
The following numbers (15 to 25) are divided and by percentage.
Example: If you want the amplitude from the upper limit of 25 to the lower limit 15
15 ÷ 25 x 100 = 60
The following numbers (15 to 25) are divided and by percentage.
Example: If you want the amplitude from the upper limit of 25 to the lower limit 15
15 ÷ 25 x 100 = 60
That's it.
Thank you very very.
Thank you very very.
背景、フキダシに使える破線の集中線ツールです。
後光や喜びの表現などに。
後光や喜びの表現などに。

参考までに3タイプ用意しました。

破線フラッシュA:破線のダッシュの長さが不規則
破線フラッシュB:破線のダッシュの長さが徐々に短くなる
破線フラッシュC:線の開始位置が不揃い
破線フラッシュB:破線のダッシュの長さが徐々に短くなる
破線フラッシュC:線の開始位置が不揃い
入り抜きを逆転させることもできます。
あとオマケで、定規を使って描く人に向けて直線ツールバージョン。

破線A:ダッシュの長さが不規則
破線B:ダッシュの長さが徐々に短くなる
破線B:ダッシュの長さが徐々に短くなる
描画間隔、描画位置などの扱いは普通の集中線と変わらないので
お好みで変更してください。
お好みで変更してください。
以下、独自の特殊な設定だけまとめておきます。
1. 切れ目の長さ
「ブラシサイズ」が破線の切れ目の長さに影響します。

2. 線幅
ブラシ先端の「厚さ」で線幅を調整できます。
前述1の「ブラシサイズ」の倍分、線幅も倍になるので、それを踏まえる必要があります。
ブラシ先端の「厚さ」で線幅を調整できます。
前述1の「ブラシサイズ」の倍分、線幅も倍になるので、それを踏まえる必要があります。

また、線幅を調整する際は、
デュアルブラシの「2-ブラシサイズ」も変更が必要です。
デュアルブラシの「2-ブラシサイズ」も変更が必要です。

はみ出す線を消去する役割を持っています。
これが線幅と同値になっていないと
線の端が角張ったり、線幅が細くなったりしてしまいます。
これが線幅と同値になっていないと
線の端が角張ったり、線幅が細くなったりしてしまいます。
3. ダッシュの長さ
ストロークの「間隔」が破線のダッシュの長さに影響します。
下図のような仕組みになっているので、
上限は25、下限は15になります。
ストロークの「間隔」が破線のダッシュの長さに影響します。
下図のような仕組みになっているので、
上限は25、下限は15になります。

ただし仕様上、上限の25を下回ると、開始のダッシュの長さが想定より短くなる問題があるため、
「間隔」は25に固定することをおすすめします。
「間隔」は25に固定することをおすすめします。
25を下回る数値は次項でいかされます。
4. ダッシュの長さの振幅
「間隔」の「ランダム」、もしくは、
「入り抜き」の「間隔」のどちらかににチェックを入れることで
ダッシュの長さに変動が生まれます。
「間隔」の「ランダム」、もしくは、
「入り抜き」の「間隔」のどちらかににチェックを入れることで
ダッシュの長さに変動が生まれます。

この時の最小値は、前述3の「間隔」で定めた数値で
それ以下の数値(15~25)を割り、パーセント指定することで求めます。
例:上限25から下限15までの振幅にしたい場合
15÷25×100=60
それ以下の数値(15~25)を割り、パーセント指定することで求めます。
例:上限25から下限15までの振幅にしたい場合
15÷25×100=60
以上です。
どうぞよろしくお願いいたします。
どうぞよろしくお願いいたします。
Shape 図形
straight line 直線


