
60 accessory brushes/jewelry/charm parts/Chain (アクセサリーブラシ60種類/宝石・チャームパーツ・チェーン) アクセサリーブラシ60種類/宝石・チャームパーツ・チェーン
Content ID:1803804
-
548

I thought that the image was not destroyed as much as possible even if I used small and made it.
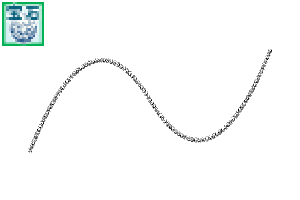
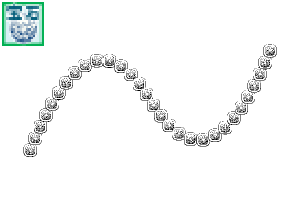
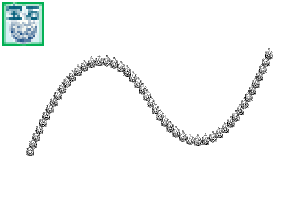
It is a set of 60 kinds of brushes for accessories.
The main sub color can be changed.
There is a jewel, a charm parts chain.
(The number of brushes has increased when I made it with this, too...)
It is a line quality that can be designed in combination with multiple,
I adjusted it to make it look sparkling with distance when I used it small.
Charming jewelry and bridal style bijou system,
Jingling necklaces and chains, flashy
Simple pendant of ordinary use, such as OL MS,
Choker, earrings, earring, bracelet, anklet, Charm....
Please make your own original design and enjoy it in the world.
小さく使ってもなるべく画像が崩れないようにと考えて作った
アクセサリー用のブラシ、60種類のセットです。
メイン・サブカラー変更可能です。
宝石・チャームパーツ・チェーンがあります。
(あれもこれもと作ってたらブラシ本数が増えてしまいました…)
複数組み合わせてデザインできるような線質にしたり、
小さく使った時に遠目でキラキラ見えるようにするなど、いろいろ調整しました。
ブライダル風ビジュー系のあでやかなジュエリーや、
派手にジャラジャラしたネックレスやチェーン、
OLさんなどの普段使いのシンプルなペンダント、
チョーカー、ピアス、イヤリング、ブレスレット、アンクレット、チャーム…。
世界でひとつの、あなただけのオリジナルデザインを作って楽しんでくださいね。
The main and sub colors can be changed.
There are jewels, charm parts, and chains.
We made various adjustments, such as making the quality of the line so that it can be designed by combining multiple items,
Brilliant bridal-style bijou jewelry, flashy necklaces and chains, simple pendants
for everyday use such as office ladies, chokers, pierced earrings, earrings, bracelets, anklets, charms ...
Please enjoy making your own original design, which is the only one in the world.
It is processed by interweaving various things such as grisaille painting method, automatic coloring,
solid color painting, texture, layer effect etc.


(下に静止画像での説明もありますので併せてご参照ください)
(There is also a still image explanation below. Please refer to it as well.)


It will be able to handle a wide range of designs such as flashy designs and women's everyday designs.
It is assumed to be the size of a character that is often found in manga manuscripts.
I made it in a small size from the beginning so that the picture does not collapse even if it is made smaller.
Carefully adjusted in dot units. Please freely combine and design nicely.
You can change the main color and sub color.
The actual size of this sample image is created in A4.
Please use it as a reference for comparison with the characters.
For details confirmation: A part of the sample image of the usage example is enlarged.

(一部の内容は、上に動画での説明もあります)
(Some contents are explained in the above video)

Change the width of what you wrote using the line correction tool.
If you uncheck "Process entire line" in the tool properties, You can partially change the line width.
If you tap it several times, it will become the width with gradation.
Check if you want a uniform width.
Jewels and other parts can be made in the same way.
Scales what you draw. (Fixed ratio)
"Change vector thickness" in the tool properties,
Check "Fixed aspect ratio" to operate.
Please note that if you forget to check it,
there will be a gap or the picture will collapse.
Rotate what you draw.
Slide the pen a little to draw. This is because I want to output multiple control points.
Select "Control Point" in the line correction tool and select in the tool property "Delete Control Point"
Erase all points except the beginning and the end.
Then, select what you drew with the object tool and specify "Sub tool details"→"Brush tip"→"Line direction".
Then pinch and move the pointer or control point to rotate it.
If the image disappears during operation, pinch the control point and extend it to bring out the image.
If you want to make a beautiful curve.
Draw a brush along with a concentric circle ruler, a parallel curve ruler, and a ruler tool created from vectors.
Or, after drawing by hand, delete unnecessary control points
and move the points one by one to create a beautiful curve.

And the minimum size value that does not cause the image to collapse.
The value may change depending on the personal computer environment of the user.
Thank you for your understanding.
Upper・Use antialiasing Lower No antialiasing
説明画像は図案が見やすいよう一部フチを太くしてるものがあります。
説明用の画像はサンプルなので線を入れています。 実際の素材には入っていません。
Some explanatory images have thicker borders to make the design easier to see.
Since the image for explanation is a sample, a line is inserted. It is not included in the actual material.
The main and sub colors can be changed.
There are jewels, charm parts, and chains.
We made various adjustments, such as making the quality of the line so that it can be designed by combining multiple items,
Brilliant bridal-style bijou jewelry, flashy necklaces and chains, simple pendants
for everyday use such as office ladies, chokers, pierced earrings, earrings, bracelets, anklets, charms ...
Please enjoy making your own original design, which is the only one in the world.
It is processed by interweaving various things such as grisaille painting method, automatic coloring,
solid color painting, texture, layer effect etc.
(下に静止画像での説明もありますので併せてご参照ください)
(There is also a still image explanation below. Please refer to it as well.)
It will be able to handle a wide range of designs such as flashy designs and women's everyday designs.
It is assumed to be the size of a character that is often found in manga manuscripts.
I made it in a small size from the beginning so that the picture does not collapse even if it is made smaller.
Carefully adjusted in dot units. Please freely combine and design nicely.
You can change the main color and sub color.
The actual size of this sample image is created in A4.
Please use it as a reference for comparison with the characters.
For details confirmation: A part of the sample image of the usage example is enlarged.
(一部の内容は、上に動画での説明もあります)
(Some contents are explained in the above video)
Change the width of what you wrote using the line correction tool.
If you uncheck "Process entire line" in the tool properties, You can partially change the line width.
If you tap it several times, it will become the width with gradation.
Check if you want a uniform width.
Jewels and other parts can be made in the same way.
Scales what you draw. (Fixed ratio)
"Change vector thickness" in the tool properties,
Check "Fixed aspect ratio" to operate.
Please note that if you forget to check it,
there will be a gap or the picture will collapse.
Rotate what you draw.
Slide the pen a little to draw. This is because I want to output multiple control points.
Select "Control Point" in the line correction tool and select in the tool property "Delete Control Point"
Erase all points except the beginning and the end.
Then, select what you drew with the object tool and specify "Sub tool details"→"Brush tip"→"Line direction".
Then pinch and move the pointer or control point to rotate it.
If the image disappears during operation, pinch the control point and extend it to bring out the image.
If you want to make a beautiful curve.
Draw a brush along with a concentric circle ruler, a parallel curve ruler, and a ruler tool created from vectors.
Or, after drawing by hand, delete unnecessary control points
and move the points one by one to create a beautiful curve.
And the minimum size value that does not cause the image to collapse.
The value may change depending on the personal computer environment of the user.
Thank you for your understanding.
Upper・Use antialiasing Lower No antialiasing
説明画像は図案が見やすいよう一部フチを太くしてるものがあります。
説明用の画像はサンプルなので線を入れています。実際の素材には入っていません。
Some explanatory images have thicker borders to make the design easier to see.
Since the image for explanation is a sample, a line is inserted. It is not included in the actual material.
Gem. 宝石
-
A1 Pavilion gem-round rounds A1館宝石-ラウンド Round
-
A2-kan gem – round bezel with rounded frame A2館宝石-ラウンド枠付 Round bezel
-
A3-Kan gem-round claw prong A3館宝石-ラウンド爪 Round prong
-
A4-Museum gem-round/SS A4館宝石-ラウンド極小 Round/SS
-
A5-kan gem-round bezel/SS with miniature small frame A5館宝石-ラウンド極小枠付 Round bezel/SS
-
B1-kan gem-oval Oval B1館宝石-オーバル Oval
-
B2 Pavilion Jewel-oval frame with Oval bezel B2館宝石-オーバル枠付 Oval bezel
-
B3-kan jewelry-oval claw Oval Prong B3館宝石-オーバル爪 Oval prong
-
B4 gem-oval tiny Oval/SS B4館宝石-オーバル極小 Oval/SS
-
B5 Pavilion gem-oval with minimal frame Oval bezel/SS B5館宝石-オーバル極小枠付 Oval bezel/SS
-
C1-Kan gem-heart shape hearts shape C1館宝石-ハートシェイプ Heart shape
-
C2-kan gem-heart shape bezel C2館宝石-ハートシェイプ枠付 Heart shape bezel
-
C3-Kan gem-heart shape nail shape prong C3館宝石-ハートシェイプ爪 Heart shape prong
-
C4-kan gem-heart shape minimal Heart shape/SS C4館宝石-ハートシェイプ極小 Heart shape/SS
-
C5-kan gem-heart shape with minimal frame heart shape bezel/SS C5館宝石-ハートシェイプ極小枠付 Heart shape bezel/SS
-
D1-kan gem-cushion Cushion D1館宝石-クッション Cushion
-
D2 Pavilion gem-cushion frame with Cushion bezel D2館宝石-クッション枠付 Cushion bezel
-
D3-kan jewelry-cushion nail Cushion Prong D3館宝石-クッション爪 Cushion prong
-
D4-kan gem-cushion tiny Cushion/SS D4館宝石-クッション極小 Cushion/SS
-
D5-kan gem-cushion with minimal frame Cushion bezel/SS D5館宝石-クッション極小枠付 Cushion bezel/SS
-
E1-kan gem-pair shape Pear shape E1館宝石-ペアシェイプ Pear shape
-
E2-kan gem-Pear shape bezel with pair shaped frame E2館宝石-ペアシェイプ枠付 Pear shape bezel
-
E3-kan jewelry-pair shape nails Pear shape prong E3館宝石-ペアシェイプ爪 Pear shape prong
-
E4 Museum gem-pair shape minimal Pear shape/SS E4館宝石-ペアシェイプ極小 Pear shape/SS
-
E5-kan gem-Pear shape bezel/SS with pair shape minimal frame E5館宝石-ペアシェイプ極小枠付 Pear shape bezel/SS
-
F1 Pavilion gem-Marquis Marquis F1館宝石-マーキス Marquis
-
Marquis bezel with the F2 gem-Marquis Frame F2館宝石-マーキス枠付 Marquis bezel
-
F3-kan gem-Marquis claw Marquis Prong F3館宝石-マーキス爪 Marquis prong
-
F4-gem-Marquis Tiny Marquis/SS F4館宝石-マーキス極小 Marquis/SS
-
F5 Gem-Marquis Marquis Bezel/SS with minimal frame F5館宝石-マーキス極小枠付 Marquis bezel/SS
-
G1 House gem-Star shape stars shape G1館宝石-スターシェイプ Star shape
-
G2-kan gem-star shape bezel G2館宝石-スターシェイプ枠付 Star shape bezel
-
G3-kan gem-star shape nail star shape prong G3館宝石-スターシェイプ爪 Star shape prong
-
G4-kan gem-star shape minimal Star shape/SS G4館宝石-スターシェイプ極小 Star shape/SS
-
G5 kan gem-star shape with minimal frame Star shape bezel/SS G5館宝石-スターシェイプ極小枠付 Star shape bezel/SS


Charm Parts チャームパーツ
-
H-kan charm-open heart H館チャーム-オープンハート Open heart
-
I-house charm-Star I館チャーム-星 Star
-
J-Kan charm-mon Moon J館チャーム-月 Moon
-
K-House Charm-Cross K館チャーム-十字架 Cross
-
L-House Charm-Butterfly Butterfly L館チャーム-蝶 Butterfly
-
M house Charm-Flower Flower M館チャーム-花 Flower
-
N-kan charm-loops loop N館チャーム-ループ Loop
-
O-House charm-ribbon Ribbons O館チャーム-リボン Ribbon
-
P-kan charm-pearl grains Pearl Grain P館チャーム-パール粒 Pearl grain
-
Q1 charm-Twisted stick A Twist Stick A Q1館チャーム-ツイストスティックA Twist stick A
-
Q2 Pavilion Charm-twisted stick B Twist Stick B Q2館チャーム-ツイストスティックB Twist stick B


Chain チェーン
-
R1 Pavilion chain-Maru Azuki-Dai-L R1館チェーン-丸アズキ大 Anchor/L
-
R2 Pavilion chain-Kihei Dai-Curb/L R2館チェーン-キヘイ大 Curb/L
-
R3 Pavilion chain-Figarochei dai Figaro Curb/L R3館チェーン-フィガロキヘイ大 Figaro curb/L
-
S-house chain-Pearl Pearl/S S館チェーン-パール Pearl/S
-
T1-kan chain-ball A Ball chain A T1館チェーン-ボールA Ball chain A
-
T2-kan chain-ball B Ball chain B T2館チェーン-ボールB Ball chain B
-
U1 Pavilion chain-round azuki beans Anchor Round U1館チェーン-丸アズキ Anchor round
-
U2 pavilion chain-flat Azuki Oval U2館チェーン-平アズキ Anchor oval
-
V-kan chain-Figaro azuki Figaro anchor V館チェーン-フィガロアズキ Figaro anchor
-
W-kan chain-Kihei Curb W館チェーン-キヘイ Curb
-
X-kan chain-Figarochei Figaro Curb X館チェーン-フィガロキヘイ Figaro curb
-
Y-Pavilion chain-Venetian Venetian chain Y館チェーン-ベネチアン Venetian chain
-
Z1-kan chain-mal-kang double Jump ring/D Z1館チェーン-マルカン二重 Jump ring/D
-
Z2 Pavilion chain-white pearl grains (combined with a mal) WT-pearl Grain & Jump ring/S Z2館チェーン-白パール粒(マルカン一重兼用)WT-pearl grain & Jump ring/S


Other materials by 背景職人の館


Popular “Material catalog” materials


New materials


-
 MVP ◆This user has contributed greatly to the management of the community, by posting many great responses to the questions asked. Once every three months, MVPs are determined based on the points earned during that period and will be recognized accordingly.
 -
 New Valuable Player (NVP) ◆These are the next-best contributors to the community after MVPs. This is awarded to users who have not yet won an MVP award, based on the number of points they have earned.
 -
 Official Expert ◆Chosen out of all MVP awardees, who are already proof of excellence, this is a testimony of outstanding correspondence in the community. After careful screening, they are appointed by CELSYS and assume their position.Note: Formally called “Evangelists”
 -
 Official Moderator of CELSYS ◆Moderators are official CELSYS staff members who are fluent in Japanese as well as various other languages. Moderators are not experts on the software or illustration, so they are not able to directly answer your questions. However, moderators provide communication and language support to ensure that everyone can smoothly communicate with each other.
 -
 CELSYS official accountThe Official Administrator Account