
Fisheye perspective ruler Free Edition Fish-eye perspective ruler (魚眼パース定規無料版 Fish-eye perspective ruler) 魚眼パース定規無料版 Fish-eye perspective ruler
Content ID:1791646
-
52,297
Unofficial version
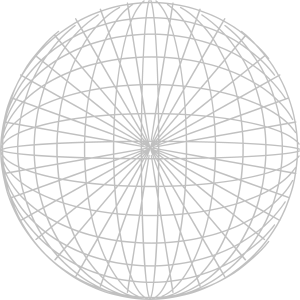
The ruler material that the line can draw in fish-eye perspective by applying the function of the clip studio.
非公式版
クリップスタジオの機能を応用した、魚眼パースで線が引ける定規素材です。
★ Attention! ] The official "Fisheye perspective ruler" has been implemented in clip studio 2.0 update, so if you have 2.0, please do not purchase this product and use the official one.
2020/10/08 appended

○ Fisheye perspective ruler × 1
☓ Fisheye perspective ruler (Lightweight version cut to half the size) × 1 (only paid version)
☓ Fisheye perspective ruler (the lightest version cut to a quarter) × 1 (this is a paid version only)
It is a fish-eye perspective ruler that I had thought I wanted before, but was finally completed!
The ruler material that the line can draw in fish-eye perspective by applying the function of the clip studio.
Please examine it by all means.
... But, it is not official material, so it is a material with various quirks.
To the following
◎ Advantages
And
☓ Weakness
So we will be listed, thank you read well.
◎ Advantages
■ As of October 06, 2020, the only fish-eye perspective ruler that can be used within clip studio functions. I am using it at work at the professional site now.
By free transform the ■ Ruler itself, you can adjust to the picturesque perspective of the way you want. Easy to align with the draft, with the Atari Layer (draft layer).

■ Very data is heavy
RAM6GB is recommended for use with more than one spec PC.
It is recommended that you test once for the free operation confirmation version, and try it if you can use it in your own environment.
It is encouraging of my material production.
It is not recommended to duplicate a ruler or to open more than one file with a ruler at one time.
If you are not using a ruler, move the ruler you placed to the empty layer once, save the empty layer to the [material window], and
It is recommended to draw out again when using again.

※ When pulling out again, rather than dragging from the material window, the state selected by clicking the material
In the bottom left corner of the material window, you can use the "Paste material" method to pull out the location information.
(If the material window is not coming out, you can leave the window from the menu bar.)

Unlike the [perspective ruler] of the official implementation of ■, you need to change the drawing layer every time you change the direction of line.
Unlike the perspective ruler implemented in CLIP STUDIO, it was not possible to have a single ruler snap along in multiple directions.
So the folder of this material
Vertical ruler (Vertical ruler)
Horizontal ruler (Horizon ruler)
Oku ruler (back ruler)

Are divided into three layers folders.
The layers placed in each folder snap to the ruler only in their respective directions.
Every time you change a direction of line, you need to change the drawing layer.
■ Ruler is too dark to see the drawing part.
→ "Preferences" in the menu bar of the CLIP STUDIO PAINT
Please try lowering the percentage of "ruler, Grid, and the opacity of the Dragonfly" in the item of "ruler, unit"

Basic knowledge of Perth is necessary for ■.
... But this material is likely to be very useful as the teaching materials.
★【注意!】クリップスタジオ2.0アップデートにて、公式の「魚眼パース定規」が実装されましたので、2.0を所持してる方は、本製品を購入せず、公式のほうをご利用ください。
2020/10/08追記

○魚眼パース定規×1
☓魚眼パース定規(半分の大きさにカットした軽量版)×1(こちらは有料版のみ)
☓魚眼パース定規(四分の一にカットした最軽量版)×1(こちらは有料版のみ)
以前から欲しい欲しいと思っていた「魚眼パース定規」ですが、とうとう完成しました!
クリップスタジオの機能を応用した、魚眼パースで線が引ける定規素材です。
ほうも、是非ご検討下さい。
…なんですが、公式の素材ではないので色々とクセのある素材です。
以下に
◎利点
と
☓弱点
を記載させて頂きますので、よくお読み頂きますようお願い申し上げます。
◎利点
■2020年10月06日現在、クリップスタジオの機能の内で使える唯一の魚眼パース定規。私がプロの現場で現在仕事で使っています。
■定規自体を自由変形する事で、思い通りの絵的なパースに合わせる事が出来ます。下書きに合わせやすい、アタリのレイヤー(draft layer)付き。

■非常にデータが重い
RAM6GB以上のスペックのPCでの使用がおすすめです。
無料動作確認版で、一度テストして、ご自身の環境で使えるかどうか試して頂く事をおすすめします。
私の素材制作の励みになります。
定規を複製したり、定規を使ったファイルを一度に複数開いて作業する事は非推奨です。
定規を使っていない時は、配置した定規を一旦何も書いてない空レイヤーに移動して、その空レイヤーを【素材ウインドウ】に保存して、
再び使う時はまた引き出すのがおすすめです。

※再び引き出す時は素材ウインドウからドラッグするのではなく、素材をクリックで選んだ状態で
素材ウインドウ左下にある「素材の貼り付け」で、【配置された位置情報そのままに】引き出す方法がおすすめです。
(素材ウインドウが出てない場合は、メニューバーの「ウインドウ」の項目から出せます)

■公式実装の【パース定規】とは違い、【線の方向を変える度に描画レイヤーを変える】必要があります。
クリスタに実装されているパース定規と違って、一つの定規で複数方向に沿う(スナップ)させる事は出来ませんでした。
なので、本素材のフォルダは
縦定規(Vertical ruler)
横定規(Horizon ruler)
奥定規(Back ruler)

の3つのレイヤーフォルダに分かれており、
それぞれのフォルダ内に配置されたレイヤーは、それぞれの方向のみに定規がスナップします。
【線の方向を変える度に、描画レイヤーを変える必要がある】という事です。
■定規の色が濃すぎて描画部分が見づらい
→CLIP STUDIO PAINTのメニューバーにある「環境設定」で
「定規・単位」の項目で「定規・グリッド・トンボの不透明度」のパーセンテージを下げてみて下さい

■使いこなすにはパースの基礎知識が必要です
…が、本素材はその教材として大いに役に立つと思われます。
Category 1 カテゴリ1


