

A sheet and auto action for experimenting with various layer effects, such as multiplication and screen.
When you want to see what color you put and what effect it is, please.
When I was worried about the layer effect used for the iris of the pupil, luster of the hair, and the shadow, etc.
各種レイヤー効果(乗算やスクリーンなど)を試すためのシートとオートアクションです。
どの色を置いてどの効果にするとどうなるのかを確認したい時にどうぞ。
瞳の虹彩や髪のツヤや影などに使うレイヤー効果に悩んだ時などにも。
※ 9/25 "layer name for duplication" in the environment setting "Do not change" is preparing a modified version so that it does not move well. Until then, please try to set the above
There was no problem in this environment, but please save it before the execution of the auto action just in case of another file is opened ※ *

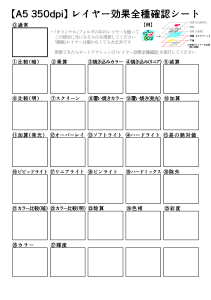
↓ The layer structure of the normal (original) part ↓

It becomes the form that the thing of such a feeling is drawn to the part and the auto action is done by copy and paste.
Use
① "Layer Confirmation sheet [A5 350dpi]" is applied to the template to create new the A5 size canvas.
The next time you save a canvas made at this time is easy, but you don't have to

② a picture in the "original" folder.

Line drawing: No, you don't have to.
Effect: necessary. Place or draw something you want to experiment with layer effects
Groundwork: Necessity. Painting and Primer
* Effect 1 will be placed on the line drawing on effect and effect 2.
If you want to use both of these later
③ auto action, press "Confirm all species ★ layer effect".

④ completed

[Effect 1, when you want to use the effect 2]
Condition: The state in which you are on top (the "0: normal" ~ "27: Luminance" folder and its contents)
① Select the layer you want to use and run the auto action.

★ When I want to put an effect layer on a line drawing ★
In the effect 2 layer, select the layer and run the upper auto action of the image.
When you want to put an effect layer on top of the ★ effect layer (under line drawing) ★
In the effect 1 layer, select the layer and run the lower auto action of the image.
The auto action of the [overwrite] item is used when you want to replace the contents of the "effect" (not effect 1 and 2) layers.
Example of painting


I draw an example on the sheet once.
Example would be if you sift through the effect layer you like
If the auto action is put in the original folder other than "effect ~" and the layer name is executed, a different auto action will live together.
Auto action name is specified in each folder name, layer name is "guide", "line drawing" and "effect". Certainly

※9/25 環境設定で「複製時のレイヤー名」を「変更しない」以外にしているとうまく動かないようなので修正版を用意中です。それまでは上記の設定にしてお試しください※
※こちらの環境では何も問題はありませんでしたが、別ファイルを開いている時は念の為にオートアクションの実行前に保存しておいてください※
↓通常(オリジナル)部分のレイヤー構造↓
こういう感じのものを太枠に部分に描くなりコピペするなりしてオートアクションを実行する形になります。
【使い方】
①「レイヤー確認シート【A5 350dpi】」をテンプレートに適用してA5サイズのキャンバスを新規作成します。
※この時に作ったキャンバスを保存しておくと次回が楽ですが、しなくてもいいです
②「オリジナル」フォルダ内に絵を用意します。
線画:無くてもいい
効果:必要。各種レイヤー効果を試したいものを置く、または描く
下地:必要。絵や下塗り
※効果1は効果の上、効果2は線画の上に配置されます
この2つを使いたい時については後述
③オートアクションの「★レイヤー効果全種確認」を押します。
④完成
【効果1、効果2を使いたい時】
条件:上を一通り行っている状態 (「0:通常」~「27:輝度」フォルダとその中身がある)
①使いたいレイヤーを選択してオートアクションを実行します。
★線画の上に効果レイヤーを置きたい時★
「効果2」レイヤーに描いて、そのレイヤーを選択した状態で上記画像の上側のオートアクションを実行。
★効果レイヤーの上(線画の下)に効果レイヤーを置きたい時★
「効果1」レイヤーに描いて、そのレイヤーを選択した状態で上記画像の下側のオートアクションを実行。
【上書き】の項目のオートアクションは、「効果」(効果1と効果2ではない)レイヤーの中身を入れ替えたい時に使います。
【絵での例】
一応シートにも例を描いています。
例は気に入った効果レイヤーを取捨選択した場合になります
レイヤー名を「効果~」以外にしてオリジナルフォルダに入れてオートアクションを実行すれば違うオートアクションが同居します。
オートアクションで名前を指定しているのは各フォルダ名、レイヤー名は「ガイド用」「線画」「効果」です。確か。
Layer effect all species confirmed レイヤー効果全種確認


Other materials by ローリングソバット大車輪


Popular “Material catalog” materials


New materials


Badges
-
 MVP ◆This user has contributed greatly to the management of the community, by posting many great responses to the questions asked. Once every three months, MVPs are determined based on the points earned during that period and will be recognized accordingly.
 -
 New Valuable Player (NVP) ◆These are the next-best contributors to the community after MVPs. This is awarded to users who have not yet won an MVP award, based on the number of points they have earned.
 -
 Official Expert ◆Chosen out of all MVP awardees, who are already proof of excellence, this is a testimony of outstanding correspondence in the community. After careful screening, they are appointed by CELSYS and assume their position.Note: Formally called “Evangelists”
 -
 Official Moderator of CELSYS ◆Moderators are official CELSYS staff members who are fluent in Japanese as well as various other languages. Moderators are not experts on the software or illustration, so they are not able to directly answer your questions. However, moderators provide communication and language support to ensure that everyone can smoothly communicate with each other.
 -
 CELSYS official accountThe Official Administrator Account