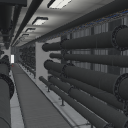
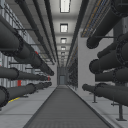
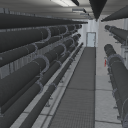
Drawable Infiltration Scene 01|Plant Machine Room [Infiltration Passage] (描ける潜入シーン01|プラント機械室[潜入通路]) 描ける潜入シーン01|プラント機械室[潜入通路]

Content ID:2318971

  • 556
This material can be used in Studio Mode. (What is Studio Mode?)

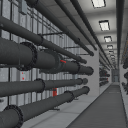
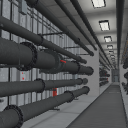
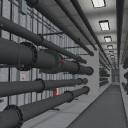
This is a 3D background material that cuts out a long and narrow infiltration passage running along the wall of the plant machine room from "Drawable Infiltration Scene 01 |
The passage is about 55 meters long, 6 meters wide, and 4.2 meters high, and includes piping, flanges, valves, cable racks, ceiling lighting, and doors at both ends. In addition, the passage is difficult to see and there are three walls where you can hide.

Materials optimized for LT conversion are applied. The faint light of the ceiling lights and the shading of the walls are already baked. Since the door is an independent part, it can also be used to express opening and closing.

You can easily use many infiltration scenes that you have given up due to "there are no materials for long passages" and "it is difficult to draw because there are many pipes" for drafts and line drawings with a large number of registered angle preset.
プラント機械室の壁際を走る、細長い潜入通路を、「描ける潜入シーン01|プラント機械室[Full]」から切り出した3D背景素材です。
全長約55m、幅約6m、高さ約4.2mの通路に、配管・フランジ・バルブ・ケーブルラック・天井照明・両端のドアを入れました。さらに、通路を見通しにくくし、身を隠せる壁を3か所に配置しています。

LT変換に最適化したマテリアル付けを行っています。天井照明のほのかな光や壁の陰影はベイク済みです。ドアは独立したパーツなので、開閉の表現にも使えます。

「長い通路は資料がない」「配管が多くて描くのが大変」で諦めていた潜入シーンを、多数登録したアングルプリセットで、お手軽に下描きや線画にご使用いただけます。

■ What is contained in this material

The infiltration passage of the plant machine room is summarized in a 3D background.
It includes wall plumbing, ceiling lighting, doors, and even hidden walls, and you can draw from a single point of perspective in a long passage, to a scene around a corner, to a cut of a looking down.


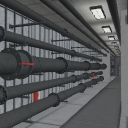
・ Piping along the wall (5 on the right, 6 on the left, 3 on the ceiling)
・Flanges and bolts, ball valves (handles), gate valves (levers)
• Piping supports and U-bolts and nuts that rise from the floor
・Cable rack (7 color-coded cables)
・Grating Corridor
・ Ceiling lighting at intervals of about 3 m (baked with a faint spread of light)
・Equipment on the partition wall side (fire extinguisher box, on-site operation panel, pull box, conduit, display board, guide light / emergency light)
Red light on the side wall
・Doors at both ends (front and back)
・ A wall where you can hide yourself that separates the passage in three places


■ The shape has been brushed up according to the release of the single item.

This time, for the release of "Drawable Infiltration Scene 01 | Plant Machine Room [Infiltration Passage]" as a single item, we have brushed up the shape of each object.
Flanges have been reshaped, valves, U-bolt nuts, ceiling lighting, door fittings have been changed, and walls have been added.

Even in the background of the "scene where the infiltration passage is drawn large", it can be used without deterioration even when approaching.


■ Create a "show" with a hidden wall

The three walls, alternating from the left and right sides of the aisle, have a mortar finish.
It can be used for compositions that allow a little peek behind the wall or for situations where you are hiding in the shadows.

]

■ Details around piping
The flange is bolted and includes piping supports.
Even close cuts can be used as materials for drawing.


■ Lighting and atmosphere

The ceiling lights are baked to the extent of the light.
LT conversion brings together the lines around the light, creating the atmosphere of a dimly lit passage.


■ Draw with only what you want to show
You can show or hide each part.
You can organize it according to the scene you want to draw, such as an overhead view with only the ceiling erased or a composition with only the door moving.

Hide Ceiling


■ How to use

(1) In the CLIP STUDIO PAINT, paste the 3D Object from the material palette onto the canvas.
(2) Using the object tools, select the angle preset and viewpoint to determine the composition.
(3) By switching the display of parts, only the elements you want to draw are displayed.
(4) You can make a draft as it is or convert it to LT to make a line drawing.
* Parts you want to move, such as doors, can be repositioned and oriented by 3D operation.


Example of 3D drawing figure arrangement (this asset does not include 3D drawing figure)


■ Specifications
3D Object 1 point (29 parts. Can be shown or hidden for each part)
Dimensions: Length approx. 55m × Width approx. 6m × Height approx. 4.2m
angle preset: 5 points


■ About the series

This is a 3D background material that brushes up some sections of "Drawable Infiltration Scene 01 | Plant Machine Room [Full]".

All sections are "Drawable Infiltration Scene 01 | Plant Machine Room [Full]",
The free limited section is "Drawable Infiltration Scene 01 | Plant Machine Room [Free]",
The control room is open to the public in "Drawable Infiltration Scene 01|Plant Machine Room [Control Room]".

Since the shape of this asset is created as a commemoration of the single item, the shape and appearance of the details are different from the same section in "Drawable Infiltration Scene 01 | Plant Machine Room [Full]".


・LT conversion is the result of confirmation in the PC version.

・ The operation of this asset is checked on a PC equipped with CPU: i5-10400 memory 16GB GeForce RTX3060 8GB.
(If you think it works, it may be improved by locking this asset from the object list)


■ この素材に入っているもの

プラント機械室の潜入通路を、3D背景にまとめました。
壁際の配管、天井照明、ドア、隠れ壁まで入っていて、長い通路の一点透視から、角を曲がる場面、見下ろしのカットまで描けます。


・壁沿いの配管(右5本・左6本・天井3本)
・フランジとボルト、玉形バルブ(ハンドル)、仕切弁(レバー)
・床から立ち上がる配管サポートとUボルト・ナット
・ケーブルラック(色分けしたケーブル7本)
・グレーチングの歩廊
・約3m間隔の天井照明(ほのかな光の広がりをベイク済み)
・仕切壁側の設備(消火器箱、現場操作盤、プルボックス、電線管、表示板、誘導灯・非常灯)
・側壁の赤色灯
・両端のドア(手前・奥)
・通路を3か所で区切る身を隠せる壁


■ 単品公開に合わせて、形状をブラッシュアップしました

今回、「描ける潜入シーン01|プラント機械室[潜入通路]」を単品でリリースするにあたり、各オブジェクトの形状をブラッシュアップいたしました。
フランジは形状変更、バルブ、Uボルトのナット、天井照明、ドアの納まりを変更、そして身を隠せる壁を追加しました。

背景に”潜入通路を大きく描くシーン”でも、近づいても劣化なく使えるようにしています。


■ 隠れ壁で「見せ場」を作る

通路の左右から交互に出る3枚の壁は、モルタル仕上げです。
壁の向こうを少しだけ覗かせる構図や、物陰に隠れる場面に使えます。

]

■ 配管まわりのディテール
フランジはボルト付きで、配管支持も入っています。
寄りのカットでも、描くための資料として使えます。


■ 照明と空気感

天井照明は、光の広がりまでベイクしてあります。
LT変換すると光の周りの線がまとまり、薄暗い通路の雰囲気が出ます。


■ 見せたいものだけを残して描く
パーツごとに表示・非表示を切り替えられます。
天井だけ消した俯瞰や、ドアだけ動かした構図など、描きたい場面に合わせて整理できます。

[天井を非表示]


■ 使い方

①CLIP STUDIO PAINTで、素材パレットから3Dオブジェクトをキャンバスに貼り付けます。
②オブジェクトのツールで、アングルプリセットや視点を選んで構図を決めます。
③パーツの表示切替で、描きたい要素だけを表示します。
④そのまま下描きにするか、LT変換して線画にできます。
※ドアなどの動かしたいパーツは、3D操作で位置や向きを変えられます。


3Dデッサン人形配置例(本アセットには3Dデッサン人形は含まれません)


■ 仕様
3Dオブジェクト 1点(29パーツ。パーツごとに表示・非表示を切り替え可能)
大きさ:全長約55m × 幅約6m × 高さ約4.2m
アングルプリセット:5点


■ シリーズについて

「描ける潜入シーン01|プラント機械室[Full]」の一部区画をブラッシュアップした3D背景素材です。

全区画は「描ける潜入シーン01|プラント機械室[Full]」、
無償限定区画は「描ける潜入シーン01|プラント機械室[Free]」、
制御室は「描ける潜入シーン01|プラント機械室[制御室]」で公開しています。

本アセットは単品出品記念として形状を作り込んでいるため、「描ける潜入シーン01|プラント機械室[Full]」内の同じ区画とは細部の形状や見た目が異なります。


・LT変換はPC版での確認結果です。

・本アセットの動作確認はCPU:i5-10400 メモリ16GB GeForce RTX3060 8GB搭載PCで行っています。 
(動作が思い場合、オブジェクトリストより本アセットにロックをかけると改善することがあります)


Material マテリアル

  • default material 初期マテリアル

Configuration 配置

  • default layout 初期レイアウト

Angle アングル

  • Sammail Angle サムメイルアングル
  • Angle A アングルA
  • Angle B アングルB
  • Angle C アングルC
  • Angle D アングルD

pose parts 可動パーツ

  • In front of the door_movable ドア手前_可動
  • Door back_movable ドア奥_可動

Content ID:2318971

Published : 2 days ago

Last updated : 2 days ago

Other materials by 伝説(レジェ)

Popular “3D object” materials

New materials