
15.6" Widescreen PC Croquis Paper (15.6インチワイドPC向けクロッキー用紙) 15.6インチワイドPC向けクロッキー用紙
Content ID:2137062
-
78

* It seems that it was "15.6-inch wide" at 9:16 instead of "15.6-inch" at 3:4.
Corrected thumbnail and testimonials
Excuse me very much
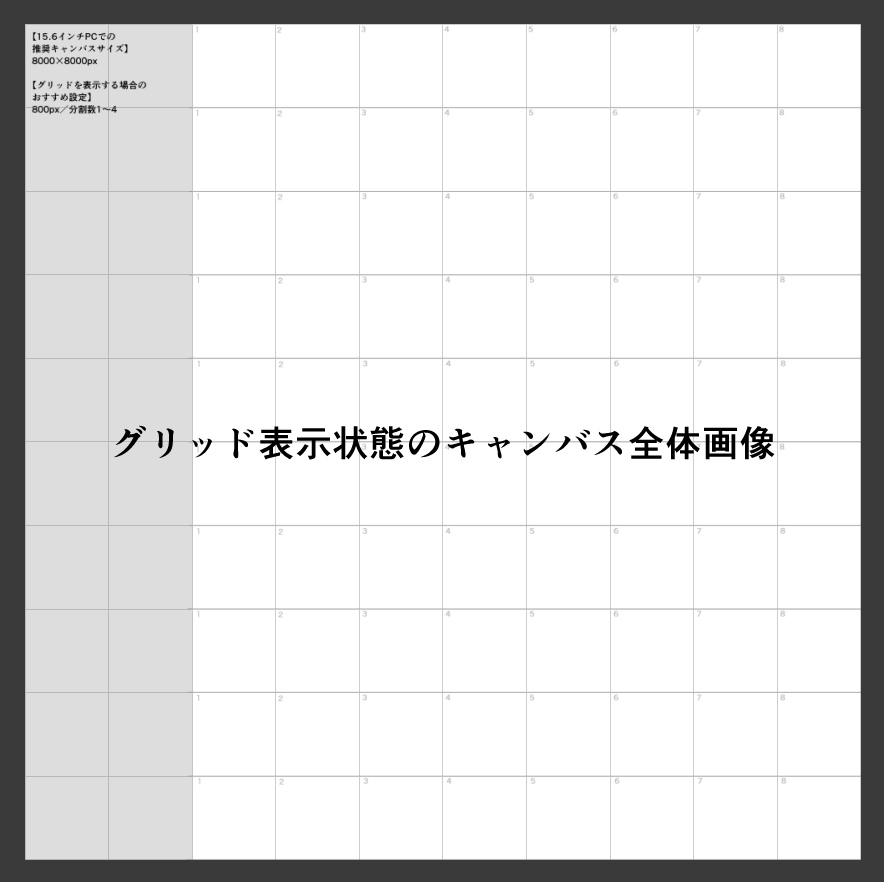
Croquis paper, size for 15.6-inch wide PC
■Recommended canvas size: 8000px × 8000px
■Recommended settings for show grid: 800px / number of divisions 1~4
■Recommended settings for show grid: 800px / number of divisions 1~4
When trimming, it is recommended to align the settings of grid first.
■ This is the layer set used when playing croquis. As I was always doing it, I couldn't tell how many figures I had drawn, so I made a piece of paper with numbers on them.
Up to No. 8 in one row, it is not a serial number.
Up to No. 8 in one row, it is not a serial number.

Distribution material does not have the outermost black edging
There is space for a total of 80 croquis, but I don't think it's usually so necessary, so please trim it as needed.
I've never used up all the contributors.
I've never used up all the contributors.
The gray area on the left is the memo field.
If you enter large characters with a font size of about 15 to 16, you can read the characters without enlarging when the output image after the croquis is displayed in a size that matches the screen. It may be a good idea to write about what you have discovered and future challenges.
If you don't need it, trim it.
■CLIP STUDIO If you display the window of the software on half of the screen of a 15.6-inch wide PC and organize the display information in the CLIP STUDIO, the drawing zone will be roughly the size that fits the screen when it is displayed at equal magnification. Please use the other half to display a website for croquis.
I think you can use it on a different screen size. Try changing the resolution and so on. (Unconfirmed)
I think you can use it on a different screen size. Try changing the resolution and so on. (Unconfirmed)

〈Recommended order of organizing display information on the screen〉
* The poster has decided to leave the tool window, but I think it is okay to leave the sub tool window.
・ Arrange the tools used for croquis at the top of the tool window.
・ If the tool window is grouped with other windows in a vertical column, make it independent (to make it easier to put out later)
・ Adjust the window size of the CLIP STUDIO software to about half the PC screen.
・ Open the window of the site for croquis next to it.
・ Press the TAB key etc. to hide almost all windows in the CLIP STUDIO.
・ Pull out only the tool window and place it in a place out of the way and ready (take it out of the column or select it in the order of the window → tools at the top main menu to display it)
〈Recommended shortcut〉
・ Press the TAB key etc. to hide almost all windows in the CLIP STUDIO.
・ Pull out only the tool window and place it in a place out of the way and ready (take it out of the column or select it in the order of the window → tools at the top main menu to display it)
〈Recommended shortcut〉
H: Hand tool for panning (almost required / hold down the key and slide to the space next to it. Press and slide to temporarily switch to the palm tool and instantly return to the pen tool. Less hassle to operate)
X: Switch between sub color and main color
C: Switch between used color and transparent color
X: Switch between sub color and main color
C: Switch between used color and transparent color
■Layer configuration

Information that may be useful when changing the resolution
・ It is recommended to set the grid spacing to 1/10 of the short or long side.
・The horizontal line is raster layer. If you are worried about blurry after scaling, you may be able to resolve it by unlocking the transparent pixel of the layer → selecting Filter Sharpen→ Sharpen (strong) from the top main menu.
■ There are no vertical lines in the output image. Thank you for your understanding.

■ I'm posting it for croquis, but it's just "paper that numbers and connects square spaces", so I think there may be some other usage.
I hope you find it useful.
*CLIP STUDIO In accordance with ASSETS' management policy, we use "Iwata Antic Body B" as the font in the distribution materials.
*There are no plans to change to paid materials.
※3:4の「15.6型」ではなく9:16の方の「15.6型ワイド」だったようです
サムネイルと紹介文を修正しました
大変失礼いたしました
クロッキー用紙・15.6型ワイドPC向けサイズ
■推奨キャンバスサイズ:8000px × 8000px
■グリッドを表示する場合のおすすめ設定:800px/分割数1~4
■グリッドを表示する場合のおすすめ設定:800px/分割数1~4
トリミングする場合は先にグリッド設定を合わせることをおすすめします
■クロッキーをするときに使っているレイヤーセットです。いつもやっているうちに何体描いたのかが分からなくなるので、番号が振ってある用紙を作りました。
1列8番まで、通し番号じゃない方式になっています。
1列8番まで、通し番号じゃない方式になっています。
配布素材には一番外側の黒い縁取りはありません
全部で80個クロッキー出来るスペースがありますが、普通はこんなに要らないと思いますので必要に応じてトリミングなどをしてください。
投稿者は全部使い切ったことはないです。
投稿者は全部使い切ったことはないです。
左側のグレーの部分はメモ欄です。
文字サイズ15〜16くらいで大きく文字入力すると、クロッキー後の出力画像を画面に合わせたサイズで表示したときに拡大せずとも文字が読めます。発見したことや今後の課題などを書いておくといいかもしれません。
必要ない方はトリミングしてください。
文字サイズ15〜16くらいで大きく文字入力すると、クロッキー後の出力画像を画面に合わせたサイズで表示したときに拡大せずとも文字が読めます。発見したことや今後の課題などを書いておくといいかもしれません。
必要ない方はトリミングしてください。
■クリスタソフトのウィンドウを15.6型ワイドPCの画面の半分に表示してクリスタ内の表示情報を整理すると、等倍表示時に描画ゾーンが画面に大体合うサイズになります。残りの半分にクロッキー向けウェブサイトなどを表示して使ってください。
別の画面サイズでも使うことができると思います。解像度などを変更してみてください。(未確認)
別の画面サイズでも使うことができると思います。解像度などを変更してみてください。(未確認)
〈画面の表示情報整理の推奨順序〉
※投稿者はツールウィンドウを残すやり方にしていますが、サブツールウィンドウの方を残してもいいと思います。
・ツールウィンドウの上の方にクロッキー時に使うツールを並べる
・ツールウィンドウが縦列の中で他ウィンドウとまとまっている場合、独立させる(後で出しやすくするため)
・クリスタソフトのウィンドウサイズを調整し、PC画面の半分程度にする
・隣にクロッキー用サイトのウィンドウなどを開く
・TABキーなどを押してクリスタ内ウィンドウをほぼ全て非表示にする
・ツールウィンドウだけを引っ張り出して邪魔にならない場所に置いて準備完了(列から出す、もしくは上部メインメニューでウィンドウ→ツールの順で選択して表示させる)
〈おすすめショートカット〉
・TABキーなどを押してクリスタ内ウィンドウをほぼ全て非表示にする
・ツールウィンドウだけを引っ張り出して邪魔にならない場所に置いて準備完了(列から出す、もしくは上部メインメニューでウィンドウ→ツールの順で選択して表示させる)
〈おすすめショートカット〉
H:画面移動用の手のひらツール(ほぼ必須/キーを押したままスライドして隣のスペースに移動します。押したままスライドすることで手のひらツールへの切り替えを一時的なものにして、即座にペンツールに戻れます。操作の煩わしさが軽減されます)
X:サブカラーとメインカラーを切り替え
C:使用カラーと透明色を切り替え
X:サブカラーとメインカラーを切り替え
C:使用カラーと透明色を切り替え
■レイヤー構成
■解像度を変更する場合に役立つかもしれない情報
・グリッド間隔は短辺or長辺の1/10に設定するのがおすすめです
・横線はラスターレイヤーになっています。拡大縮小後にぼやけが気になる場合、レイヤーの透明ピクセルのロックを解除した後に上部メインメニューから「フィルター」→「シャープ」→「シャープ(強)」の順に選択すると解消できる可能性があります
■出力画像に縦線は出ません。ご了承ください。
■クロッキー用として投稿していますが、「正方形のスペースを番号を振って連結している用紙」というだけですので、何かほかの使い方もあるかと思います。
お役に立ちましたら幸いです。
*CLIP STUDIO ASSETSの運営ポリシーに従い、配布素材内フォントに「イワタアンチック体B」を使用しています。
*有償素材に変更する予定はありません。


Other materials by mae(前)


Popular “Layer template” materials


New materials


Badges
-
 MVP ◆This user has contributed greatly to the management of the community, by posting many great responses to the questions asked. Once every three months, MVPs are determined based on the points earned during that period and will be recognized accordingly.
 -
 New Valuable Player (NVP) ◆These are the next-best contributors to the community after MVPs. This is awarded to users who have not yet won an MVP award, based on the number of points they have earned.
 -
 Official Expert ◆Chosen out of all MVP awardees, who are already proof of excellence, this is a testimony of outstanding correspondence in the community. After careful screening, they are appointed by CELSYS and assume their position.Note: Formally called “Evangelists”
 -
 Official Moderator of CELSYS ◆Moderators are official CELSYS staff members who are fluent in Japanese as well as various other languages. Moderators are not experts on the software or illustration, so they are not able to directly answer your questions. However, moderators provide communication and language support to ensure that everyone can smoothly communicate with each other.
 -
 CELSYS official accountThe Official Administrator Account