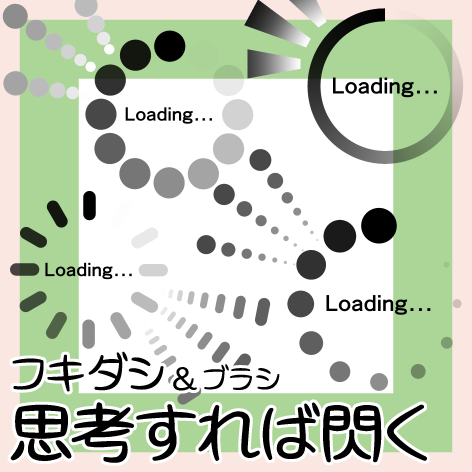
・Material data (original picture)
main color: Black, sub color: White
W x H: Within 55 x 25 mm, 600 dpi
・Balloon: 11 types
9 → stamp types
2 → ribbon types
・Brushes: 8 types
6 → stamp types
2 → ribbon types
・Bonus
1 layer template for sample
Total 20 points
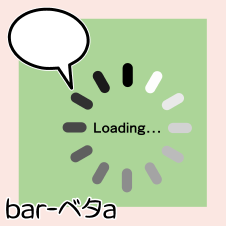
I wonder if I can use the "Loading..." that I see when operating digitally as a sign.
I made it with that in mind.
How about expressing a little worry or thought?
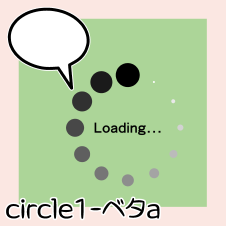
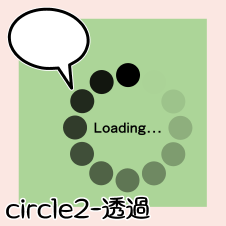
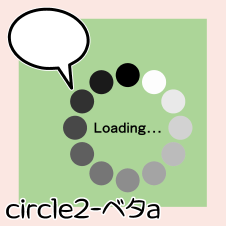
Balloon (stamp type) 9 points
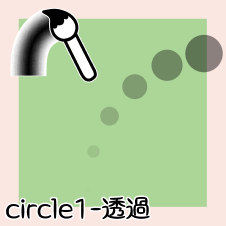
* Difference between [transmission], [solid A], and [solid B]
↓ "layer property→border effect→ edge (blue)" is added for explanation.
【Transparency】It is a gradient with transparency.
It is affected by the background (border color).
At the beginning of the gradient, there is a very light gray original picture.
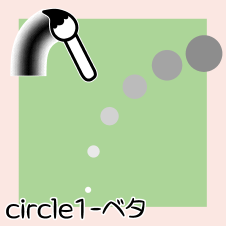
【Betta】It is a gradient due to the change in gray density.
It is not affected by the background.
【Betta A】The starting part of the gradient is a very light gray original picture.
It's too light and looks more white than gray...
【Betta B】The starting part of the gradient is a blank original picture.
It was made so that it can be used according to the situation such as background.
The joints are slightly tilted.
This is to adjust the gradient start position.
If you rotate the entire area, you can change the gradient start to your preferred position.
You can also change the gradient start position by moving the original image.
It didn't fit in the sample video, but 12 points are registered.
It is moved one by one from the end of the original drawing to the front.
Balloon (ribbon type) 2 points
Property
* Since balloons are image material, fixed tool property settings cannot be made.
Please check the settings that are not displayed on the tool property at hand with "sub tool detail".
The following sample image uses a ribbon type.
The stamp type has a similar effect.
1) Lines and bases
The default setting is "Create Line".
I think you can add a base if necessary.
2) Line color, ground color
"Line color" is main color, and "ground color" is sub color.
Left [Transparency] does not reflect the sub color because the original image is a single color.
The right [Betta] reflects the sub color and creates a colorful gradient.
Left [Transmissive] reflects the ground color from the center of the main line part.
The right [Betta] will have the same drawing color of the ground color and the gradient ribbon.
3)opacity of ground
Left: 100 Right:50
4) brush size
Left: 4 Right:2
* For the brush part that corresponds to the main line, please check the brush description.
5)anti-aliasing
The original drawing is made without anti-aliasing.
I think it is better to enable anti-aliasing when using.
6)change thickness while scaling
On: The main line width changes as the balloon expands and contracts.
If you scale with a → circle, the balance of the gradient will also be maintained.
Off: The main line width does not change when the balloon is scaled.
Even if you scale with a → circle, the gradient will be out of balance.
6 brushes (stamp type)
* There is no distinction between [Betta A] and [Betta B] for brushes.
*About the original drawing
All three types are original drawings with the upper row being [transparent] and the lower row being [solid].
12 original drawings of different concentrations are registered.
If you skip one, you can create a short gradation of 6 points in the original picture.
tool property
1) brush size
Set the thickness.
2) anti-aliasing
The original drawing is made without anti-aliasing.
I think it is better to enable anti-aliasing when drawing.
3) Thickness 4) Orientation 5) Spacing
By customize each number, the expression changes.
* The above drawing example is included as a bonus.
Please use it as a reference for reading numerical values.
6)repeat method
Left: 《Do not repeat》
The last black circle is in a row.
Right: 《Wrap up》
White circle→ gray circle→ black circle→ gray circle→ white circle... and so on.
2 brushes (ribbon type)
*About the original drawing
The top is [transparent] and the bottom is the original picture of [betta].
Three types of original drawings are registered for each (the same applies to balloons).
Pull out if necessary (see below
tool property
*Explanations are omitted for common areas.
3) Thickness
The original gradient is very long.
Compress if necessary.
*An explanatory example of the original drawing was drawn with "Thickness: 25".
6)repeat method
Left: 《Do not repeat》The third gradation original image is omitted.
Black is drawn longer.
Right: 《Wrapped》The second solid black original picture is removed.
If you make the brush part thinner or compressed without changing the original image, it will look like this.
Both the left and right sides are "do not repeat".
Please try to make various adjustments aiming for the effect.
7)stabilization
Adjust it to your liking.
Since it is a ribbon type, if you bend it extremely, the drawing will collapse.
Drawing example
The characters in the balloon are text data.
You can change the words, typeface, and size of your choice.
It would be interesting if I could handle the spark after thinking with the same design as the balloon.
I also added a brush.
It can also be used as a line with a gradient effect.
* Drawing examples are included as an extra.
Since digital operations are so ubiquitous, the "Loading..." that indicates the passage of time is
I think it can be used as a familiar expression.
I hope you find it useful ☆
・素材データ(原画)
メインカラー:黒、サブカラー:白
幅 x 高さ:55 x 25 mm 以内、600 dpi
・フキダシ:11 種類
→スタンプタイプ 9 点
→リボンタイプ 2 点
・ブラシ:8 種類
→スタンプタイプ 6 点
→リボンタイプ 2 点
・おまけ
サンプル用 レイヤーテンプレート 1 点
合計 20 点
デジタル操作していると見かける「Loading…」を漫符として使えないかな
と思って作りました。
ちょっと悩んだり考え込む様子の表現にいかがでしょうか。
フキダシ(スタンプタイプ)9 点
*【透過】【ベタa】【ベタb】の違い
↓説明用に《レイヤープロパティ→境界効果→フチ(青)》を付けています。
【透過】透明度でグラデーションになっています。
背景(フチ色)の影響を受けます。
グラデーション開始部分にはごく薄いグレーの原画があります。
【ベタ】グレーの濃度変化でグラデーションになっています。
背景に影響されません。
【ベタa】グラデーション開始部分はごく薄いグレーの原画です。
薄すぎてグレーというより白に見えていますが…。
【ベタb】グラデーション開始部分は空白の原画になっています。
背景等の状況に応じて使い分けできるように作りました。
接合部を少し傾けています。
グラデーション開始位置を調整するためです。
全体を回転すればグラデーション開始をお好みの位置に変更できます。
原画を移動してもグラデーション開始位置を変更できます。
サンプル動画に収まりきらなかったのですが、12点登録してある
原画の最後から最前へ順番にひとつずつ移動しています。
フキダシ(リボンタイプ)2 点
プロパティ
*フキダシは画像素材なので固定のツールプロパティ設定ができません。
手元のツールプロパティに表示が無い設定は《サブツール詳細》で確認してください。
以下のサンプル画はリボンタイプを使用していますが、
スタンプタイプも同様の効果になります。
1)線・下地
初期設定では《線を作成》になっています。
必要に応じて下地をつけてもいいと思います。
2)線の色、下地の色
《線の色》はメインカラー、《下地の色》はサブカラーになります。
左【透過】は原画が単色なのでサブカラーは反映されません。
右【ベタ】はサブカラーを反映し、カラフルなグラデーションができます。
左【透過】は主線部分の中心から下地の色が反映されます。
右【ベタ】は下地の色とグラデーションリボンの描画色が同じになります。
3)下地の不透明度
左:100 右:50
4)ブラシサイズ
左:4 右:2
*主線にあたるブラシ部分については、ブラシの説明をご確認ください。
5)アンチエイリアス
原画はアンチエイリアス無しで作っています。
使用時はアンチエイリアスを有効にしたほうがキレイだと思います。
6)拡縮時に太さを変更
オン:フキダシの拡大縮小にあわせて主線の太さも変化する。
→正円で拡縮すればグラデーションのバランスも保たれます。
オフ:フキダシを拡大縮小しても主線の太さは変化しない。
→正円で拡縮してもグラデーションのバランスが崩れます。
ブラシ(スタンプタイプ)6 点
*ブラシには【ベタa】【ベタb】の区別はありません。
*原画について
3種とも上列が【透過】下列が【ベタ】の原画です。
濃度の異なる原画が12点登録されています。
ひとつ飛ばしで抜けば原画 6 点の短いグラデーションにできます。
ツールプロパティ
1)ブラシサイズ
太さを設定します。
2)アンチエイリアス
原画はアンチエイリアス無しで作っています。
描画時はアンチエイリアスを有効にしたほうがキレイだと思います。
3)厚さ 4)向き 5)間隔
各数値をカスタマイズすることで表現に変化が生まれます。
*上の作画例はおまけに付いています。
数値を読み取る参考としてご利用ください。
6)繰り返し方法
左:《繰り返さない》
最後の黒丸が連なります。
右:《折り返し》
白丸→グレー丸→黒丸→グレー丸→白丸… と並びます。
ブラシ(リボンタイプ)2 点
*原画について
上が【透過】下が【ベタ】の原画です。
それぞれ3種類の原画を登録しています(フキダシも同様)
必要に応じて抜いてください(後述
ツールプロパティ
*共通箇所は説明を省略します。
3)厚さ
グラデーションの原画はとても長くなっています。
必要に応じて圧縮してください。
*原画についての説明例は《厚さ:25》で描きました。
6)繰り返し方法
左:《繰り返さない》3つめのグラデーション原画を抜いた状態です。
黒が長く描かれます。
右:《折り返し》2つめの黒ベタ原画を抜いた状態です。
原画を変更せずブラシ部分を細くしたり圧縮すると以下のようになります。
左右どちらも《繰り返さない》になっています。
効果を狙って、いろいろ調整してみてください。
7)手ブレ補正
お好みで調整してください。
リボンタイプなので極端に曲げると描画が崩壊します。
作画例
フキダシ内の文字はテキストデータです。
お好みの言葉や書体、大きさが変更できます。
考えたあとの閃きをフキダシと同じデザインで処理できたら面白いかな
と思ってブラシも添えました。
グラデーション効果のある線としても利用できます。
*作画例はおまけに付いています。
デジタル操作は広く普及しているので、時間経過を示す「Loading…」は
見慣れた表現として使えると思います。
お役に立てば幸いです☆


 MVP ◆This user has contributed greatly to the management of the community, by posting many great responses to the questions asked. Once every three months, MVPs are determined based on the points earned during that period and will be recognized accordingly.
 New Valuable Player (NVP) ◆These are the next-best contributors to the community after MVPs. This is awarded to users who have not yet won an MVP award, based on the number of points they have earned.
 Official Expert ◆Chosen out of all MVP awardees, who are already proof of excellence, this is a testimony of outstanding correspondence in the community. After careful screening, they are appointed by CELSYS and assume their position.Note: Formally called “Evangelists”
 Official Moderator of CELSYS ◆Moderators are official CELSYS staff members who are fluent in Japanese as well as various other languages. Moderators are not experts on the software or illustration, so they are not able to directly answer your questions. However, moderators provide communication and language support to ensure that everyone can smoothly communicate with each other.
 CELSYS official accountThe Official Administrator Account