

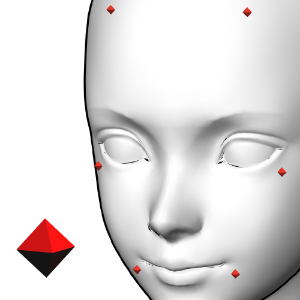
It is a landmark 3D material that does not make a mistake in drawing facial features when flipped left and right.
In the initial arrangement, there are 6 pieces that are supposed to be markers of hair parting and the position of moles.
Please use it in combination with Head 3D.
The first position matches the CLIP STUDIO head 3D model "Base".
Please use it when drawing people.
左右反転した時に顔の特徴を描き間違えないための目印3D素材です。
初期の配置では髪の分け目、ほくろの位置の目印を想定したものが6個配置されています。
頭部3Dと併用してご使用ください。
最初の位置はクリスタの頭部3Dモデル「ベース」と合うようになっています。
人物の作画時にどうぞ。


Facial Feature Markers 3D 顔の特徴目印3D


Other materials by ldl


Popular “Material catalog” materials


New materials


-
 MVP ◆This user has contributed greatly to the management of the community, by posting many great responses to the questions asked. Once every three months, MVPs are determined based on the points earned during that period and will be recognized accordingly.
 -
 New Valuable Player (NVP) ◆These are the next-best contributors to the community after MVPs. This is awarded to users who have not yet won an MVP award, based on the number of points they have earned.
 -
 Official Expert ◆Chosen out of all MVP awardees, who are already proof of excellence, this is a testimony of outstanding correspondence in the community. After careful screening, they are appointed by CELSYS and assume their position.Note: Formally called “Evangelists”
 -
 Official Moderator of CELSYS ◆Moderators are official CELSYS staff members who are fluent in Japanese as well as various other languages. Moderators are not experts on the software or illustration, so they are not able to directly answer your questions. However, moderators provide communication and language support to ensure that everyone can smoothly communicate with each other.
 -
 CELSYS official accountThe Official Administrator Account