

It is a pen to make the frame border an analog wind.
You can use it as a mere G-pen tool.
※ Duotone, please use it in the manuscript of the resolution 600DPI.
The gray layer does not have the desired effect.
コマ枠をアナログ風にするためのペンです。
単なるGペンツールとしても使用していただけます。
※モノクロ2階調、解像度600dpiの原稿にお使いください。
グレーレイヤーで使用すると意図している効果が出ません。

A brief description >
① This tool sub tool
② tool to select "sub tool detail" brush shape: "register to preset"
Create basic frame border in ③ manuscript
④ Select this pen tool from "brush shape" in "tool property"
⑤ cut frame border cut with a cut border tool.
Now it will be a natural border-ish analogue!
Especially when I print black and white, it really shines.
※ If you are not sure how to do
frame border Technique 2 by ClipStudioOfficial character search
Please refer to it and think it is easy to understand!
The writing taste as a mere G-pen tool

※ The following is a supplementary description for those who stick.
If you want to fine-tune the degree of roundness and rough feeling of the corners,
When you select frame border in the object tool
" Brush Tip": "Hardness" is changed by "Sub tool detail".
The lower the number of hardness. It is thick and round. The rough condition also changes.
However, it suddenly becomes straight depending on the number,
I think that it is good to enlarge and to check the number while checking it.
The thickness difference between 0.7 mm settings >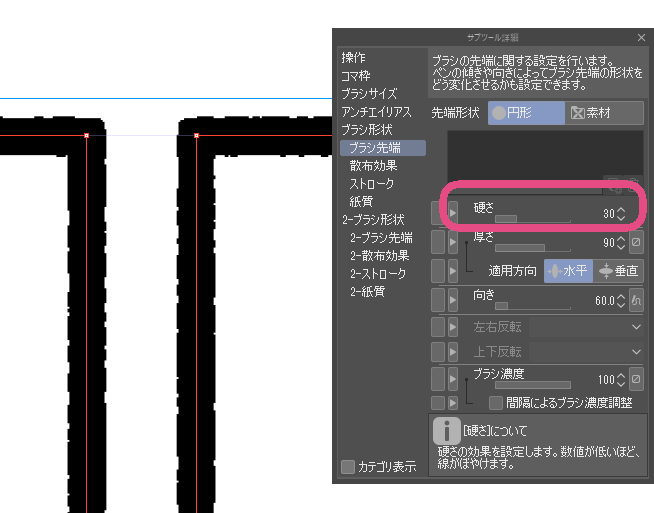

↑ Hardness: 30 thick. The corners are rounded. 0.7 mm, actually 0.9 mm.

↑ Hardness: 50 a little thick. 0.7 mm, actually 0.8 mm.

Hardness: 80 mm is the same as the setting of 0.7 millimeters. The corners tend to be clear.
<簡単な説明>
①このツールをサブツールに登録
②ツールを選んで「サブツール詳細」の「ブラシ形状」:「プリセットに登録」
③原稿に基本のコマ枠を作成
④「ツールプロパティ」の「ブラシ形状」からこのペンツールを選ぶ
⑤コマ枠カット、枠線カットツールで切っていく。
これで、アナログっぽい自然な枠線になります!
特にモノクロ印刷した時に本領を発揮します。
※やり方がよく分からない方は、
コマ枠のテクニック2 by ClipStudioOfficial を文字検索して
ご参照いただくと分かりやすいと思います!
<単なるGペンツールとしての書き味>
※以下、こだわる方向けの補足説明です。
角の丸み具合、ざらざら感などを微調整したい場合は、
コマ枠を「オブジェクトツール」で選択中に
「サブツール詳細」にて「ブラシ先端」:「硬さ」を変更します。
「硬さ」の数値が低いほど。太く丸みを帯びます。ざらざら具合も変化します。
しかし、数値によっては急にまっすぐになったりするので、
拡大表示して確認しながら数値をいじるとよいと思います。
<ブラシサイズ0.7mmの設定での太さの違い>
↑硬さ:30 太い。角に丸みが出る。0.7mm設定で実際0.9mmくらい。
↑硬さ:50 ちょっと太い。0.7mm設定で実際0.8mmくらい。
硬さ:80 太さは設定と同じ0.7mmくらい。角がはっきりしがち。


Other materials by たちばな豊可


Popular “Brush” materials


New materials


Badges
-
 MVP ◆This user has contributed greatly to the management of the community, by posting many great responses to the questions asked. Once every three months, MVPs are determined based on the points earned during that period and will be recognized accordingly.
 -
 New Valuable Player (NVP) ◆These are the next-best contributors to the community after MVPs. This is awarded to users who have not yet won an MVP award, based on the number of points they have earned.
 -
 Official Expert ◆Chosen out of all MVP awardees, who are already proof of excellence, this is a testimony of outstanding correspondence in the community. After careful screening, they are appointed by CELSYS and assume their position.Note: Formally called “Evangelists”
 -
 Official Moderator of CELSYS ◆Moderators are official CELSYS staff members who are fluent in Japanese as well as various other languages. Moderators are not experts on the software or illustration, so they are not able to directly answer your questions. However, moderators provide communication and language support to ensure that everyone can smoothly communicate with each other.
 -
 CELSYS official accountThe Official Administrator Account