I've been a manga assistant for a commercial magazine for a long time.
"Hand-painted 3D of the Reed" series is an LT conversion, the contour line, the touch line, the solid tone all
Output in the state of the finished product. However, it is output to a little thick for the width which can be adjusted for the touch line. I think this material is useful to suppress the insistence of the touch line such a big plump easily.
Use
①
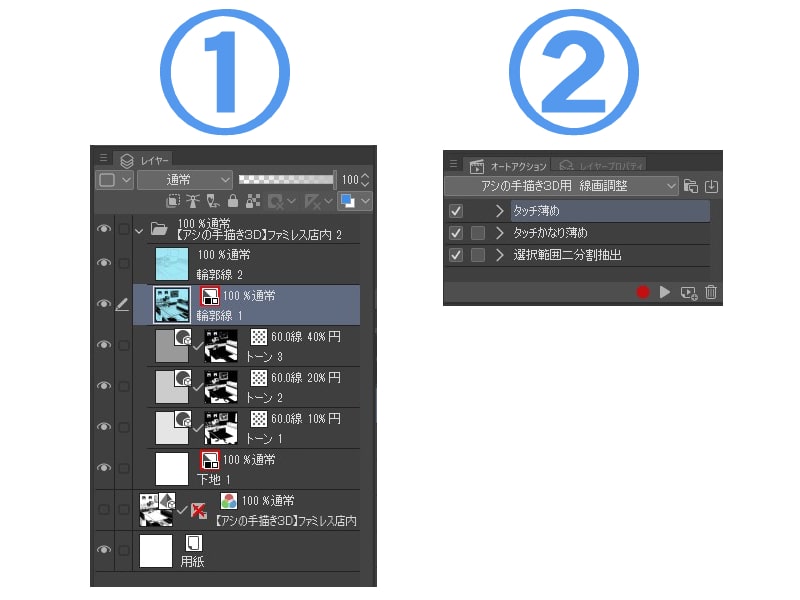
If you convert "hand-painted 3D of the reed" to LT, the following image creates a folder with layer structure like ①. Select Contour Line 1, which is the background touch line.
②
Then, this material auto action "touch line diluted" or "Touch line thinner"
It is complete if I apply it in preference.

[Reference image]
[Application hen]
The range of the touch lines is diluted and the touch lines are diluted to the entire layer of the touch line. In the previous reference image material "hand-painted 3D restaurant-in-store" in addition to the touch line of the wall and the desk, the solid touch of the sofa itself has been affected a little impression. "The solid touch of the sofa is good as the LT conversion!" Please try the auto action of this material "selection split split".
①
The first step is to select a tone layer that is related to the couch part from within the LT converted folder.
②
Auto action of this material "selection binary split extraction" is applied.
③
Two selection layer, such as a couch part and a wall or a desk, are created. If you use one of the selection layer to split the touch line layer and adjust the touch hodokose only to the desk and wall layers, the solid touch on the couch remains at the LT conversion. (As shown in the following image, selection split extraction does not mean that the only part of the sofa can be extracted, so it is necessary to clear the extra selection if necessary)
※ It is recommended to use "cut selecting object into another layer" which is the default auto action of CLIP STUDIO to split the layer of the selection part.
[Reference image]
[Selection extra elements of the extraction of binary split]
In addition to splitting the layers, you can easily garatsu the mood of the screen simply by dividing the selection of the screen into two parts (basically from horror).
If the auto action of this material is applied, a white line will appear on the touch area.
It is a phenomenon that occurs when the touch line etc. where the shadow of the tone are dark are thinned in the auto action. Because a white border effect is applied to the touch line layer on the auto action's composition, only the white border remains when the thin line disappears without the residue.
The solution is to move the layer of touch lines in the folder output by the LT transform to the bottom of the tone layer.
[About the hand-drawn 3D series of the Reed]
Quick and easy to handle the background of the commercial magazine quality 360 degrees angle "hand-painted 3D of reed" series is open separately, so please check from my materials list. Below is a reference image. We have not made any additions to the LT conversion.
※ This material "touch line adjustment for hand-drawn 3D of the Reed" is not included.
商業誌で長年漫画のアシスタントをしてきた私が自身の作画背景を3D化した
「アシの手描き3D」シリーズはLT変換一発で輪郭線・タッチ線・ベタ・トーン全てを
完成品の状態で出力します。ただ、タッチ線に関しては調整できる幅を持たせるために少し太めに出力されるようになっています。本素材はそんな太めのタッチ線の主張を簡単に抑えるのに役立つかと思います。
【使い方】
①
「アシの手描き3D」をLT変換すると下記画像①のようなレイヤー構成を持ったフォルダが作成されます。ここでは背景のタッチ線となる「輪郭線1」を選択します
②
続いて本素材であるオートアクション「タッチ線薄め」か「タッチ線かなり薄め」を
お好みで適用すれば完成です。

【参考画像】
【応用編】
「タッチ線薄め」と「タッチ線かなり薄め」の効果範囲はタッチ線のレイヤー全体に及びます。これまでの参考画像にある素材「アシの手描き3D ファミレス店内」では壁や机のタッチ線に加え、ソファのベタタッチ自体も影響を受けて少し印象が変わっています。「ソファのベタタッチ等はLT変換時のままがいい!」という方は本素材のオートアクション「選択範囲二分割抽出」をお試しください。
①
まずはLT変換されたフォルダ内からソファ部分に関係するトーンレイヤーを一つ選択状態にします。
②
本素材のオートアクション「選択範囲二分割抽出」を適用
③
ソファ部分と壁や机等が分かれた選択範囲レイヤーが2つ作成されます。あとはこの選択範囲レイヤーの片方を使ってタッチ線のレイヤーを分割し机と壁のレイヤーにのみタッチ線の調整を施せばソファのベタタッチはLT変換時のままとなります。(下記画像のように選択範囲分割抽出は完璧にソファ部分だけを抽出できているわけではありませんので、必要に応じて余分に選択してしまった部分を消去する必要があります)
※選択範囲部分のレイヤーを分割するにはクリスタのデフォルトのオートアクションである「選択対象を別レイヤーに切り出し」を使うのがおすすめです。
【参考画像】
【選択範囲二分割抽出のおまけ要素】
レイヤーを分割するだけではなく、単純に画面の選択範囲を2つに分けてトーンやベタを塗るだけで画面の雰囲気を簡単にガラッと変えられます(基本的にホラーより)
【本素材のオートアクションを適用するとタッチ部分に白い線が出てしまう場合】
トーンの影が濃い部分のタッチ線等をオートアクションで薄くした場合に起こりやすい現象です。オートアクションの構成上タッチ線レイヤーに白色の境界線効果をかけているので、薄くした線が残らずに消えてしまった場合白色の境界線だけが残る事が原因です。
解決策としてはLT変換によって出力されたフォルダ内のタッチ線のレイヤーをトーンレイヤーより下に移動する事で解消されます。
【アシの手描き3Dシリーズについて】
お手軽に素早く商業誌クオリティの背景を360度アングルで扱える「アシの手描き3D」シリーズは別途公開中ですのでよろしければ私の素材一覧からご確認ください。下記は参考画像になります。LT変換後の加筆は一切行っていません。
※本素材である「アシの手描き3D用 タッチ線調整」には付属していません。


