

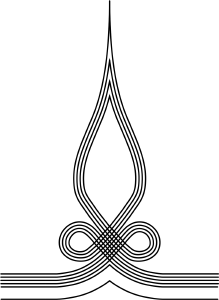
[2021/12/03] the "laces (Flat)" setting was added to 3D sleeve. TL conversion result is a little refreshing.
I would like to give my superiors a tailor-made rib suit.
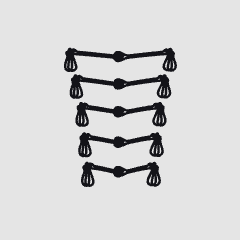
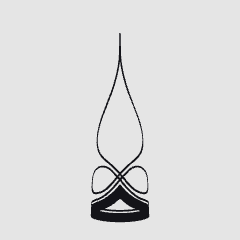
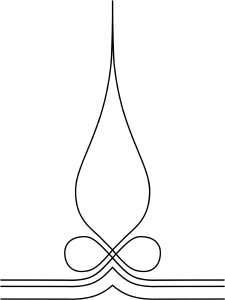
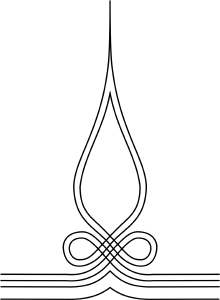
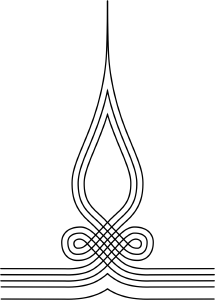
But it's an ornament, a button, a name that I don't even know. The design seems to be different in each class of the sleeve and is a twirl string.
My head is tangled just looking, I do not feel like a draw!
...... It is a 3D model that I made in order to unravel the sorrow of first drawing first.
Hasty believing to hastily.
Do not think it difficult, dueling, please put your ribs in your superiors.
※ It is not the one made by referring to the actual material. Please think about the accuracy of the atmosphere.
※ When I use it at an angle where I hide by the cloth, please correct it for good.
※ [3D sleeve], "Officers class" is included in a separate material collection. The "General class" is not yet released.
* The distribution price may be changed without prior notice. Please understand.
【2021/12/03】3D袖章に「平紐(Flat)」設定を追加しました。TL変換結果が少しスッキリします。
上官殿に肋骨服を仕立てて差し上げたい。
だけど、飾りだか、ボタンだか、名前すらよくわからないあの紐とか……! 袖のなんか階級ごとにデザインが違うらしいくるくるした紐とか……!
見ているだけで頭がこんがらがって、さっぱり描ける気がしない!
……そんなお絵かき一等卒の憂いを、スッキリ解きほぐすためにつくった3Dモデルです。
巧遅は拙速に如かず。
難しいことは考えず、疾くあなたの上官殿に肋骨を着付けて差し上げてください。
※実物資料を参照してつくったものではありません。雰囲気程度の精度とお考えください。
※布地で隠れるところが見えちゃう角度で使う際は、うまいこと修正してください。
※ 【3D袖章】について、「佐官階級」は別素材集に収録されています。「将官階級」は未リリースです。
※頒布価格は事前の告知なしに変更になることがあります。ご了承ください。


1 Load 3D Model2 Select the left arm (L)/right arm (R) from the preset in the layout.Set the Base_on .If you want to reproduce the detail "bellows Braid (Jabara)",If it is not necessary, choose "laces".3 Match both ends of the Base parts with the cuffs and elbows .4 Adjust the position while switching between "Base_off" and "Base_on" in the preset of "layout".5 "TL Transform Layer"6 Clear lines and fills that are not needed7 The part that was protruding from the "Base" part is completed by the "mesh transformation" along the upper arm.
Sleeve is different in the way of overlapping the string with the right arm and the left arm .Bellows Braid is used for the sleeve of the rib suit.Therefore, the initial setting of "3D sleeve" also "bellows Braid (Emblem_Jabara) " is displayed.Unfortunately, this detail may not be able to extract a clean line drawing by interfering with the TL conversion.There is no irregularity [Laces (Emblem_Flat)] Parts I was separately prepared.If you want to reduce the amount of information, if you want to clean the TL conversion, please use this.-When using a small picture, I think that it is better and quicker to use vector data.
160cm The average height of the Japanese in the Meiji era was produced with the assumption that ("Base" part length is 24cm).
I think that the length of the cuffs-elbow is about 3cm longer for the person of height 180. Please find the best ratio of the tailor that sticks to you.-Armband model to match the paper pattern of the arm, it has been produced separately in the body (in) and outside (out) ("Sub tool detail" can be changed to show/hide).
"Out" parts only show "TL conversion" to put, so I think you will save the process of correction, please use appropriate depending on the situation.


1.3Dモデルを読み込みます2.「レイアウト」のプリセットから「左腕(L)/右腕(R)」を選択。「Base_on」でセットしてください。ディテールを再現したい場合は「蛇腹組紐(Jabara)」、不要の場合は「平紐(Flat)」を選びましょう。3.「Base」パーツの両端を袖口と肘に合わせてください。4.「レイアウト」のプリセットで「Base_off」「Base_on」を切り替えながら位置を調節する。5.「レイヤーをTL変換」6.不要な線や塗りを消去7.「Base]パーツからはみ出ていた部分を、「メッシュ変形」で上腕に沿わせて完成です。
・袖章は右腕と左腕で紐の重ね合わせ方が異なります。・肋骨服の袖章には蛇腹組紐が使用されています。そのため「3D袖章」の初期設定も「蛇腹組紐(Emblem_Jabara)」が表示されるようになっています。残念なことにTL変換時にこのディテールが邪魔をして、きれいな線画が抽出できないことがあります。そこで凹凸のない「平紐(Emblem_Flat)」パーツを別途用意しました。情報量を減らしたい、TL変換を綺麗に行いたい場合は、こちらをご利用ください。・小さな絵に使う際はベクターデータを使用する方が、きれいに素早く仕上がると思います。
・明治期日本人の平均身長を160cm前後と想定して制作しました(「Base」パーツの長さは24cm)。
身長180cmの人物の場合、袖口~肘の長さは+3cmくらい長くなると思います。こだわる仕立て屋さんは自分だけのベストな比率を見つけてください。・腕章モデルは腕の型紙に合わせて、身体側(In)と外側(Out)で分けて制作してあります(「サブツール詳細」から表示/非表示変更できます)。
「Out」パーツのみ表示して「TL変換」をかける方が、修正工程を省けると思いますので、状況に応じて使い分けてください。
[3D] Front Parts 【3D】フロントパーツ
3D armband 【3D】袖章


Vector: Sleeve 【ベクター】袖章


Update history
2021/10/24: ver2.1.0 "3D sleeve", in addition to conventional bellows braid (Jabara), Laces (Flat) was added.
2021/10/24: ver2.0.0 3D data fixed the "sash _ Rib clothes" and added a new sleeve material set.
2021/10/18: ver1.0.0 3D data "sash _ Rib Clothes" released
2021/10/24:ver2.1.0 「3D袖章」に、従来の蛇腹組紐(Jabara)に加え、平紐(Flat)を追加しました。
2021/10/24:ver2.0.0 3Dデータ「飾り紐_肋骨服」を修正、新たに袖章を加え素材セットとしました。
2021/10/18:ver1.0.0 3Dデータ「飾り紐_肋骨服」リリース
Old version


Other materials by おおあらせいと


Popular “Material catalog” materials


New materials


-
 MVP ◆This user has contributed greatly to the management of the community, by posting many great responses to the questions asked. Once every three months, MVPs are determined based on the points earned during that period and will be recognized accordingly.
 -
 New Valuable Player (NVP) ◆These are the next-best contributors to the community after MVPs. This is awarded to users who have not yet won an MVP award, based on the number of points they have earned.
 -
 Official Expert ◆Chosen out of all MVP awardees, who are already proof of excellence, this is a testimony of outstanding correspondence in the community. After careful screening, they are appointed by CELSYS and assume their position.Note: Formally called “Evangelists”
 -
 Official Moderator of CELSYS ◆Moderators are official CELSYS staff members who are fluent in Japanese as well as various other languages. Moderators are not experts on the software or illustration, so they are not able to directly answer your questions. However, moderators provide communication and language support to ensure that everyone can smoothly communicate with each other.
 -
 CELSYS official accountThe Official Administrator Account