1... Prepare the gray circle. This is the layer of the month.
The "Sea of the Moon" layer is prepared on the "moon" layer.
The Sea of the Moon is the part of the moon that is shaded.
Using a brush with a bleeding such as "running color edge watercolor" which is attached by the default of the CLIP STUDIO, the color paints the sea of the moon by Gray.
This time I used the "running color edge watercolor" which is attached by default in CLIP STUDIO for the making, but I think that it is good to use other brushes if it is a blurred effect brush.
On the "Sea of the Moon" layer, place a further fill layer (this time yellow
)
Clipping fill layer to overlay.
Form a folder called "Crater" on the yellow layer,
Clipping per folder
Image material "crater", "Crater (Tycho)", "Crater (no Light)" is placed freely, the image of the sphere to free transform the appropriate material.
"Light article" refers to the plot of light.
We adjust the direction and the thickness of the light by using free transform and the eraser.
As an image, it is like a collage of materials.
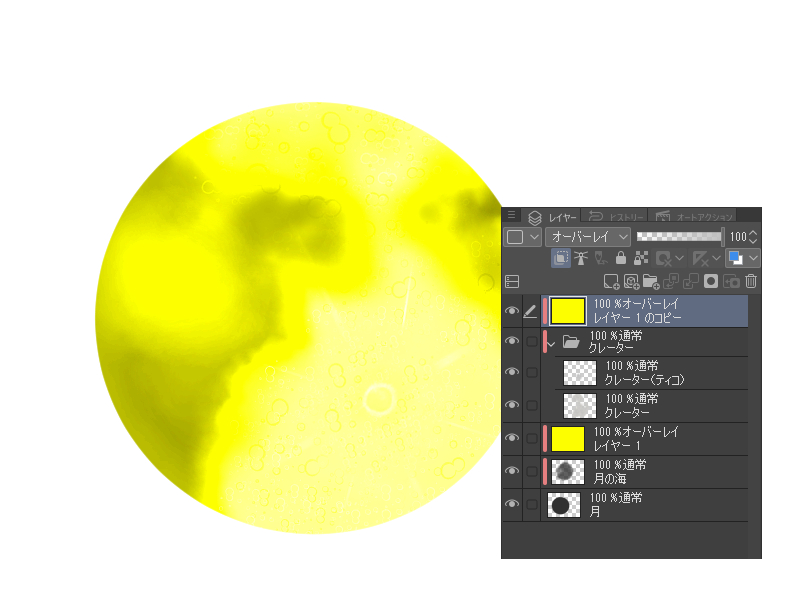
Duplicate layer the overlay on top of the "Sea of Moon" layer and put it on the crater folder.
The "crater" is overlay the folder, and it is drawn in "Sea of the Moon" layer with "running color edge watercolor" brush.
If "crater" is too bright, the "Sea of the Moon" layer is dark gray and lighter gray if it is dark.
To adjust the brightness of the crater in the "Sea of the Moon" layer, adjust the brightness of the entire month by the layer above the "crater" folder.
In the "Sea of the Moon" layer, if the color is not well adjusted, adjust the layer of overlay by pinching it.
I thought the yellow fill first was too bright, so I changed it using tonal correction.
If you hide the yellow layer, it looks like this.
The last background was a fill black layer underneath the moon layer.
If the border between the month and the black background is clear, applying border of watercolor to the month layer in the layer property makes it feel a little blurry.
1.灰色の円を用意します。このレイヤーを「月」とします。
「月」レイヤーの上に「月の海」レイヤーを用意します。
月の海とは、月の中で影になっている部分です。
クリスタののデフォルトでついている「にじみ縁水彩」など滲みのあるブラシを用いて、色はグレーで月の海を描いていきます。
今回はメイキング用にクリスタでデフォルトでついている「にじみ縁水彩」を使いましたが、にじんだ効果のあるブラシなら、ほかのブラシを使ってもいいと思います。
「月の海」レイヤーの上に更に塗りつぶしたレイヤーをのせます(今回は黄色に
しました)
塗りつぶしたレイヤーをクリッピングし、オーバーレイにします。
黄色いレイヤーの上に「クレーター」というフォルダーを形成し、
フォルダーごとクリッピングします。
画像素材「クレーター」、「クレーター(ティコ)」、「クレーター(光条なし)」を自由に載せ、球体をイメージして適宜素材を自由変形させます。
「光条」は光の筋のことをさしています。
光条の向きや濃さを自由変形や消しゴムなどを使って調節していきます。
イメージとしては素材をコラージュしていくようなかんじです。
「月の海」レイヤーの上に乗せたオーバーレイレイヤーを複製し、クレーターフォルダーの上にのせます。
「クレーター」をフォルダーをオーバーレイにし、「にじみ縁水彩」ブラシで「月の海」レイヤーに描きこんでいきます。
「クレーター」が明るすぎる場合は「月の海」レイヤーに濃い灰色を、暗い場合は明るめの灰色をのせていきます。
クレーターの明るさは「月の海」レイヤーで調節、月全体の明るさを調節する場合は「クレーター」フォルダーの上にあるレイヤーで調節します。
「月の海」レイヤーでも色がうまく調節できない場合はその上にオーバーレイレイヤーを挟みながら調節します。
あと最初に塗りつぶした黄色が明るすぎると思ったので、色調補正を使って変更しました。
黄色のレイヤーを非表示にするとこんなかんじになります。
最後に背景として「月」レイヤーの下に黒く塗りつぶしたレイヤーをおきました。
月と黒い背景の境界がはっきりしている場合は、レイヤープロパティで「月」レイヤーに水彩境界を適用するとちょっとぼやけた感じになります。


