
[Bashamichi] Floor and wall trial free edition ([馬車道」床と壁お試し無料版) [馬車道」床と壁お試し無料版
Content ID:1757928
-
80,852

A material that pastes the floor, ground, and texture of the wall into a plate polygon, you can easily draw the floor and wall of the Perth with 3D operation and LT conversion.
Unlike the case of transforming the image material, "blur pattern is so distant" effect can be semi-automatic.
We re-create what we had previously published for ComicStudio for CLIP STUDIO and increased variations and types.
This material is one of them, and will be published free of charge for trial use.
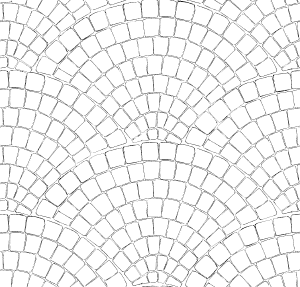
It is the cobbled stone which seems to be in an old town in Europe. I did not know the name of "Bashamichi" but I was told that it was "stick with the narrow stone scales".
The main is the 3D material, but the pasted texture is also attached as a seamless image material.
Please use appropriately depending on the situation.
板ポリゴンに床や地面、壁の模様になるテクスチャを貼り付けた素材です、3D操作とLT変換で簡単にパースのついた床面や壁面の描画ができます。
画像素材を変形させた場合と違い、「遠景になるほど模様がボケる」効果も半自動でできます。
以前コミスタ用に公開していたものをクリスタ用に作り直し、バリエーションや種類も増やしました。
この素材はその中の一種類で、お試しで使っていただけるように無償公開します。
ヨーロッパの古い町並みにありそうな石畳です。名前がわからず「馬車道」とつけましたが「石畳のうろこ貼り」だと教えていただきました。
メインは3D素材になりますが、貼り付けたテクスチャもシームレス画像素材として添付しています。
状況によって使い分けてください。
There are two types of materials drawn with a narrow line and a thick line.


Use

Paste 3D material to the canvas.
The pattern is easier to see if you set the tool property display settings for editing to normal.
There are several variations of the angle and material.


You can double-value the pattern by turning on "extract line" in the layer property.
You can also move 3D in this display state.

You can also set the "line width" and "threshold of edge" in the window that comes out by pressing "run lt conversion of layer".
When you perform an LT transformation, a rendered image layer is created and the 3D layer is turned off.

The top layer in the folder that was created is the top "Contour 1," which renders the polygon shape (black edges of the pattern), or removes the display.
The "groundwork" layer at the bottom will be the one that the pattern is drawn in white in case of this material, and if this is not needed, I cut or delete the display, but there is not much trouble as it is.
The pattern is drawn in the middle of the "Contour 2" layer.
This layer has a red border thumbnail if the canvas basic expression color is monochrome.
If there is no red frame, use "layer property" to "monochrome." Keep the red border visible.
You can change the drawing state of the pattern by moving the alpha threshold slider in the layer property.

If you increase the number of "alpha threshold", it disappears from the distant view.

If you apply the color expression during preview, you will not be able to change the drawing state after the layer's binarization is finalized.
Applying the expression color during preview does not have to be a problem as a binary document without having to run to the end.
How to use without LT conversion
The accuracy of the line extraction is slightly sweeter, but the pattern can be binarization without the LT conversion.
Tool property "display settings for editing" in the normal state, layer property "display decrease color: color: Monochrome" is OK if you turn on.
You can also change the drawing state of a line with the "alpha threshold" slider, similar to the LT converted layer.
However, please note that it may seem to change the display state a little by the scale of the canvas.

You can also move it as 3D as it is in this display state.
You can either rasterize this 3D layer or perform an "LT transform" to determine the rendering state of the binary, but it is not a problem as a binary document even if you put it as a 3D layer of the display state until the end.
However, if you do the LT conversion from this state, the properties of the "Contour 2" layer will not be able to adjust the drawing state any more, so be careful.


細めの線と太めの線で描かれた二種類のマテリアルが設定されています。
使い方
キャンバスに3D素材を貼り付けます。
模様は、ツールプロパティの「編集表示設定」を「通常」に設定すると見やすくなります。
「アングル」「マテリアル」にいくつかバリエーションが設定されています。
レイヤープロパティで「ライン抽出」をオンにすると、模様を二値化できます。
この表示状態でも、3Dは動かすことができます。
「ライン幅」や「エッジ閾値」などは「レイヤーのLT変換を実行」を押して出てくるウィンドウでも設定できます。
LT変換を実行すると、レンダリングされた画像レイヤーが作成され、3Dレイヤーの表示はオフになります。
作成されたフォルダーの中のレイヤーのうち、一番上の「輪郭線1」のレイヤーはポリゴンの形状をレンダリングしたものですので(模様のフチの黒枠)表示を切るか削除します。
一番下の「下地」レイヤーは、この素材の場合、模様が白で描画されているものになりますので、これも不要でしたら表示を切るか削除しますが、そのままでもあまり支障はありません。
模様は真ん中の「輪郭線2」レイヤーに描画されています。
このレイヤーは、キャンバス基本表現色が「モノクロ」の場合はサムネイルに赤い枠がついています。
赤枠がついていない場合は「レイヤープロパティ」で「表現色」を「モノクロ」にします。赤枠は表示されたままにします。
レイヤープロパティで「アルファの閾値」のスライダーを動かすと、模様の描画状態を変更できます。
「アルファの閾値」の数値を上げていくと、遠景からボケて消えていきます。
「プレビュー中の表現色を適用」を実行すると、レイヤーの二値化が確定して、以降は描画状態は変更できなくなります。
「プレビュー中の表現色を適用」は最後まで実行しなくても二値化原稿として問題はありません。
LT変換しないまま使う方法
線の抽出精度が多少甘くなりますが、LT変換をしなくても模様の二値化はできます。
ツールプロパティの「編集表示設定」を「通常」の状態で、レイヤープロパティの「減色表示:表現色:モノクロ」をオンにすればOKです。
LT変換後のレイヤーと同様に「アルファの閾値」のスライダーで線の描画状態を変更することもできます。
ただ、キャンバスの表示倍率によってちょっと表示状態が変わって見える場合がありますのでご注意ください。
この表示状態のまま3Dとして動かすこともできます。
この3Dレイヤーをラスタライズしたり「LT変換」を実行して、二値化の描画状態を確定することもできますが、最後までこの表示状態の3Dレイヤーとして置いておいても二値化原稿として問題はありません。
ただしこの状態からLT変換をした場合は「輪郭線2」レイヤーのプロパティではもう描画状態の調整はできませんので、その点もご注意ください。
3D Material 3D素材

Seamless image material シームレス画像素材


Other materials by 摩耶薫子


Popular “Material catalog” materials


New materials


-
 MVP ◆This user has contributed greatly to the management of the community, by posting many great responses to the questions asked. Once every three months, MVPs are determined based on the points earned during that period and will be recognized accordingly.
 -
 New Valuable Player (NVP) ◆These are the next-best contributors to the community after MVPs. This is awarded to users who have not yet won an MVP award, based on the number of points they have earned.
 -
 Official Expert ◆Chosen out of all MVP awardees, who are already proof of excellence, this is a testimony of outstanding correspondence in the community. After careful screening, they are appointed by CELSYS and assume their position.Note: Formally called “Evangelists”
 -
 Official Moderator of CELSYS ◆Moderators are official CELSYS staff members who are fluent in Japanese as well as various other languages. Moderators are not experts on the software or illustration, so they are not able to directly answer your questions. However, moderators provide communication and language support to ensure that everyone can smoothly communicate with each other.
 -
 CELSYS official accountThe Official Administrator Account