

無憂,基本自動操作:灰度開關。非常適合您的價值檢查需求! Hassle-Free, Basic Auto-action: Greyscale Switch. Perfect for your Value checking needs!

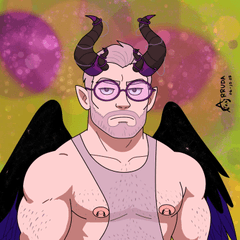
想像一下,這個插圖還沒有平坦,這意味著所有的圖層仍然存在。

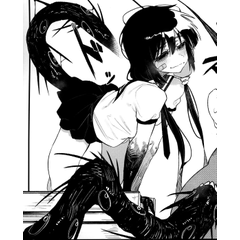
灰度開關不會平整您的所有層,它不會改變您的任何層和效果。 它只會創建一個校正層來顯示灰度版本。
- 轉到功能表選項卡>層>新的校正層>色調/飽和/亮度
- 向下滑動飽和級別至"-100"
- 按一下確定
你會注意到,色調和發光度沒有改變(所有保持0),這意味著這個 灰度開關是忠於你的彩色藝術。
- 轉到功能表選項卡> 層>新層>填充
- 選擇最黑的黑色或十六角形#0000000(使用純黑色是最好的顏色來選擇創建灰度預覽)
- 將混合模式設置為色調或顏色
- 始終將此填充層保留在您所有圖層的頂部
- 沃伊拉!
- [面膜層:關閉]: 校正層沒有面膜層。所以,當你使用這個自動行動, 灰度開關將顯示一切灰色!
- [面膜層:打開]:保留在進行校正層時創建的面膜層。這樣你就可以編輯出藝術的哪一部分看起來是灰色的。


重要
- 兩組灰度開關將自動將校正層 (創建灰度預覽的東西)放在 所有圖層的頂部。 我提到這一點的情況下,你不需要你的其他層是灰度。
- 您可以在灰度開關打開時匯出/保存作為您的作品。如果你需要它。只需匯出(到您喜歡的圖像格式)或保存為。
- 灰度開關集最初是英文的。 因此,要更改灰度切換層的名稱,請在下面的步驟。。。
- 轉到自動操作視窗
- 打開灰度開關(並關閉"關閉"按鈕模式,如果你有它"打開")
- click the arrow pointing to the set name, and dinffind the "Change Layer Name" command

- 按一下方形框,就這樣!


現在,每次啟動/播放自動功能集時,灰度開關都會要求您重命名它。但由於自動重命名是如此麻煩,我做了兩個動作集的校正層有層調色板顏色(十六色#595959),這樣如果你懶得重命名校正層,那麼你可以很容易地識別它與層的顏色(和層順序:總是在上面)!
- (如果這將永遠發生在你身上)如果您選擇已經在所有其他圖層頂部的一層,然後啟動灰度交換器,然後會出現 一個錯誤視窗 ,要求您該層不能放在頂部: 只需按一下"確定"即可繼續。這意味著您已經選擇了所有圖層的最高順序,並且自動操作只是冗余。
保證
您可以在您的.clip檔或任何平面圖像(PNG,JPG,TIFF等)上使用灰度開關。
此灰度預覽最適合用於檢查您作品上的值。隨時使用它!
結論
感謝您閱讀這一切,並下載灰度開關!我希望這對那些需要幫助的人是有説明的。如果您使用灰度交換器時有任何錯誤,請在Twitter上與我聯繫(參見我的個人資料)。
我非常感激那些真正閱讀我上傳資產所有方向的人。因為我寫了很多, 我喜歡分享我從我的經驗中學到的剪輯工作室油漆。
好吧,直到下次大家!( o < )Vm
Imagine this illustration isn't flat yet, meaning all the layers are still there.
Greyscale Switch will NOT flatten all your layers, it will NOT change any of your layers and effects. It will only create a correction layer to show the greyscale version.
- go to menu tab > LAYER > New Correction Layer > Hue/Saturation/Luminosity
- slide down the Saturation level to "-100"
- click ok
You'll notice that the Hue and Luminosity aren't changed (all remain 0), which means this Greyscale Switch is loyal to your coloured art.
- go to menu tab> LAYER > New Layer > Fill
- pick the blackest of the black or hex#000000 (using pure black is the best colour to pick to create a greyscale preview)
- set the blending mode to either Hue or Color
- keep this fill layer on the top of all your layers always
- voíla!
- [ MASK LAYER: OFF ] : the correction layer does not have the mask layer. so that when you use this autoaction, the Greyscale Switch will show everything grey!
- [ MASK LAYER: ON ] : the mask layer created when making a correction layer is retained. So that you can edit out the what part of the art will look grey.
IMPORTANT
- Both sets of the Greyscale Switch will automatically put the correction layer (the thing that's creating the greyscale preview) at the TOP of all your layers. I'm mentioning this in case you don't need your other layers to be greyscale.
- You can export/save as your artwork while the Greyscale Switch is on. If you ever need it. Just export as (into your prefered image format) or save as.
- The Greyscale Switch sets are originally in english. So to change the name of Greyscale Switch layer, do the steps below...
- go to the auto-action window
- open Greyscale Switch (and turn "off" the button mode if you have it "on")
- click the arrow pointing to the set name, and dinffind the "Change Layer Name" command
- click the square box, and that's it!
Now every time you activate/play the auto-ction set, the greyscale switch will ask you to rename it. But because that automatic renaming is such a hassle, I made the correction layer of both action sets to have layer palette colours (hex#595959) so that if you get lazy to rename the correction layer, then you can easily identify it with the layer colour (and the layer order: always on top)!
- (If this will ever happen to you) If you select a layer already on top of all the other layers, and then you activate Greyscale Switch, and then an error window will appear asking you that the layer can not be put to the top: just click OK to continue. This means that you have already selected the top order of all the layers, and that the auto-action is just being redundant.
GUARANTEE
You can use Greyscale Switch on your .clip files or any flat images (PNG, JPG, TIFF, etc.).
This greyscale preview is best used to check the values on your artwork. Use it whenever you feel like it!
CONCLUSION
Thanks for reading all that and for downloading Greyscale Switch! I hope this is helpful to those who need it. If there's any errors when you're using Greyscale Switch, contact me in twitter (see my profile).
I highly appreciate the people that actually read all the directions of my uploaded assets. Because I write a lot and I love sharing what I've learnt from my experiences using clip studio paint.
Alright, until next time folks! ( o w < )Vm


「carmina」的其他素材


「自動動作」的人氣素材


最新素材


-
 MVP ◆針對問題投稿了眾多適切的回答,對社群有顯著貢獻的用戶。每3個月一次,會依據期間內獲得的點數選出MVP用戶,並進行表揚。
 -
 NVP(New Valuable Player) ◆繼MVP後,對社群營運做出良好貢獻的用戶。將從不曾獲選為MVP的用戶中,依據獲得的點數進行評選、表揚。
 -
 官方推廣大使 ◆從被證明為優良回答用戶的MVP獲獎者中選出社群中最優異的回答者。並經審查後由本社委託就任。※舊名稱為「Evangelist」
 -
 CELSYS公認Moderator ◆Moderator為會使用日文及其他語言的CELSYS公認工作人員。由於並非軟體或創作的專業人士,Moderator無法直接為用戶解決疑問,但能在語言、交流方面提供支援,幫助用戶們順利地進行溝通。
 -
 CELSYS官方為與營運相關的官方帳號。