


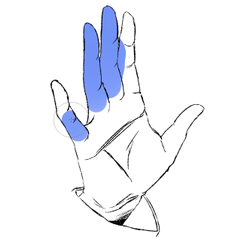

I want to paint softly when painting skin tones, but with an airbrush, it is difficult to paint the edges of the line art.
Range selection and color coding are troublesome.
It is good to leave it to the momentum, but it takes more time to erase the protruding parts.
Such a poor person is me.
Two bullets of brushes that save me.
I was using it custom for myself, but I received a request to use it, so I will publish it.
・・・・・・I didn't hide it, it's true.
肌色を塗る時に柔らかく塗りたいけど、エアブラシだと線画のふちが塗りづらい。
範囲選択も色分けも面倒だ。
勢いに任せて塗ったは良いが、はみ出した所を消すためにかえって時間がかかってしまう。
そんなかわいそうな人が私です。
私を救ってくれるブラシの2弾。
自分用でカスタムして使っていたけど、使いたいと要望頂いたので公開します。
・・・・・・あの隠してたりしたわけではないんです、本当です。

Please note that the area larger than the circle of the brush shape is the judgment range of the line, and it is easier to protrude than a brush that paints along the line art.
Useful for character skin color and shade painting.
Addendum 1
The line art was partially erased and painted.
The broken part of the line drawing is outside the circle range, but the color leaks.

Addendum 2
Reference the lineart layer before using it.

Preferences → cursor →brush-type cursor
If you set the setting to "brush shape and cross", the fill area is easy to understand.

ブラシ形状の円より大きな範囲が線の判定範囲となり、線画に沿って塗るブラシよりはみ出しやすいのでご注意ください。
キャラクターの肌色や陰塗りとかに便利。
補記1
線画を一部消して塗った様子。
線画の途切れ部分は円の範囲外だが、色が漏れてしまう。
補記2
線画レイヤーを参照設定してから使ってね。
環境設定→カーソル→ブラシ系カーソル
の設定を「ブラシ形状と十字」にすると塗り範囲がわかりやすいよ。






Other materials by Sataki_666

Popular “Brush” materials


New materials






-
 MVP ◆This user has contributed greatly to the management of the community, by posting many great responses to the questions asked. Once every three months, MVPs are determined based on the points earned during that period and will be recognized accordingly.
 -
 New Valuable Player (NVP) ◆These are the next-best contributors to the community after MVPs. This is awarded to users who have not yet won an MVP award, based on the number of points they have earned.
 -
 Official Expert ◆Chosen out of all MVP awardees, who are already proof of excellence, this is a testimony of outstanding correspondence in the community. After careful screening, they are appointed by CELSYS and assume their position.Note: Formally called “Evangelists”
 -
 Official Moderator of CELSYS ◆Moderators are official CELSYS staff members who are fluent in Japanese as well as various other languages. Moderators are not experts on the software or illustration, so they are not able to directly answer your questions. However, moderators provide communication and language support to ensure that everyone can smoothly communicate with each other.
 -
 CELSYS official accountThe Official Administrator Account