

An auto action to do the 'bromine trick' with gradient maps, as well as a small selection of gradients to use afterwards.
Want a bromine hack that will allow you to do coloring underneath without doing a bunch of nonsense to get your artwork prepped?
Indecisive about what color of bromine you want?
Here's a pack for you!
1. A layer template that works under a pretty simple premise : basically every single bromine trick out there is doing five thousand steps to do what a gradient map and a couple folders with the right settings could do in like... two seconds.
2. A set of gradients specifically tuned to what the folder set does, just in case you don't have a lot of gradient map sets already, and don't like the look of CSP's default ones. To use these instead of what initially pops in just swap which gradient is being used in the folder.


FAQ :
Q: I'm using the bromine layer, but the colors aren't working right.
A: Check to make sure that you're using pure black on the bromine lines layer. Additionally, brushes with grain or transparency are the ones that work best with this trick! A G-pen or any other similar solid 100% opacity line will only have mild color changes. That being said, that could work well for making interesting traditional cel effects, if you duplicate the lines and gaussian blur the duplicate underneath.
Q: I'm not able to use color, everything is turning out bromine color...

Q: I like this effect, but I would like to be able to do the bromine effect in different colors per piece of art. Is there a way to do this?
A: Yes, but it will get cluttered; you will need to have multiple folders, with each 'piece' (clothes, skin) separated out. So you'd have a purple bromine trick linework folder, and one that has a tan color in another one, or whatnot.
A: Set the tools to 'Reference Layer' instead of 'all layers', and set 'Draw Lines Here' as the reference, or temporarily toggle the visibility of the 'Keep White' layer off while using the tool in question, and turn it back on after you do so. The 'Keep White' layer is set as a Draft by default to avoid these issues in the first place.

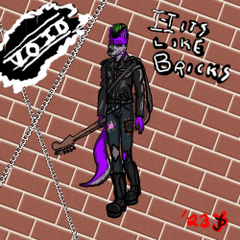
With that... Have fun! (Character depicted in these examples is mine, and my sloppy handwriting is mine)
The Bromines


Update history
added further explanation of how to fix common problems with getting the bromine effect to work, as some portions of the explanation were forgotten on the initial upload.


Other materials by AMORPHAGE


Popular “Material catalog” materials


New materials


-
 MVP ◆This user has contributed greatly to the management of the community, by posting many great responses to the questions asked. Once every three months, MVPs are determined based on the points earned during that period and will be recognized accordingly.
 -
 New Valuable Player (NVP) ◆These are the next-best contributors to the community after MVPs. This is awarded to users who have not yet won an MVP award, based on the number of points they have earned.
 -
 Official Expert ◆Chosen out of all MVP awardees, who are already proof of excellence, this is a testimony of outstanding correspondence in the community. After careful screening, they are appointed by CELSYS and assume their position.Note: Formally called “Evangelists”
 -
 Official Moderator of CELSYS ◆Moderators are official CELSYS staff members who are fluent in Japanese as well as various other languages. Moderators are not experts on the software or illustration, so they are not able to directly answer your questions. However, moderators provide communication and language support to ensure that everyone can smoothly communicate with each other.
 -
 CELSYS official accountThe Official Administrator Account