





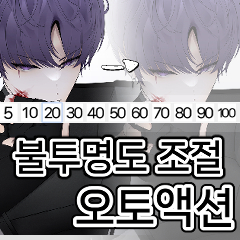
When you click on the icon, it is an auto-action that adjusts the opacity to match that number.
I made it because I don't like to have to adjust it laboriously.
Please use it well!!
There was a slight mistake, so I deleted the material and uploaded it again.
We apologize for any inconvenience this may cause.
★ Instructions ★
1. Drag the downloaded image material onto the canvas.
(Canvas size: 1000 x 1000 )
2. Save the image material to your personal PC computer.
3. From the top, use the right mouse to select [ Command Bar Settings].
4. Select [Main Menu ▶ Auto Action].
5. Press the downloaded [ Opacity Auto Action ] and add it to the top of each category.
6. Right-click on the icon you added at the top and click [ Icon Settings ].
7. Designate the number of image materials stored on your personal PC as the auto-action icon.
It is subject to change to a paid plan regardless of the period.
아이콘을 클릭하면 해당 숫자에 맞게 불투명도를 조절해주는 오토액션입니다.
힘들게 조절하는 게 싫어서 만들었습니다.
잘 사용해주세요!!!
약간에 실수가 있어서 소재를 삭제하고 다시 업로드 합니다.
불편을 끼쳐드려 죄송합니다.
★ 사용방법 ★
1. 다운로드한 화상소재를 캔버스 위로 끌어당깁니다.
(캔버스 크기: 1000 X 1000 )
2. 화상소재를 개인 PC 컴퓨터에 저장합니다.
3. 상단에서 오른쪽 마우스로 [ 커맨드 바 설정]을 선택합니다.
4. [ 메인메뉴 ▶ 오토액션 ]을 선택합니다.
5. 다운로드한 [ 불투명도 오토액션 ] 아래 화살표를 눌러 카테고리마다 상단에 추가를 해줍니다.
6. 상단에 추가한 아이콘을 오른쪽 마우스로 클릭하여 [ 아이콘 설정 ]을 클릭합니다.
7. 개인 PC에 저장한 화상소재 숫자를 오토액션 아이콘으로 지정합니다.
기간과 상관없이 유료로 변경될 수 있습니다.
Category 1 카테고리 1












Other materials by owo_love


Popular “Material catalog” materials


New materials




Badges
-
 MVP ◆This user has contributed greatly to the management of the community, by posting many great responses to the questions asked. Once every three months, MVPs are determined based on the points earned during that period and will be recognized accordingly.
 -
 New Valuable Player (NVP) ◆These are the next-best contributors to the community after MVPs. This is awarded to users who have not yet won an MVP award, based on the number of points they have earned.
 -
 Official Expert ◆Chosen out of all MVP awardees, who are already proof of excellence, this is a testimony of outstanding correspondence in the community. After careful screening, they are appointed by CELSYS and assume their position.Note: Formally called “Evangelists”
 -
 Official Moderator of CELSYS ◆Moderators are official CELSYS staff members who are fluent in Japanese as well as various other languages. Moderators are not experts on the software or illustration, so they are not able to directly answer your questions. However, moderators provide communication and language support to ensure that everyone can smoothly communicate with each other.
 -
 CELSYS official accountThe Official Administrator Account