
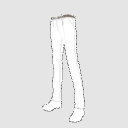
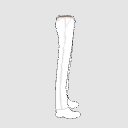
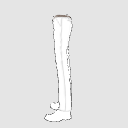
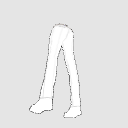
Men's Slacks Standing Wrinkle Reference 3D Model (メンズのスラックス 立ち シワ参考用3Dモデル) メンズのスラックス 立ち シワ参考用3Dモデル
Content ID:2071597
-
24,931

Reference material for wrinkles on trousers ズボンのしわの参考素材

It is made with 3D software for clothes, so it is a realistic wrinkle.


Select the model in the 3D layer and open the [sub tool detail palette].

The lines of the pockets and seams are written on the texture (surface material) in advance!


Then, like this, unnecessary shadows are eliminated and natural realistic wrinkles become ♪
So for this model, if you draw a wrinkle line without adding shadows as described above,
From next time it will be completely black and white. Then tonal correction→ it seems that binarization can be omitted.


洋服用の3Dソフトで作ってあるのでリアルなしわになっています。
3Dのレイヤーでモデルを選択してから【サブツール詳細パレット】を開く。
ポケットや縫い目の線などはあらかじめテクスチャ(表面素材)に書いてあるよ!
するとこんな感じで余計な陰影をなくして自然なリアルなしわになります♪
なのでこのモデルは、上記のように影を入れず、しわの線を描きこんだら
次回から完全に白黒にします。そうすれば色調補正→2値化は省略できそうです。
Material マテリアル
-
default material 初期マテリアル

Place 配置
-
default layout 初期レイアウト

Angle アングル
-
front 正面
-
Diagonal 斜め
-
Right 右
-
Left 左
-
After 後
-
Diagonally down 斜め下後
-
Diagonally up front 斜め上前


Update history
◆ About correction
2024/3/10 I was not used to it, so I fixed it because the texture was not pasted well
◆修正について
2024/3/10 慣れていなかったため、テクスチャがうまく貼れていなかったので修正しました
Old version


Other materials by うさこの洋裁工房


Popular “3D object” materials
-
 Plan Bonus


New materials


-
 MVP ◆This user has contributed greatly to the management of the community, by posting many great responses to the questions asked. Once every three months, MVPs are determined based on the points earned during that period and will be recognized accordingly.
 -
 New Valuable Player (NVP) ◆These are the next-best contributors to the community after MVPs. This is awarded to users who have not yet won an MVP award, based on the number of points they have earned.
 -
 Official Expert ◆Chosen out of all MVP awardees, who are already proof of excellence, this is a testimony of outstanding correspondence in the community. After careful screening, they are appointed by CELSYS and assume their position.Note: Formally called “Evangelists”
 -
 Official Moderator of CELSYS ◆Moderators are official CELSYS staff members who are fluent in Japanese as well as various other languages. Moderators are not experts on the software or illustration, so they are not able to directly answer your questions. However, moderators provide communication and language support to ensure that everyone can smoothly communicate with each other.
 -
 CELSYS official accountThe Official Administrator Account