

This is a sample of the material collection [One wing: gradient] (ID: 2070065).
It also explains common operations.
素材集【片翼:グラデーション】(ID:2070065)の試供品です。
共通する操作の説明も兼ねています。

・Material data
Original: Color (gradation), B&W (wings)
W x H: 40 x 40 mm, 600 dpi
It is a brush that draws gradients.
The sample is a color original, so please use a color layer.
You can draw on raster layer, but you can easily adjust it after drawing.
vector layer is recommended.

It is called "one-winged" because it is drawn on one side of the line when drawing.
For illustrative purposes, I have included a sample of actually drawing one wing.
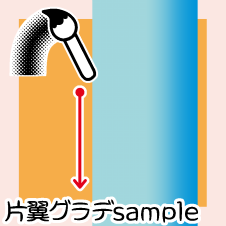
Free sample [One-wing grade sample] (ribbon type)

It is a gradient of central color: pale blue→ outer color: blue.
If you draw from top to bottom, you can draw only on the right side.
The gradient ribbon brush seems to weigh a little bit when drawing.
Please try to see if you can use it comfortably in your work environment.
Free sample [One-wing sample] (stamp type)

The original picture is monochrome in two colors.
I prepared it for illustration.
It is not in the regular version.
tool property

a)brush size
The lime green area is the original brush size.

α) Drawing line
β) Actual drawing
→ since only one side is drawn, the actual drawing will be half of the specified value.
b )anti-aliasing
The default setting is "anti-aliasing: Weak".
Adjust it to your liking.
c) Thickness
You can change the drawing size separately from the brush size.
This is useful when you want to change only one brush size in a dual setting.
d ) Flip left and right
Flips the drawing line to the axis.

Right: None (default) Left: Invert
e )brush density
You can adjust the transparency.

f )stabilization
It is set a little stronger.
Adjust it to your liking.
g )able to snap
Snap to rulers and guides.
Uncheck it if you don't need it.
* Beware of extreme "bending"
If you bend it narrower than the drawing width of the brush, it will come out.

Even with the regular version of the single-color brush, it still comes out.
Even if you toning it, it will come out.
One wing to both wings (dual setting)
If you copy and paste the drawn line and set it to "Flip left and right: Flip → none"
I think it's easy to customize one wing at a time.
If you want to draw multiple times with the same settings, the dual setting is useful.
Even after drawing with duals, it is possible to customize with vectors.
* Dual configuration steps (sub tool detail)

1. Select the brush you want to use for dual settings.
2. Select Register in "Presets" from "brush shape"

3. Confirm that it has been added to "Preset".
4. Select the brush you want to change to dual settings.
→ this time, I copied the original brush and changed the name to [Both wings].

5. Select "2-brush shape" → various settings
《Dual Brush: On》
The appearance of the → brush will be black, but there is no problem.
It will be solved by 《apply brush shape》.
《Application method: Normal》
《Apply to RGB value: On》
《Linked to main brush size: On》
《2-brush size》《2-anti-aliasing》
→ this time, I set the same settings as the main brush.
6. Click apply brush shape.

7. Select "2-brush tip" → change it to "2-Flip Left and Right: Flip".

8) Completion
Prepared [both wings] brush and
You can also check it in "sub tool detail→ Stroke Preview".
Drawing example (canvas size: 1888x1888 300dpi)
The dashed red line is the drawing line.

I'll add it to that.
Please use it as a reference for various setting values.
In the dual setting, the brush added to 《2-brush shape》
It is drawn up when drawing.
You can also create a line or curve tool by registering → applying a "preset".
Please use it for your favorite customize.
・素材データ
原画:カラー(グラデーション) 白黒(翼)
幅 x 高さ:40 x 40 mm、600 dpi
グラデーションを描くブラシです。
サンプルはカラー原画なのでカラーレイヤーを使ってください。
ラスターレイヤーにも描けますが、描画後の調整が簡単にできる
ベクターレイヤーがオススメです。
描画時に線の片側で描くため「片翼」と称しています。
説明用として、実際に片翼を描くサンプルを添えています。
試供品【片翼グラデsample】(リボンタイプ)
中心色:淡青→外側色:青のグラデーションです。
上から下へ描画すると右側にのみ描けます。
グラデーションのリボンブラシは描画時に若干の重さが生じるようです。
作業環境で快適に使えるか、お試しください。
試供品【片翼sample】(スタンプタイプ)
原画はモノクロ2色です。
説明用に用意しました。
正規版にはありません。
ツールプロパティ
a )ブラシサイズ
ライムグリーンの領域が本来のブラシサイズです。
α )描画線
β )実際の描画
→片側のみ描画なので実際の描画は指定数値の半分になります。
b )アンチエイリアス
初期設定は《アンチエイリアス:弱》になっています。
お好みで調整してください。
c )厚さ
ブラシサイズとは別に描画サイズを変更できます。
デュアル設定で片方のブラシサイズのみを変更したい場合に活躍します。
d )左右反転
描画線を軸に反転します。
右:なし(初期設定) 左:反転
e )ブラシ濃度
透明度を調整できます。
f )手ブレ補正
やや強めに設定しています。
お好みで調整してください。
g )スナップ可能
定規やガイドにスナップします。
不要の場合はチェックを外してください。
*極端な「曲げ」に注意
ブラシの描画幅よりも狭く曲がるとハミ出ます。
正規版の単色ブラシでも、やっぱりハミ出ます。
トーン化してもハミ出ます。
片翼を両翼にする(デュアル設定)
描画した線をコピペして《左右反転:なし→反転》にすれば
片翼ずつカスタマイズしやすいと思います。
同じ設定で何度も描画したい場合はデュアル設定が便利です。
デュアルで描いた後でもベクターならカスタマイズは可能です。
*デュアル設定の手順(サブツール詳細)
1)デュアル設定に使いたいブラシを選択
2)《ブラシ形状》から《プリセット》に登録を選択
3)《プリセット》に追加登録されたことを確認
4)デュアル設定に変更したいブラシを選択
→今回は元のブラシをコピーして名称を【両翼】に変更しました。
5)《2-ブラシ形状》を選択→各種設定
《デュアルブラシ:オン》
→ブラシの様子が真っ黒になりますが問題ありません。
《ブラシ形状を適用》で解消されます。
《適用方法:通常》
《RGB値に適用:オン》
《メインのブラシサイズに連動:オン》
《2-ブラシサイズ》《2-アンチエイリアス》
→今回はメインのブラシと同設定にしました。
6)《ブラシ形状を適用》をクリック
7)《2-ブラシ先端》を選択→《2-左右反転:反転》に変更
8)完成
用意した【両翼】ブラシと
《サブツール詳細→ストロークプレビュー》でも確認できます。
作画例(キャンバスサイズ:1888x1888 300dpi)
赤い破線が描画線です。
おまけに付けておきます。
各種設定数値の参考等にご活用ください。
デュアル設定では《2-ブラシ形状》に追加したブラシが、
描画時に上へ描画されます。
折れ線や曲線ツールでも《プリセット》登録→適用の手順で作れます。
お好みのカスタマイズにご活用ください。
Sample サンプル

Bonus おまけ


Other materials by _mariyan_


Popular “Material catalog” materials


New materials


Badges
-
 MVP ◆This user has contributed greatly to the management of the community, by posting many great responses to the questions asked. Once every three months, MVPs are determined based on the points earned during that period and will be recognized accordingly.
 -
 New Valuable Player (NVP) ◆These are the next-best contributors to the community after MVPs. This is awarded to users who have not yet won an MVP award, based on the number of points they have earned.
 -
 Official Expert ◆Chosen out of all MVP awardees, who are already proof of excellence, this is a testimony of outstanding correspondence in the community. After careful screening, they are appointed by CELSYS and assume their position.Note: Formally called “Evangelists”
 -
 Official Moderator of CELSYS ◆Moderators are official CELSYS staff members who are fluent in Japanese as well as various other languages. Moderators are not experts on the software or illustration, so they are not able to directly answer your questions. However, moderators provide communication and language support to ensure that everyone can smoothly communicate with each other.
 -
 CELSYS official accountThe Official Administrator Account