
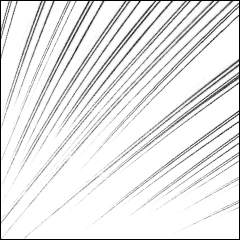
[Delicate Flash Set-Pen Drawing Stroke saturated line-2] (【繊細フラッシュセット-ペン描きストローク集中線-2】) 【繊細フラッシュセット-ペン描きストローク集中線-2】
Content ID:2033598
-
408

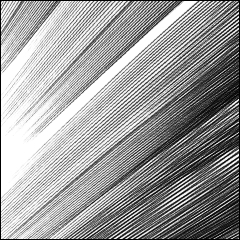
"Kei N's Favorite" Emotional Analog Touch saturated line
/ High-resolution brushes that take advantage of the touch of drawing on paper with analog art materials
[Delicate Flash Set-Pen Drawing Stroke saturated line-2]
「慶n'sフェバリット」エモーショナルアナログタッチ集中線
/アナログ画材で紙に描いたタッチを活かした高解像度ブラシ
【繊細フラッシュセット-ペン描きストローク集中線-2】
I scanned the original drawing with an analog pen at 1200 dpi and created it.
Not only to manipulate contrast etc., but also to create a paper touch to the limit
The paper color is finished by manually erasing the sides of each line.
It was an analog pen that could draw the sharpest lines.
It is a brush that aims to realize this texture touch that does not appear digitally.
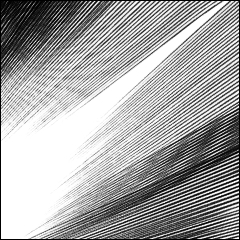
Finish by drawing with a pen in a hurry! You can draw reliably where you stroke
It is a concentrated stroke brush with a hand-drawn feel!


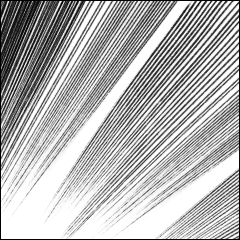
Set "Slope" to the thickness change parameter
If you knock the pen down, it will be longer and if you stand it up, it will be shorter.
"Speed" setting: gets smaller with faster strokes
"Invert" reverses the saturated line bundle and changes the drawing.
"Reverse" results in a reverse stroke with → removed.
If you want to draw a point where the line disappears, click here
From when you want to make it as sharp as possible with a plan to convert to 2-bit
Until you want to make the expression even softer, such as in the case of color manga
Please use color change or toning as appropriate.

You can use it as a tone!
The best expression of the delicate and emotional touch is suitable for gray 8bit.
It can be used even with 2-bit manga manuscripts with threshold adjustment monochrome.
(This is the same as scanning and digitizing analog pen-finished manuscripts.)
・ Because it cannot be used directly by monochrome drawing / layer conversion
Draw with a gray layer layer property change it to monochrome and adjust it with "alpha threshold"

(vector eraser is also displayed)
The entry part is also "pulled out / blurred", so it looks beautiful even if you enter the inside of the frame.
The emo tip pulls out the stroke!
If you want to shorten the end of a long line, stroke it from outside the frame and put out only the tip.
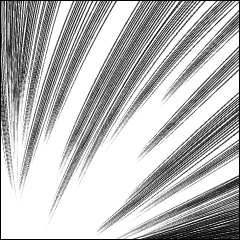
(1) Radiation rulers, etc.
The center of the bundle goes to the center of the ruler, so pay attention to the drawing distance.
(If the adjacent tips are close, the center will be shifted)
Place the pen tip and draw a straight line using the Shift key

It becomes a beautiful curve with wrist snaps and elbow fixing strokes!
It takes some getting used to the stroke, but it's recommended!
It's cool if you subtly shift it and stack it! To the Kake Speed Line!
It also follows the curve that you turn

It may be troublesome to draw one by one, but
Here it is! You can draw in one shot, and you can work to draw with your will!

アナログペンで描いた原画を1200dpiでスキャンし創作しました。
コントラスト等の操作だけではなく極限まで紙タッチを出すために
紙色を線一本ずつのサイドを手作業で消去して仕上げています。
最高にシャープな線が描けるアナログペンでした。
デジタルでは出ないこの質感タッチの実現を目指したブラシです。
速攻でペン描き込み仕上がり!ストロークしたところに確実に描ける
手描き感の集中ストロークブラシです!
厚み変化のパラメーターに「傾き」を設定
ペンを倒すと長くなり立てると短くなります
「速さ」設定:速いストロークで小さくなります
「反転」で集中線束が逆になり描画に変化が出せます
「反転」すると抜き→入りの逆ストロークになる
線が消えるポイントを定めて描きたい場合はこちらで
2bit化予定でなるべくシャープにしたい時から
カラーマンガの場合など更に柔らかい表現にしたい時まで
カラー替え使いやトーン化等で適宜どうぞ
トーンとしてお使いいただけます!
繊細でエモーショナルなタッチの最高表現はグレー8bit向きですが
閾値調整モノクロ化で2bitの漫画原稿でも使用できます。
(アナログペン仕上げ原稿のスキャンデジタル化と同様です)
・直にモノクロ描き/レイヤー変換では使えませんので
グレーレイヤーで描きレイヤープロパティでモノクロに変え「アルファ閾値」で調整します
(ベクター消去も表示してます)
入り部分も「抜き/ぼかし」てあるのでコマの内部に入っても綺麗に見えます
エモい先端はストロークを抜き切って!
長い線の先を短く入れたいときはコマの外からストロークし先だけ出します
①放射線定規など
一束の中心が定規中心に向かうので描画距離に注意してください
(となりあう先端が近いと中心がずれたようになります)
ペン先を置いてShiftキー使いで直線描き
手首スナップやひじ固定ストロークで綺麗な曲線になります!
ストローク慣れは要りますがイチオシ!
微妙にずらして重ねるとカッケー!カケスピード線に!
クルリと回すカーブにもついてきます
一本ずつ描くのはデジタル的には面倒かもですが
ここぞ!ってとこに一発で描け、意思で描き込んでいくワークができます!
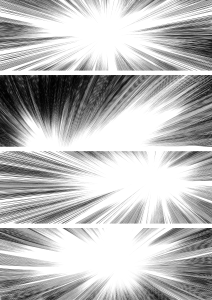
Pen drawing flash radiation saturated line brush ペン描きフラッシュ放射集中線ブラシ
-
Pen Drawing Flash Radiation saturated line-1 ペン描きフラッシュ放射集中線-1
-
Pen Drawing Flash Radiation saturated line-2 ペン描きフラッシュ放射集中線-2
-
Pen Drawing Flash Radiation saturated line-3 ペン描きフラッシュ放射集中線-3
-
Pen Drawing Flash Radiation saturated line-Right 4 ペン描きフラッシュ放射集中線-右4
-
Pen Drawing Flash Radiation saturated line - Left 5 ペン描きフラッシュ放射集中線-左5
-
Pen Drawing Flash Radiation saturated line-6 ペン描きフラッシュ放射集中線-6
-
Pen Drawing Flash Radiation saturated line-7 ペン描きフラッシュ放射集中線-7
-
Pen Drawing Flash Radiation saturated line - Dark Angle ペン描きフラッシュ放射集中線-濃角
-
Pen Drawing Flash Radiation saturated line-Fine 1 ペン描きフラッシュ放射集中線-細1
-
Pen Drawing Flash Radiation saturated line-Fine 2 ペン描きフラッシュ放射集中線-細2
-
Pen Drawing Flash Radiation saturated line-Fine 3 ペン描きフラッシュ放射集中線-細3


Pen drawing flash emissive saturated line tone ペン描きフラッシュ放射集中線トーン
Update history
update●tool propertychange settings
・ "brush size": Change the "thickness" of the line
・ "Thickness": Change the "length" of the line
Set "Slope" to the thickness change parameter
If you knock the pen down, it will be longer and if you stand it up, it will be shorter.
"Speed" setting: gets smaller with faster strokes
(Changing "direction of applying" changes the shape, but it is not recommended and is hidden.)
・ "Left and right reversal": Basic "None"
"Invert" reverses the saturated line bundle and changes the drawing.
・ "flip vertical": Basically set → enter and out stroke
"Reverse" results in a reverse stroke with → removed.
If you want to draw a point where the line disappears, click here
・ "anti-aliasing": Bokashi 1st stage
From when you want to make it as sharp as possible with a plan to convert to 2-bit
Until you want to make the expression even softer, such as in the case of color manga
・ "brush density": Basically MAX100
Please use color change or toning as appropriate.
update●ツールプロパティ設定変更
・「ブラシサイズ」:線の「太さ」を変える
・「厚さ」:線の「長さ」を変える
厚み変化のパラメーターに「傾き」を設定
ペンを倒すと長くなり立てると短くなります
「速さ」設定:速いストロークで小さくなります
(「適用方向」を変えると形状が変わりますが非推奨なので非表示です)
・「左右反転」:基本「なし」
「反転」で集中線束が逆になり描画に変化が出せます
・「上下反転」:基本は入り→抜きストロークに設定
「反転」すると抜き→入りの逆ストロークになる
線が消えるポイントを定めて描きたい場合はこちらで
・「アンチエイリアス」:ボカシ1段目にしています
2bit化予定でなるべくシャープにしたい時から
カラーマンガの場合など更に柔らかい表現にしたい時まで
・「ブラシ濃度」:基本はMAX100
カラー替え使いやトーン化等で適宜どうぞ
Old version


Other materials by 慶n


Popular “Material catalog” materials


New materials


-
 MVP ◆This user has contributed greatly to the management of the community, by posting many great responses to the questions asked. Once every three months, MVPs are determined based on the points earned during that period and will be recognized accordingly.
 -
 New Valuable Player (NVP) ◆These are the next-best contributors to the community after MVPs. This is awarded to users who have not yet won an MVP award, based on the number of points they have earned.
 -
 Official Expert ◆Chosen out of all MVP awardees, who are already proof of excellence, this is a testimony of outstanding correspondence in the community. After careful screening, they are appointed by CELSYS and assume their position.Note: Formally called “Evangelists”
 -
 Official Moderator of CELSYS ◆Moderators are official CELSYS staff members who are fluent in Japanese as well as various other languages. Moderators are not experts on the software or illustration, so they are not able to directly answer your questions. However, moderators provide communication and language support to ensure that everyone can smoothly communicate with each other.
 -
 CELSYS official accountThe Official Administrator Account