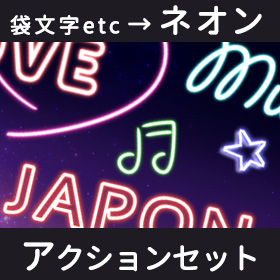

I make from a font! Neon Processing Action Set (フォントから作れる!ネオン加工アクションセット) フォントから作れる!ネオン加工アクションセット
Content ID:1921588
-
12,931
It is a set auto action give the "neon processing" at once while leaving original image from the raster layer of "text layer" or hand-drawn.
「テキストレイヤー」または手描きのラスターレイヤーから原本画像を残しながら「ネオン加工」を一気に施すオートアクションセットです。

Contents >
■ Neon auto action set
■ [SAMPLE] for reference text layer
1. Prepare text layer of edge-Cut specification
2. When you play the "black and white text → neon" action, it is automatically neon.

3. When you want to increase the light of the neon, select the " luminescent" layer and then "light" and increase (Blur 18) action.
Adjust the opacity of the layer.

-When you want to change the thickness of the neon tube
You can adjust it by the change edge thickness of the character.

Change the "saturation" in the tonal correction of the shadow layer to adjust.
Note
Please be careful because it becomes a different color when I use this action in the State other than red.

● When you want to make a character hole


Use the [black text → Neon] action.

-When you want to neon bag character and pattern of handwriting
1. [Black Line white border (narrow or thick)] action execution
2. Then [black and white text → Neon] action is performed
By doing this, it becomes a neon material of the bag character wind easily.

-Other arrangements ●


<内容>
■ ネオン化オートアクションセット
■ 【縁取り文字】参考用「SAMPLE」テキストレイヤー
1. フチ取り仕様のテキストレイヤーを用意します
2. 『白黒テキスト→ネオン化』アクションを再生すると自動でネオン化されます。

3. ネオンの光をもっと増し増しにしたい時は「発光」レイヤーを選択したうえで『「発光」増し(ぼかし18)』アクションをどうぞ。
微調整はレイヤーの「不透明度」で調節してください。

●ネオン管の太さを変えたい時●
文字のフチの太さ変更で調節できます。

「シャドウ」レイヤーの色調補正で「彩度」などを変更して調節しましょう。
※注意※
赤以外の状態でこのアクションを使用すると別の色になったりしますのでお気をつけください。

●穴をあけた文字にしたい時●


【黒テキスト→ネオン化】アクションを使用してください。

●手書きの文字や模様を袋文字ネオンにしたい時●
1. 【黒線白縁取り(細or太)】アクションを実行
2. 次に【白黒テキスト→ネオン化】アクションを実行
こうすることで簡単に袋文字風のネオン素材になります。

●その他アレンジ●


Action Set アクションセット
Reference text 参考テキスト
Update history
Added action to round the corners of the 22.07.03 22.07.03 角に丸みを帯びさせるアクションを追加しました


