

It is three sets of brushes for finishing the color illustrations. カラーイラストの仕上げ用ブラシ3種セットです。
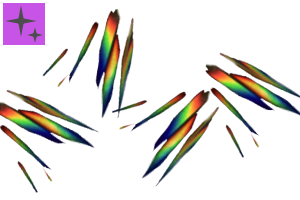
> Prism effect _1
Edgy prism brush.
I think that it is easy to use it 線の方向 " when snap to ruler concentric circles because the direction of the brush is " direction of line".
It is a specification that the edge part becomes outside when I draw it counterclockwise.
The easiest way to use selection tool to → rotate ( move ) is to place the stamp appropriately .
If you want to use a larger brush size, gaussian blur will look great.
The layer mode is recommended for addition ( luminescence ) and Dodge ( luminescence ) . Adjust the opacity of the layer if you do not want the screen to adapt.

> Prism effect _2
Oval Prism Brush.
This is random to some extent direction of particle. It is supported by pressure.
発光 The layer mode is recommended for addition and Dodge ( luminescence) 発光 as well as above .
Please accent the screen.
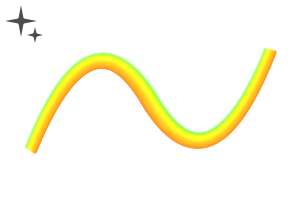
> Prism Line
It is the brush that I use for the part of the pupil mainly.
Draw to highlight part → I think that I can easily shine atmosphere when I adjust the opacity by changing the layer mode by the cutting of the layers by the transparent airbrush etc . ( luminescence ) .

All 350dpi are created in 350dpi. If you want to change the color because the brush is a fixed color, please use tonal correction layer, etc.
>プリズムエフェクト_1
エッジのきいたプリズムブラシ。
ブラシの方向が"線の方向"になっているので同心円定規にスナップさせると使いやすいと思います。
反時計回りに描くとエッジ部分が外側になる仕様です。
適当にスタンプするように置いてから選択範囲ツールを使用→回転(移動)させる使い方が一番楽です。
ブラシサイズを大きくして使う場合は、ガウスぼかしを使用すると見栄えが良くなります。
レイヤーモードは加算(発光)と覆い焼き(発光)がオススメ。画面に馴染まないと思ったらレイヤーの不透明度を調整してください。
>プリズムエフェクト_2
楕円状のプリズムブラシ。
こちらは粒子の向きがある程度ランダムです。筆圧に対応しています。
レイヤーモードは上と同じく加算(発光)と覆い焼き(発光)がオススメです。
画面のアクセントにどうぞ。
>プリズムライン
主に瞳の部分に使用しているブラシです。
ハイライト部分等に描画→両端を透明のエアブラシ等で削りレイヤーモードを加算(発光)に変更して不透明度を調整すると手軽にキラキラした雰囲気が出せると思います。
全て350dpiで作成しています。ブラシは固定色なので色の変更をする場合は色調補正レイヤーなどを使用してください。
Category 1 カテゴリ1


Other materials by 陸翁


Popular “Material catalog” materials


New materials


-
 MVP ◆This user has contributed greatly to the management of the community, by posting many great responses to the questions asked. Once every three months, MVPs are determined based on the points earned during that period and will be recognized accordingly.
 -
 New Valuable Player (NVP) ◆These are the next-best contributors to the community after MVPs. This is awarded to users who have not yet won an MVP award, based on the number of points they have earned.
 -
 Official Expert ◆Chosen out of all MVP awardees, who are already proof of excellence, this is a testimony of outstanding correspondence in the community. After careful screening, they are appointed by CELSYS and assume their position.Note: Formally called “Evangelists”
 -
 Official Moderator of CELSYS ◆Moderators are official CELSYS staff members who are fluent in Japanese as well as various other languages. Moderators are not experts on the software or illustration, so they are not able to directly answer your questions. However, moderators provide communication and language support to ensure that everyone can smoothly communicate with each other.
 -
 CELSYS official accountThe Official Administrator Account