

It is a set auto action to simplify the mosaic put work. It is a type of mosaic where the block size is adjustable each time and blocks not cut in the lasso range. モザイク入れ作業を簡略化するオートアクションセットです。ブロックサイズが都度調整可能で、ブロックが投げ縄範囲で削られないタイプのモザイクです。
It is a set auto action to simplify the mosaic put work.
Features

Block size can be adjusted each time.
Mosaic-related layers are organized into a single folder.
• The integration layer does not hide the pre-integration layer.
The mosaic is not cut into the shape of the lasso, the block appears neatly.
Use
It is made up of two auto action.

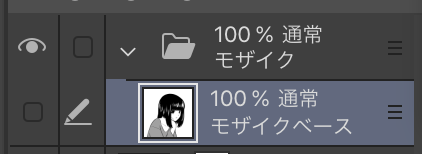
First, perform mosaic preparation only once on the canvas where you want to put the mosaic. Then the "Mosaic" layer, integrated with the "Mosaic" folder, is generated in front of the top.

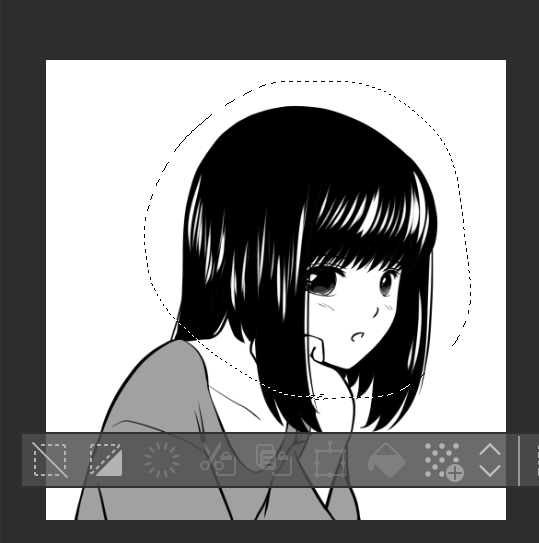
Select the area where you want to use the mosaic and then perform "Mosaic creation".

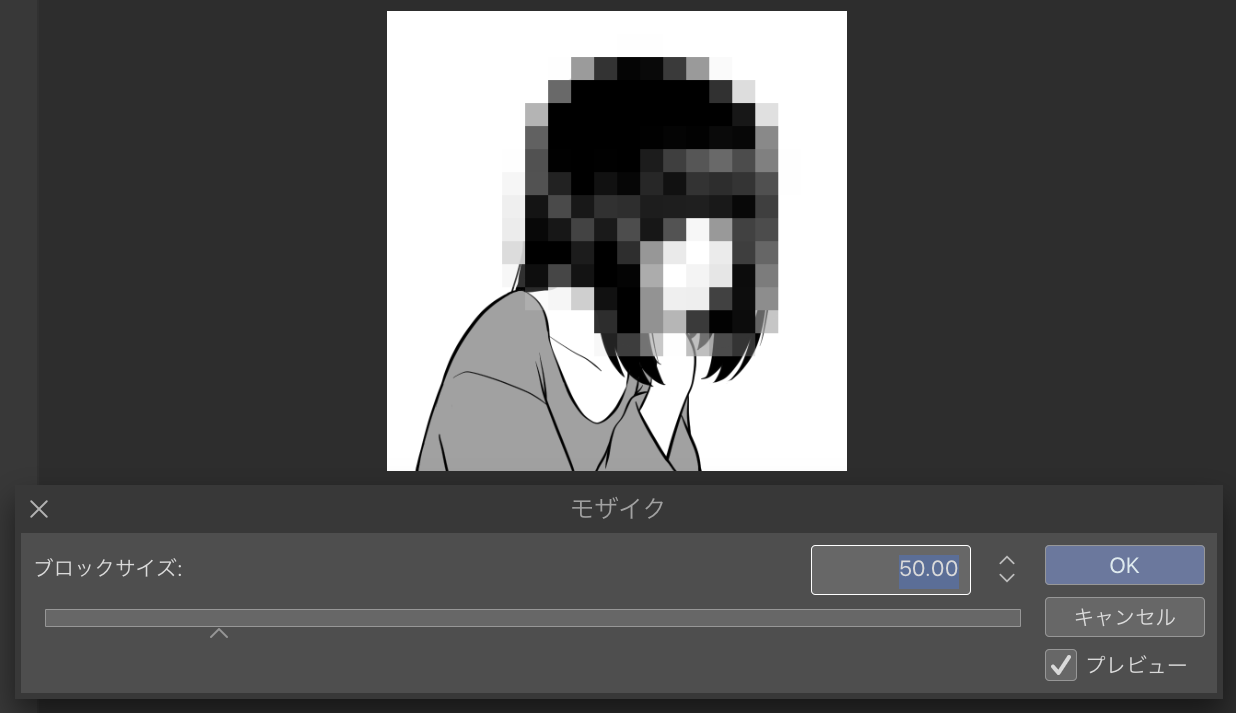
The Mosaic Filter dialog displays, adjust the block size and press OK.

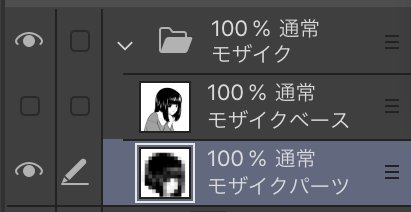
You have created a "mosaic parts" layer in the "Mosaic" folder and you are done.

You can generate "mosaic parts" in multiple places by repeating the lasso selection and "Mosaic creation".
Other
-If you want to start mosaic from scratch, remove the whole mosaic folder and irrevocably from the mosaic preparation run is OK.
Usually, white edges and translucent blocks appear in the characteristics of the Mosaic filter, but the action to remove them at the end of the "create Mosaic" is put. As a result, since the time of the preview is slightly smaller , I think the lasso to choose a larger feeling is good.
モザイク入れ作業を簡略化するオートアクションセットです。
特徴
・ブロックサイズが都度調整可能です。
・モザイク関連レイヤーは1つのフォルダにまとめられます。
・統合レイヤーが統合前レイヤーを隠しません。
・モザイクが投げ縄選択の形に切り取られずブロックがキレイに現れます。
使い方
2つのオートアクションで構成されています。
まず、モザイクを入れたいキャンバスで一度だけ「モザイク準備」を実行します。すると最前面に「モザイク」フォルダと統合された「モザイクベース」レイヤーが生成されます。
モザイクを掛けたい範囲を投げ縄選択し「モザイク作成」を実行します。
モザイクフィルタのダイアログが表示されるのでブロックサイズを調整して「OK」を押します。
「モザイク」フォルダの中に「モザイクパーツ」レイヤーが生成されて完了です。
投げ縄選択と「モザイク作成」を繰り返し行う事で複数箇所の「モザイクパーツ」を生成できます。
その他
・モザイクを一からやり直したい時は「モザイク」フォルダを丸ごと削除して「モザイク準備」実行からやり直せばokです。
・普通、モザイクフィルターの特性で白いフチや半透明なブロックが現れるのですが「モザイク作成」の最後にそれらを削除するアクションが入れてあります。この結果、プレビュー時よりが少し小さくなりますので、気持ち大きめに投げ縄選択するのが良いと思います。


Popular “Auto Action” materials


New materials


Badges
-
 MVP ◆This user has contributed greatly to the management of the community, by posting many great responses to the questions asked. Once every three months, MVPs are determined based on the points earned during that period and will be recognized accordingly.
 -
 New Valuable Player (NVP) ◆These are the next-best contributors to the community after MVPs. This is awarded to users who have not yet won an MVP award, based on the number of points they have earned.
 -
 Official Expert ◆Chosen out of all MVP awardees, who are already proof of excellence, this is a testimony of outstanding correspondence in the community. After careful screening, they are appointed by CELSYS and assume their position.Note: Formally called “Evangelists”
 -
 Official Moderator of CELSYS ◆Moderators are official CELSYS staff members who are fluent in Japanese as well as various other languages. Moderators are not experts on the software or illustration, so they are not able to directly answer your questions. However, moderators provide communication and language support to ensure that everyone can smoothly communicate with each other.
 -
 CELSYS official accountThe Official Administrator Account