
Automatic Anime color conversion auto action Edition (自動アニメカラー変換 オートアクション版) 自動アニメカラー変換 オートアクション版
Content ID:1446897
-
6,872

Received a special award for the 1st CLIP STUDIO PAINT Imaging plug-in development contest.
Automatic Anime color conversion filter
And exhibition "Automatic Shadow Color Conversion" filter
It is the auto action that I made with the same idea.
The detailed usage is explained in my site http://material.animehack.jp/tools_gactionCSPac.html.
第1回 CLIP STUDIO PAINT イメージングプラグイン開発コンテスト で特別賞をいただいた
「自動アニメカラー変換」フィルタ
および出品作「自動影色変換」フィルタ
と同様の発想で作ったオートアクションです。
詳細な使い方は私のサイト http://material.animehack.jp/tools_gactionCSPac.html でも解説しています。
When you run the auto action, you generate a temporary color for the shadow or highlight in the new layer.
Automatic anime color conversion- perform actions such as shadows.
Replace with the color of the next tile in the color set.
Automatic Shadow Color specification-shadow and automatic Shadow color specification-perform highlights .
Create a temporary shadow color by adjusting the hue and saturation for each color gamut of the Nuriwake.
I hope you will try this auto action version.
■ 1 auto action before running,
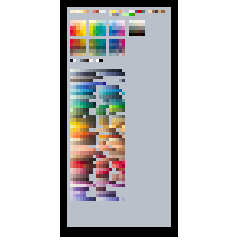
We need to train the included "color sample Set" image. (* Required)
■ Two runs take time.
The palette may turn white while it's running, but it's freezing.
When the auto action is finished, it will move as usual.
■ Cannot run to only within 3 selection.
■ 4 preview and color intensity cannot be adjusted.
In order to execute a lot of commands ■ 5
Auto action History cannot return to its pre-execution state.
→ Save the file before running auto action.
■ 6 automatic Shadow color specification action
Automatic animation color conversion plug-in version "automatically converted"
Because the method of defining the color gamut is different from the conversion by, the color of the conversion result is also different.
■ 7 MAC user, PRO version user can also be used.

オートアクションを実行すると、新規レイヤーに影またはハイライトの仮色を生成します。
自動アニメカラー変換-シャドウ 等のアクションを実行してください。
カラーセット中の隣のタイルの色で置き換えます。
自動影色指定-シャドウ および 自動影色指定-ハイライトを実行してください。
ヌリワケの色の色域別に色相・彩度を調整して仮の影色を作成します。
こちらのオートアクション版をお試しいただければと思います。
■1 オートアクション実行前に、
同梱の「色サンプルセット」画像を仕込む必要があります。(※必須)
■2 実行には時間がかかります。
実行中はパレットが白くなってフリーズしたような状態になることがありますが
オートアクションが終了すれば通常通り動きます。
■3 選択範囲内のみへの実行はできません。
■4 プレビュー、色の濃さの調節はできません。
■5 たくさんのコマンドを実行する為、
ヒストリーでオートアクション実行前の状態に戻ることはできません。
→オートアクション実行前にファイルを保存してください。
■6 自動影色指定アクションは、
自動アニメカラー変換プラグイン版の「自動的に変換」
による変換とは色域の定義方法が違うので、変換結果の色も異なります。
■7 MACユーザー、PRO版ユーザーの方でも使用できます。
Category 1 カテゴリ1

Update history
2013.06.14 up 2013.06.14 up


Other materials by 玉英


Popular “Material catalog” materials


New materials


-
 MVP ◆This user has contributed greatly to the management of the community, by posting many great responses to the questions asked. Once every three months, MVPs are determined based on the points earned during that period and will be recognized accordingly.
 -
 New Valuable Player (NVP) ◆These are the next-best contributors to the community after MVPs. This is awarded to users who have not yet won an MVP award, based on the number of points they have earned.
 -
 Official Expert ◆Chosen out of all MVP awardees, who are already proof of excellence, this is a testimony of outstanding correspondence in the community. After careful screening, they are appointed by CELSYS and assume their position.Note: Formally called “Evangelists”
 -
 Official Moderator of CELSYS ◆Moderators are official CELSYS staff members who are fluent in Japanese as well as various other languages. Moderators are not experts on the software or illustration, so they are not able to directly answer your questions. However, moderators provide communication and language support to ensure that everyone can smoothly communicate with each other.
 -
 CELSYS official accountThe Official Administrator Account