
“剪輯、合併並繼續”自動操作 ("Clip, Merge and Continue" Auto Action) "Clip, Merge and Continue" Auto Action
素材ID:2059681
-
176
一種自動操作,可説明將一個或多個圖層合併到文檔中的所有層次。 An auto action that helps merging one or multiple Layers to all Layers in your document.
如果您想將一個或多個 校正圖層快速 合併到所有圖層,這是適合您的自動操作。它還有其他用途,但 這是我創建它的主要 用途。
用法:
要將單個圖層合併到其下方的圖層,只需選擇它並運行自動 操作,根據需要重複。對於多個圖層,選擇它們並創建一個圖層資料夾, 關閉該資料夾,然後對要合併它們的每個圖層正常運行自動操作。
詳細說明:
首先選擇要套用於 下方層次的層次 。
用法:
要將單個圖層合併到其下方的圖層,只需選擇它並運行自動 操作,根據需要重複。對於多個圖層,選擇它們並創建一個圖層資料夾, 關閉該資料夾,然後對要合併它們的每個圖層正常運行自動操作。
詳細說明:
首先選擇要套用於 下方層次的層次 。

運行「剪輯、合併並繼續」自動操作,我建議在「檔」>“Shorcut Settings”>Category:Auto Actions中為其分配一個快捷方式。

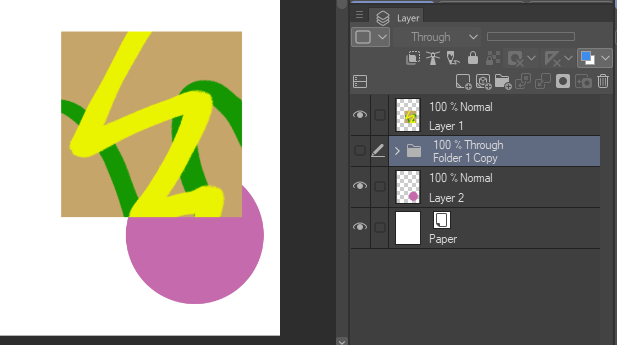
在畫布上看起來什麼都沒發生,但仔細觀察圖層就會發現結果:圖層 被剪裁並合併到其正下方的圖層中。如果 禁用其可見性,則可以自己查看。

現在還有一個副本,以便您可以 輕鬆地對以下圖層重複該過程。 我禁用了它的可見性來顯示發生了什麼,但自動操作僅在圖層可見時才有效。 完成所有所需層次的過程後, 只需刪除最後一個副本即可。

如果要一次將多個層次應用於每個層次,只需將它們 群組到層次資料夾中,按下資料夾圖示右側的小箭頭將其關閉 , 然後才能 執行相同的自動操作。 如果資料夾處於開啟狀態,它將 無法正常工作 。 無法記錄到 自動操作中 。

同樣,禁用圖層可見性只是為了演示結果:

筆記:

筆記:
- 每次都會複製初始層次/資料夾 , 但產生的合併層次始終會成為 柵格層次 。因此,如果 應用的初始圖層是向量圖層及其下方的圖層,並且 您希望 合併的圖層仍然是 向量圖層,請在該步驟中手動合併 它們,然後對其他圖層正常進行。如果您打算將其與向量圖層一起使用,請考慮複製此自動操作並進行必要的調整。
- 出於同樣的原因,當當前圖層下方的圖層是資料夾時要小心。如果不希望整個資料夾成為合併 的柵格圖層,請在運行自動操作之前將當前層次/資料夾移至其 下方的資料夾內。
- 某些校正圖層(如海報化) 在應用於整個畫布 時與裁剪到單個圖層時可能會進行不同的計算, 從而導致此 自動操作 意外更改圖層 的外觀。在這些情況下,除了解決有問題的校正層並可能使其不與任何內容合併之外,沒有太多事情可做。
If you ever wanted to quickly merge one or multiple Correction Layers to all of your layers, this is the auto action for you. It has other uses, but that's the main one I created it for.
Usage:
To merge a single Layer to the ones below it, just select it and run the auto action, repeating as needed. For multiple Layers, select them and create a Layer Folder, close the Folder, then run the auto action normally for each Layer you want to merge them with.
Detailed instructions:
Begin by selecting the Layer that you want to apply to the Layers below it.

Run the "Clip, Merge and Continue" auto action, I recommend assigning a shortcut to it in File > Shorcut Settings > Category:Auto Actions.

It might look like nothing happened on the Canvas, but a close look at the layers reveals the result: the layer was clipped and merged to the one directly below it. If you disable its visibility you can see for yourself.

There is also a duplicate of it now so that you can easily repeat the process for the following layers. I disabled its visibility to show what happened but the auto action only works if the Layer is visibile. When you've finished the process for all of the layers that you wanted, simply delete the last duplicate.

If you want to apply multiple Layers at once to each Layer, simply group them in a Layer Folder, close it by clicking on the little arrow to the right of the folder icon, and only then run the same auto action. It won't work properly if the folder is open. This closing folder step couldn't be recorded into the auto action, unfortunately.

Again, Layer visiblity disabled just to demonstrate the results:

Notes:

Notes:
- The initial Layer/Folder is duplicated without changes every time, but the resulting merged layer always becomes a Raster Layer. So if the initial Layer being applied is a Vector Layer and the Layer below it too and you want the merged Layer to still be a Vector one, merge them manually for that step, then proceed normally for other Layers. If you intend to use this with Vector Layers a lot, consider duplicating this auto action and making the necessary adjustments.
- For the same reason, be careful when the layer below the current one is a Folder. If you don't want the entire Folder to become a merged Raster Layer, move the current Layer/Folder inside the Folder below it before running the auto action.
- Some Correction Layers, like Posterization, might make different calculations when applied to the entire canvas vs. when clipped to a single layer, leading this auto action to change a Layer's appearance unexpectedly. There's not much to do in those cases except working around the problematic Correction Layer and perhaps leaving it unmerged with anything.


