



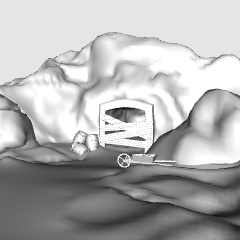
광산과 동굴 입구의 다용도 3D 모델로, 만화, 웹툰, 일러스트에 완벽한 작품입니다. 최대한 유연하게 설계된 모든 인공 구조물과 소품은 클립 스튜디오에서 쉽게 숨기거나 보여줄 수 있습니다. 이 덕분에 순수 자연 동굴, 분주한 광산, 으스스한 버려진 입구 등 이야기의 맥락에 맞게 자산을 즉시 커스터마이즈할 수 있습니다. A versatile 3D model of a mine and cave entrance perfect for manga, webtoons, and illustrations. Designed with maximum flexibility, all man-made structures and props can be easily hidden or shown in Clip Studio. This allows you to instantly customize the asset to fit your story's context—whether you need a pure natural cave, an active bustling mine, or a spooky abandoned entrance.


배경 Background


'Janlibell'님의 다른 소재


'소재집'의 인기 소재


신규 소재







-
 MVP ◆질문에 적절한 답변을 많이 게시하고 커뮤니티 운영에 크게 공헌한 사용자입니다. MVP는 3개월에 한 번, 그 사이에 획득한 포인트를 바탕으로 결정하고 표창을 실시하고 있습니다.
 -
 NVP(New Valuable Player) ◆MVP 다음으로 커뮤니티 운영에 공헌한 사용자입니다. 이제까지 MVP 수상 경험이 없는 분 중에서 획득한 포인트를 바탕으로 결정하여 표창을 실시하고 있습니다.
 -
 공식 엑스퍼트 ◆뛰어난 응답자의 증표인 MVP수상자 중에서 선택된 커뮤니티에서 가장 뛰어난 응답자의 증표입니다. 심사를 거쳐서 저희 회사에서 의뢰할 경우 취임되십니다.※ 옛 명칭 '에반젤리스트'
 -
 셀시스 공인 모더레이터 ◆모더레이터는 일본어와 기타 언어로 말할 수 있는 셀시스 공인 스태프입니다. 소프트웨어나 창작 전문가가 아니므로 직접 의문을 해결할 수는 없지만 여러분이 순조롭게 소통할 수 있도록 언어나 커뮤니케이션 측면에서 지원합니다.
 -
 셀시스 공식운영에 관련된 공식 계정입니다.