

일러스트와 만화 페이지를 위한 레이어 템플릿과 보조 자동 행동 layers template and complementary auto-action for illustration and comic's page
이 템플릿은 제가 직접 만든 색상 구분 레이어 템플릿 입니다 . 저는 레이어에 색상이 있는 걸 선호 하는데, 그게 너무 길들리지 않고 모든 것을 추적 하기 더 쉽 기 때문입니다 .
"PROGRESS", "eye_strain_prevention", "SKETCH" 는 "Draft Layer"에 설정 되어 있어 , 작업을 내보낼 때 는 켜져 있어도 표시되지 않지만 홈페이지에는 여전히 표시됩니다.


그리고 여기 모든 폴더 가 열 려 있는 상태 입니다 :

원하는 대로 추가 하거나 삭제 하는 것을 주저하지 마세요!
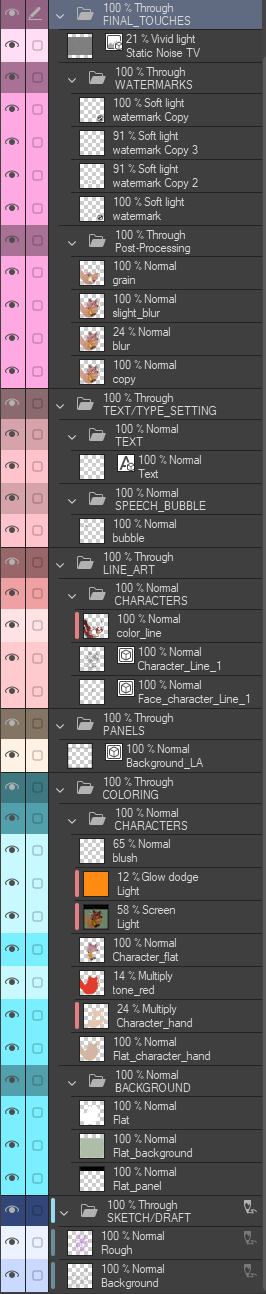
제 Ansoll 일러스트 를 위한 제 공간 은 이렇 습니다;

이 자료들은 무엇을 하나요?
이 템플릿 은 일러스트 에 여러 개의 이름 붙인 폴더, 하위 폴더 , 레이어를 추가합니다
자동 행동 덕분에 색칠 변경과 레이어 생성 이 더 쉬워 집니다
템플릿 은 여덟 가지 주요 범주로 나뉩 니다;
- 진행 상황 | 이 폴더는 이미지 자료가 담겨 있어 한 번에 그림을 어떤 상태로 남겼는지 기억하는 데 도움이 됩니다.
- 마지막 손질 | 붉은 마젠타
- 텍스트/타이핑 설정 | 핑크빛 붉은색
- 선화 | 코퍼 로즈
- 패널 | 갈색빛 회색
- 색칠 | 페이디드 제이드
- 톤/효과 | 어두운 푸른색
- 스케치/초안 | 블루제이
메인 폴더 위에 눈의 피로 방지 레이어가 하나 추가되었습니다.
"PROGRESS", "eye_strain_prevention", "SKETCH" 는 "Draft Layer"에 설정 되어 있어 , 작업을 내보낼 때 는 켜져 있어도 표시되지 않지만 홈페이지에는 여전히 표시됩니다.
(˶ˆ꒳ˆ˵)
모든 폴더는 "통과(Through)"로 설정되어 있습니다;
이 모드는 폴더 내 레이어 들의 개별 블렌딩 모드가 폴더 아래 레이어로 전달 될 수 있게 해 줍니다.
"Through"가 없으면 블렌딩 모드 가 폴더 자체의 블렌드 모드로 기본값 으로 전환됩니다.
예를 들어 그림 예시입니다: "Through"와 "Normal"으로 설정한 상태입니다.

ദ്ദി ˉ͈̀꒳ˉ͈́ )✧
진행 상황 폴더 :
페이지 어디에 배치할지 자유롭게 배치 할 수 있고, 추가하면 캔버스 에 맞게 됩니다. 8 가지 종류가 있으며, 해당 폴더의 메인 음 영으로 색상이 나뉩 니다.
이렇게 보 입니다;
이렇게 보 입니다;

어떻게 설정하나요?
먼저 "template" 버튼을 클릭한 후 "downloaded material"에서 검색 하거나 "LLOSNA" 라고 입력 하면 추가할 수 있습니다

또는 재료를 레이어 로 드래그 해서 이동시킬 수도 있습니다.

이 사진 은 템플릿 을 추가 했을 때 어떻게 보이는지도 보여줍니다 !
그리고 여기 모든 폴더 가 열 려 있는 상태 입니다 :

기본적인 수준으로 유지 하려고 노력했 어요
가능한 한 필요한 것을 상대적으로 갖추고 있어야 합니다.원하는 대로 추가 하거나 삭제 하는 것을 주저하지 마세요!
제 Ansoll 일러스트 를 위한 제 공간 은 이렇 습니다;

필요 없는 폴더와 레이어 는 지우 고, 필요에 따라 제 것도 추가 했어요 :3
﹌﹌﹌﹌﹌﹌﹌﹌﹌﹌﹌﹌﹌﹌﹌﹌
이제 자동 행동 을 만들어 이름 붙인 레이어와 색깔 레이어를 추가 하고, 레이어 색상 만 바꾸 는 기능도 만들 었어요!
그래서 모든 걸 수동으로 할 필요가 없 어요 .
다시 말하지만, 특히 이름이 있는 레이어를 만들 때 는 엄격 한 최소한의 기준일 뿐입니다. 저는 주로 레이어를 쉽게 다시 색칠 하기 위해 컬러 액션을 사용합니다.
ദ്ദി◝ ⩊ ◜.ᐟ
이 두 개는 빈 자동 행동으로 분리 되어 최대한 쉽게 읽을 수 있도록 되어 있습니다

이게 제 전 부입니다! 좋은 하루 보내 고, 제 연구에 관심 가져줘 서 고마 워요 (정말 오래 걸렸어요 ᄏᄏ)
૮₍ ´ ꒳ `₎ა
* 재료 카탈로그를 업데이트하는 방법을 이해하려고 목숨을 걸고 싸우고 있어서, 그냥 하나를 다시 만들고, 진행 폴더에서 이미지 내 텍스트를 제거하고 썸네일의 글꼴을 바꾸도록 편집했습니다
This is a colour coded layers template I made for myself, because I prefer to have my layers with colours, as it is easier for me to keep track of everything without getting too lost.
The "PROGRESS", "eye_strain_prevention" and "SKETCH" are set on "Draft Layer", wich mean they will not show when you export your work even if they are turned on, but they will still be shown on your homepage.
And here it is with all folder open :
Here's how my space looks for my Ansoll illustration ;
WHAT DOES THIS MATERIAL DO ?
This template add to your illustration, multiple nammed folders, subfolders and layers
The auto-action make it easier to recolor and create layers
The Template has eight main categories ;
- PROGRESS | This is a folder with Image material to help you remember in what state you left the illustration at in one simple look.
- FINAL TOUCHES | Reddish Magenta
- TEXT/TYPE SETTING | Pinkish Red
- LINE ART | Copper Rose
- PANELS | Brownish Grey
- COLORING | Faded Jade
- TONES/EFFECT | Dusky Blue
- SKETCH/DRAFT | Blue Jay
One Eye Strain Prevention layer was added on top of the main folders.
The "PROGRESS", "eye_strain_prevention" and "SKETCH" are set on "Draft Layer", wich mean they will not show when you export your work even if they are turned on, but they will still be shown on your homepage.
(˶ˆ꒳ˆ˵)
All folders are set on "Through";
It allows the individual blending modes of those layers in the folder to pass through to the layers below the folder.
Without "Through", the blending modes will default to the blend mode of the folder itself.
Here's a picture exemple : With set on "Through" and set on "Normal"
ദ്ദി ˉ͈̀꒳ˉ͈́ )✧
Progress Folder :
You can Place it where you want on the page, and it fit your canvas when added, there is eight variant, colored with their corresponding's main folder's shade.
Here how it looks ;
Here how it looks ;
HOW TO SET UP ?
You can add it first by clicking on the "template" button and searching it from "downloaded material"or writing "LLOSNA" in the search option
Or by dragging it to your layers, from your materials.
This picture also show how the template looks when added !
And here it is with all folder open :
I tried to keep it as basic as possible, all while having relatively what is needed.
Do not hesitate to add and remove as you wish !
Do not hesitate to add and remove as you wish !
Here's how my space looks for my Ansoll illustration ;
I erased the folders and layers I didn't need, and added my owns, depending of my needs :3
﹌﹌﹌﹌﹌﹌﹌﹌﹌﹌﹌﹌﹌﹌﹌﹌
Now with that, I created an auto-action that add nammed and colored layers, as well as just switch the color of the layers !
So I don't have to do everything manually.
Again, it's just the strict minimum, especially for creating ones with names, I mostly use the color action to easily recolor my layers.
ദ്ദി◝ ⩊ ◜.ᐟ
They are separated with empty auto-action to be as easily readable as possible
And that's all for me ! Have a nice day, and thanks for being interested in my work (it took me so long lmao)
૮₍ ´ ꒳ `₎ა
* fighting for my life understanding how to uptate material catalogue, so I just recreated one, edit to remove the text in the image from the progress folder and change the font in the thumbnails
팝업 레이어 템플릿 Pop-Up Layers Template

보완 자동 행동 Complementary Auto Action


'Llsona'님의 다른 소재

'소재집'의 인기 소재


신규 소재


배지
-
 MVP ◆질문에 적절한 답변을 많이 게시하고 커뮤니티 운영에 크게 공헌한 사용자입니다. MVP는 3개월에 한 번, 그 사이에 획득한 포인트를 바탕으로 결정하고 표창을 실시하고 있습니다.
 -
 NVP(New Valuable Player) ◆MVP 다음으로 커뮤니티 운영에 공헌한 사용자입니다. 이제까지 MVP 수상 경험이 없는 분 중에서 획득한 포인트를 바탕으로 결정하여 표창을 실시하고 있습니다.
 -
 공식 엑스퍼트 ◆뛰어난 응답자의 증표인 MVP수상자 중에서 선택된 커뮤니티에서 가장 뛰어난 응답자의 증표입니다. 심사를 거쳐서 저희 회사에서 의뢰할 경우 취임되십니다.※ 옛 명칭 '에반젤리스트'
 -
 셀시스 공인 모더레이터 ◆모더레이터는 일본어와 기타 언어로 말할 수 있는 셀시스 공인 스태프입니다. 소프트웨어나 창작 전문가가 아니므로 직접 의문을 해결할 수는 없지만 여러분이 순조롭게 소통할 수 있도록 언어나 커뮤니케이션 측면에서 지원합니다.
 -
 셀시스 공식운영에 관련된 공식 계정입니다.