

대부분의 부품은 선택 사항입니다.
솔직히 무슨 말을 해야 할지 모르겠어..
Many of the parts are optional
Idk what to say tbh..
전에

후

몇 가지 참고 사항:
- 도면의 크기를 캔버스 크기로 유지하는 것을 잊지 마십시오.
- "밝기"가 때때로 작동하지 않습니다. - 새 레이어를 만들고 원하는 색상을 사용하십시오.
(더 어둡거나 밝은 효과를 원하는지에 따라 다릅니다.
어둡고 어두운 색상, 밝은 색상 - 밝은 색상 (여기서는 진한 파란색을 사용했습니다)

후

몇 가지 참고 사항:
- 도면의 크기를 캔버스 크기로 유지하는 것을 잊지 마십시오.
- "밝기"가 때때로 작동하지 않습니다. - 새 레이어를 만들고 원하는 색상을 사용하십시오.
(더 어둡거나 밝은 효과를 원하는지에 따라 다릅니다.
어둡고 어두운 색상, 밝은 색상 - 밝은 색상 (여기서는 진한 파란색을 사용했습니다)
레이어를 밝기로 설정하고 원하는 대로 불투명도를 변경합니다.
- "선 색상" 및 "선 흐림"은 선화용입니다. 하나를 주변에 두는 것을 잊지 마십시오. 없는 경우 이 작업을 건너뛰거나 다음을 수행할 수 있습니다.
- 원본 도면으로 레이어 복사
- 채도가 있는 보정 레이어를 만들고 0으로 설정합니다. 이 사본에 마지
- 수정 레이어를 "레버 수정"으로 만들고 선화만 남을 때까지 이동해 보세요.
- 오토액션에서 "라인 효과"를 사용하되 "화면"으로 설정하고 병합합니다.
- 이제 "선 흐림"을 사용하면 모든 작업이 완료됩니다.
더 나은 효과를 위해 "Retro TV Frame"도 추천합니다!
그러나 그것은 선택 사항일 뿐입니다 (예 : 여기서는 사용하지 않았습니다)
https://assets.clip-studio.com/en-us/detail?id=2103749
누리다!
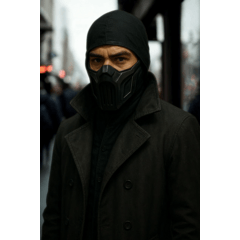
Before
After
Few notes:
- remember to keep size of the drawing as canvas size
- "brightness" sometimes doesnt work - Make new layer, use any color you want
(depends on if you want darker or brighter effect.
For dark - darker color, for bright - brighter color (here I used dark blue)
After
Few notes:
- remember to keep size of the drawing as canvas size
- "brightness" sometimes doesnt work - Make new layer, use any color you want
(depends on if you want darker or brighter effect.
For dark - darker color, for bright - brighter color (here I used dark blue)
set layer to brightness and change opacity as you like.
- "line color" and "line blur" is for lineart. Remember to keep one around. If you don't have one, you can skip this action or:
- copy layer with the original drawing
- make correction layer with saturation and set it to 0. Marge it on this copy
- make correction layer "lever correction" and try to move around till all it's left is lineart
- use "line effect" in auto action, but set it to "screen" and merge
- now use "line blur" and all is done : D
I also reccomand "Retro TV Frame" for even better effect!
But that's only optional (for example I didn't use it here)
https://assets.clip-studio.com/en-us/detail?id=2103749
Enjoy!


'KarolH'님의 다른 소재


'오토 액션'의 인기 소재


신규 소재


배지
-
 MVP ◆질문에 적절한 답변을 많이 게시하고 커뮤니티 운영에 크게 공헌한 사용자입니다. MVP는 3개월에 한 번, 그 사이에 획득한 포인트를 바탕으로 결정하고 표창을 실시하고 있습니다.
 -
 NVP(New Valuable Player) ◆MVP 다음으로 커뮤니티 운영에 공헌한 사용자입니다. 이제까지 MVP 수상 경험이 없는 분 중에서 획득한 포인트를 바탕으로 결정하여 표창을 실시하고 있습니다.
 -
 공식 엑스퍼트 ◆뛰어난 응답자의 증표인 MVP수상자 중에서 선택된 커뮤니티에서 가장 뛰어난 응답자의 증표입니다. 심사를 거쳐서 저희 회사에서 의뢰할 경우 취임되십니다.※ 옛 명칭 '에반젤리스트'
 -
 셀시스 공인 모더레이터 ◆모더레이터는 일본어와 기타 언어로 말할 수 있는 셀시스 공인 스태프입니다. 소프트웨어나 창작 전문가가 아니므로 직접 의문을 해결할 수는 없지만 여러분이 순조롭게 소통할 수 있도록 언어나 커뮤니케이션 측면에서 지원합니다.
 -
 셀시스 공식운영에 관련된 공식 계정입니다.