


選択レイヤーをエクスポート(自動アクション) (Export Selected Layer (Auto-Action)) Export Selected Layer (Auto-Action)
コンテンツID:2302636
-
365
by
 ◆
◆
◆

現在のレイヤーをPNGとしてエクスポートしてください Export the current layer as a PNG
現在選択されているレイヤーを自動的にPNGとしてエクスポートし、他のレイヤーの表示に影響しません。個々のレイヤーやレイヤーフォルダで動作します。レイヤーを選択し、オートアクションを実行し、ファイル名を選択するだけです。レイヤーコンプを使ってドキュメントの状態を一時的に保存するため、 バージョン3.0以前のClip StudioやClip Studio Debutでは動作しません。
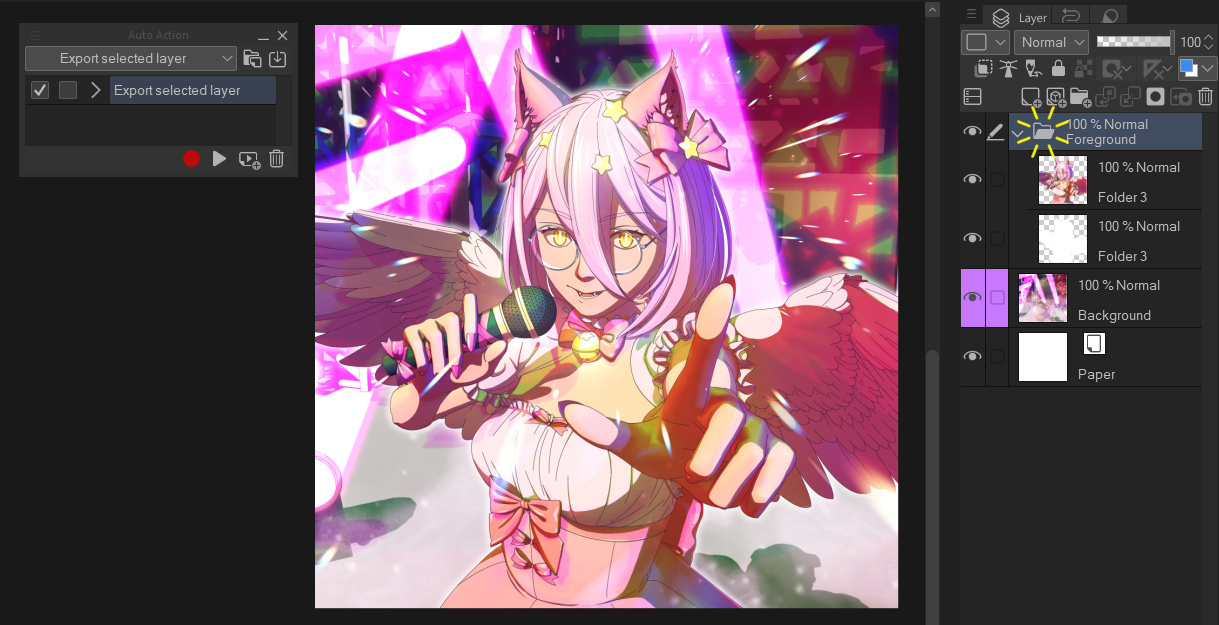
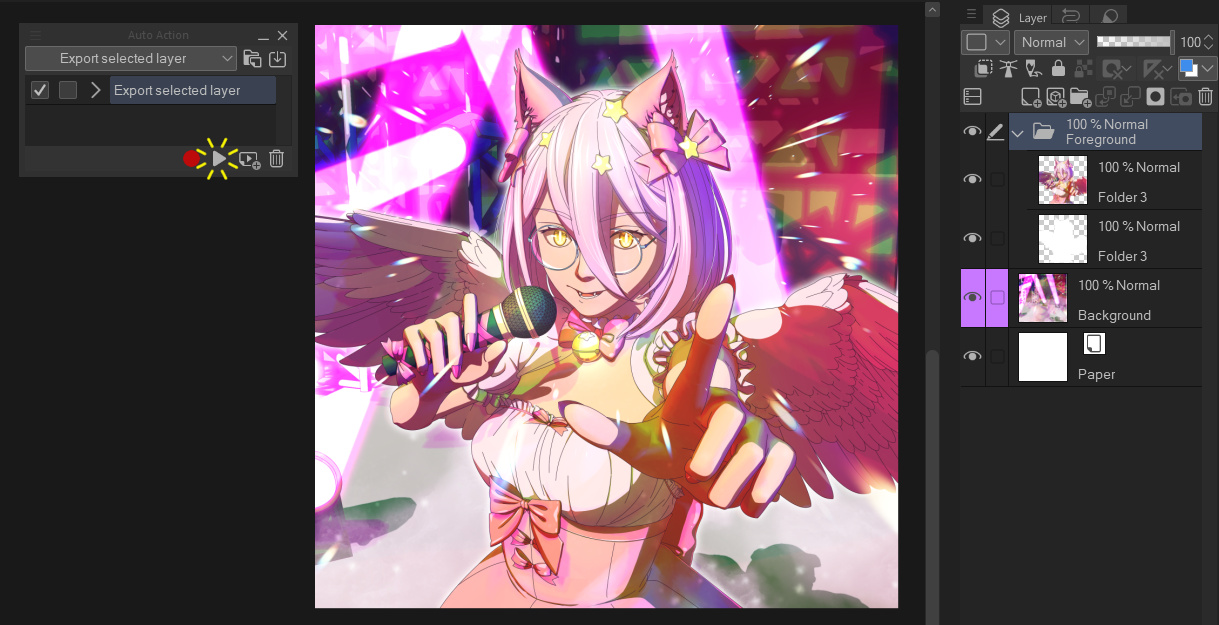
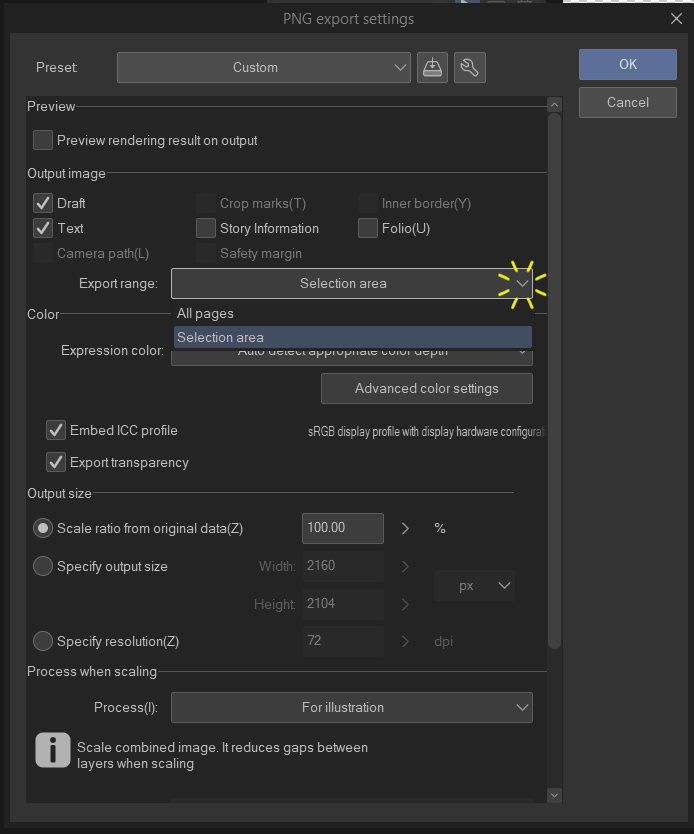
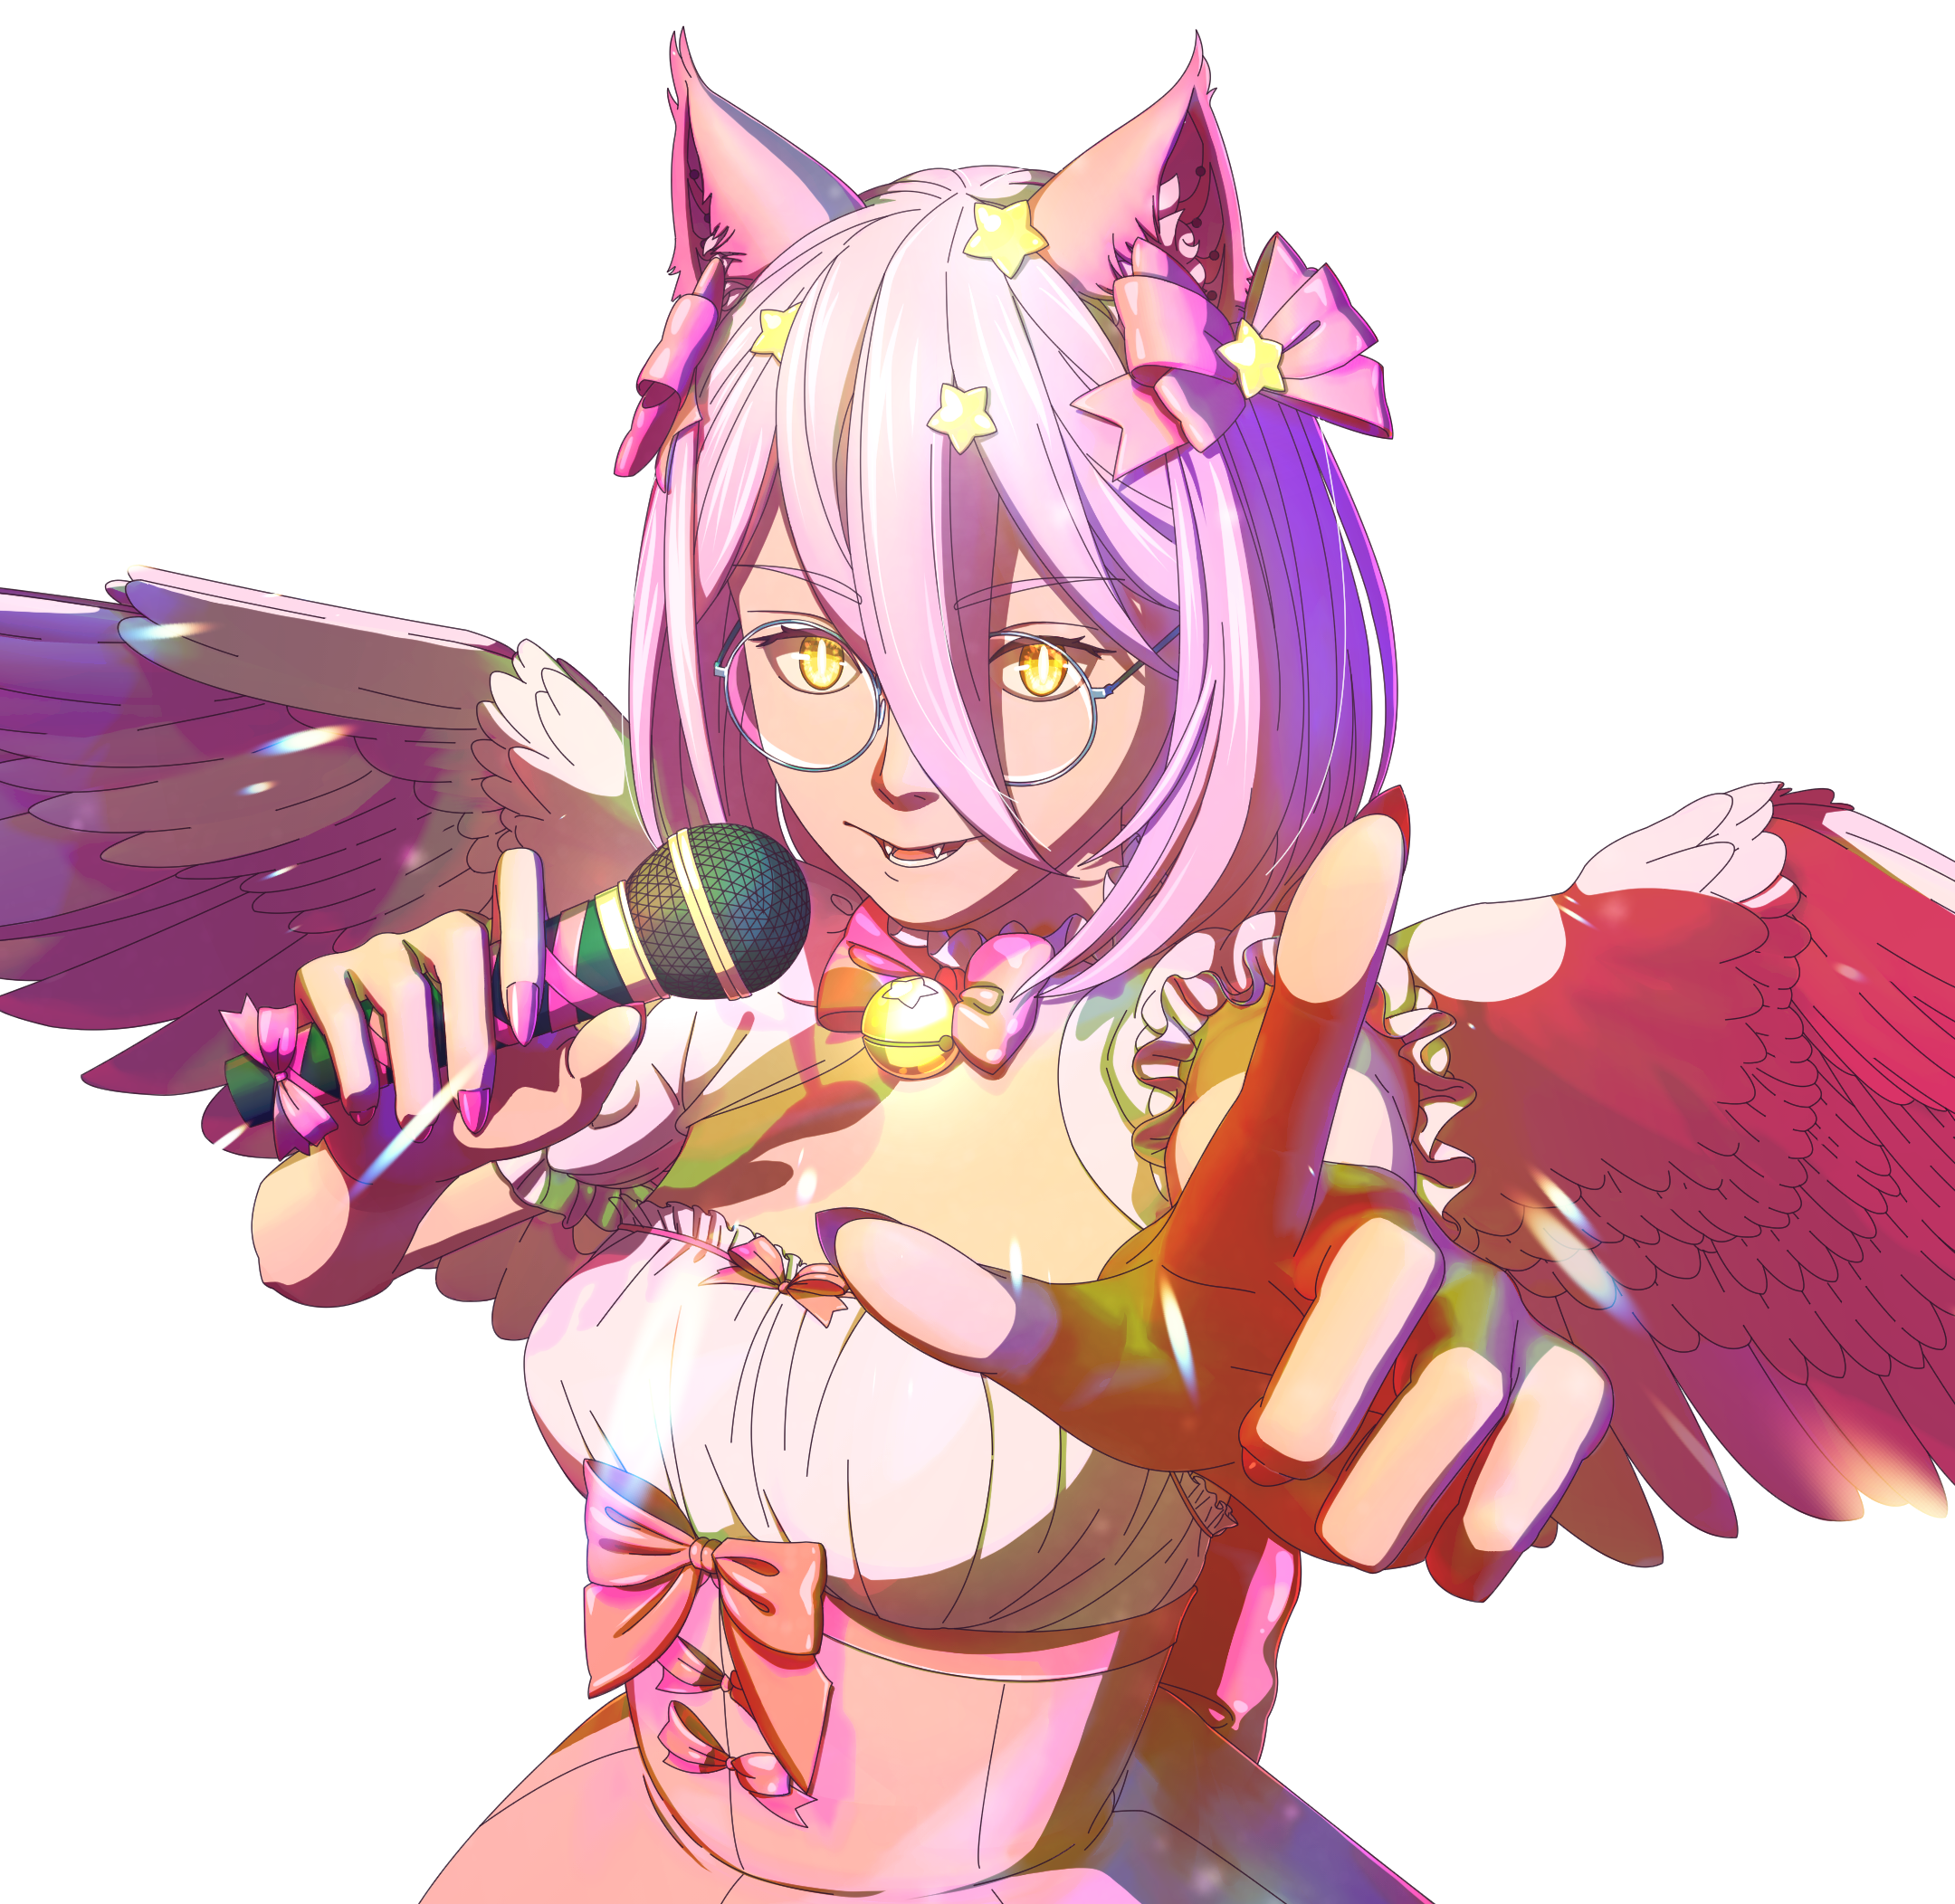
ファイルのエクスポート先を選ぶ際、「Export range」ドロップダウンを「Selection area」に変更することで、描画されたレイヤーの部分だけをエクスポート(エッジの透明なピクセルはトリミング)することができます。「すべてのページ」にすると、キャンバスと同じ解像度でレイヤーがエクスポートされます。
また、キーボードショートカットにオートアクションを登録することで、さらに高速なエクスポートも可能です。「ファイル ->ショートカット設定」を使い、カテゴリを「自動アクション」に変更して設定してください。
使用例
エクスポートしたいレイヤーを選択します
自動アクションを実行してください(再生ボタンを押してください)
ファイル名を選び、エクスポート範囲で「選択エリア」または「全ページ」を選択します
完了!
オートアクションについて
オートアクションを使ったことがなければ、以下に使い方のガイドを紹介します:
https://support.clip-studio.com/en-us/FAQ/articles/20210077
https://support.clip-studio.com/en-us/faq/articles/20220025
Automatically export the currently selected layer on its own as a PNG, without affecting the visibility of any other layers. Works on individual layers or layer folders. Just select a layer, run the auto-action, then choose the file name. Uses layer comps to temporarily save the document state, so will not work on versions of Clip Studio before version 3.0, or in Clip Studio Debut.
When choosing where to export the file, you can choose to either export only the parts of the layer that are drawn on (cropping any transparent pixels on the edges) by changing the "Export range" dropdown to "Selection area". Leaving it on "All pages" will export the layer at the same resolution as the canvas.
You can also register auto-actions to keyboard shortcuts for even faster exporting. Use "File -> Shortcut settings" and change the category to "Auto actions" to set this up.
Example usage
Select the layer you want to export
Run the auto-action (press the play button)
Choose a name for your file, then choose either "Selection area" or "All pages" for the export range
Done!
About Auto Actions
If you've never used an Auto Action before, here's some guides on how to use them:
https://support.clip-studio.com/en-us/faq/articles/20210077
https://support.clip-studio.com/en-us/faq/articles/20220025









"DragonWithaFez"さんの別の素材


"オートアクション"の人気素材


新着素材


バッジ
-
 MVP ◆質問に対して適切な回答を数多く投稿し、コミュニティの運営に大きく貢献したユーザーです。MVPは3ヶ月に一度、その間に獲得したポイントを元に決定し、表彰を行っています。
 -
 NVP (New Valuable Player) ◆MVPに次いでコミュニティの運営に貢献したユーザーです。これまでMVPの受賞経験のない方から、獲得したポイントを元に決定し、表彰を行なっています。
 -
 公式エキスパート ◆優れた回答者の証であるMVP受賞者の中からさらに選ばれた、コミュニティで最も優良な回答者の証です。審査を経て当社から依頼し就任いただいています。※旧名称「エバンジェリスト」
 -
 セルシス公認モデレーター ◆モデレーターは、日本語とその他の言語が話せるセルシス公認のスタッフです。ソフトウェアや創作のエキスパートではないので、直接疑問を解決することはできませんが、みなさんがスムーズにコミュニケーションできるように、言葉やコミュニケーションの側面からサポートします。
 -
 セルシス公式運営に関連した公式アカウントです。