

Let me replace the pen I published today
Because there is too little difference to upload a new ...
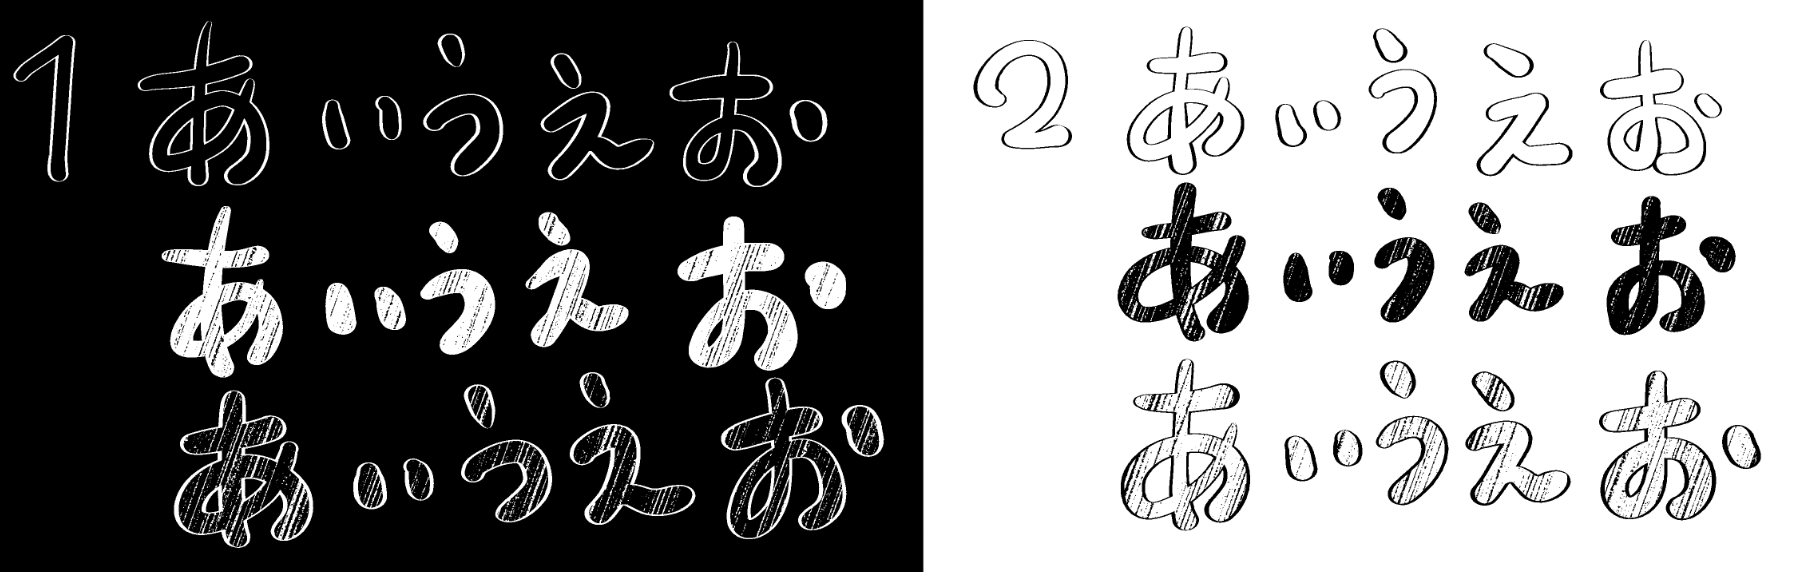
Edging faint character pen→ all writing pen
It is replaced by
The reason for naming is just that I want to manage this one setting and reduce the number of pens (I can't do all of them).
今日公開したペンを差し替えさせてください
新しくアップするには違いが無さすぎるので...
縁どりかすれ文字ペン→書き文字全部ペン
に差し替えです
命名の理由はこれ一本の設定をやりくりしてペンの数を減らしたいだけ(全部はできない)
1. Explanation of the changes to those who downloaded the previous pen
* The brush shape > of the main brush brush tip> tip shape > material > black fixed circles have been added, and the brush shape > brush tip > tip shape > material > white fixed circles have been removed.
* Along with that, the drawing color remains white brush tip and the drawing color of the main brush is changed by switching [Circle] or [Material] from the > tip shape.
* Dual brush > >brush shape brush tip > tip shape > I personally use Gouache 1 as a material, but it has been deleted from the distribution data because it is a redistribution of the material.

2,How to use
2-1,When bordering white (left side of the image)
The foreground color should be white and select a circle from the tip shape of the main brush.
To apply dual brushes, select Subtraction.
Set your preferred tip shape or select a circular shape on the brush tip of the dual brush.
If you want to produce faint paper quality, set the texture density number closer to 100 (if you don't want to fade, set the texture density number to 1).
2-2,When bordering black (right side of the image)
Set the foreground color to white and select a dark circle > the material from the tip shape of the main brush.
How to apply dual brushes, select normal
Set your preferred tip shape or select a circular shape on the brush tip of the dual brush.
If you want to produce faint paper quality, set the texture density number closer to 100 (if you don't want to fade, set the texture density number to 1).
* If you select monochrome > the expression color > layer property in advance, the border will not go well. Select color or gray > the expression color, draw the text, and finally convert > expression color to monochrome. If you apply too much pen pressure, the edging will overlap over the already drawn lines and the finish will be unnatural.
* When working only in monochrome > expression color in manga manuscripts sub tool detail I think that the work of bordering white by selecting > multiplication combine mode > ink > can be used somewhat.
in this case to change the border to black use a white border and then edit > reverse gradient
* If it is difficult to check the outline of the text during work layer property please use the > border effect > edge while working. After using this method, please return to the ink > combine mode > comparison (concentration) (this is the original combine mode of the pen).
3,Where to change as you like
Dual brush brush size (change the thickness of the edges)
Paper quality> magnification, rotation angle (size and angle of fainting)
texture density > reverse density (invert the black and white area of the faint)
If you want to draw crisp and slightly linear characters, set the post-correction to about 4.
* It is a brush whose brush size changes depending on the pressure of the pen to some extent. If it does not fit sub tool detail please effect source settings brush size from the > brush size > ✓ mark
Set the dual brush brush size similarly
1,以前のペンをダウンロードしてくださった方へ変更点の説明
※メインのブラシのブラシ形状>ブラシ先端>先端形状>素材>黒色固定の丸を追加したうえでデュアルブラシのブラシ形状>ブラシ先端>先端形状>素材>白色固定の丸を削除しています
※それに伴い、描画色は白のままでブラシ先端>先端形状から[円形]または[素材]を切り替えることでメインのブラシの描画色を変更する方法にしています
※デュアルブラシ>ブラシ形状>ブラシ先端>先端形状>素材にガッシュ1を私的に使用していますが素材の再配布に当たるため配布用のデータからは削除しています
2,使用方法
2-1,白く縁取る場合(画像の左側)
描画色は白にして、メインのブラシの先端形状から円形を選択します
デュアルブラシの適用方法は減算を選択
デュアルブラシのブラシ先端にお好みの先端形状をセットするか円形を選択します
紙質でかすれを出したい場合は紙質濃度の数値を100に近づけます(かすれが不要の場合は紙質濃度の数値を1にしておきます)
2-2,黒く縁取る場合(画像の右側)
描画色は白にして、メインのブラシの先端形状から素材>黒丸を選択します
デュアルブラシの適用方法は通常を選択
デュアルブラシのブラシ先端にお好みの先端形状をセットするか円形を選択します
紙質でかすれを出したい場合は紙質濃度の数値を100に近づけます(かすれが不要の場合は紙質濃度の数値を1にしておきます)
※あらかじめレイヤープロパティ>表現色>モノクロを選択した状態だと縁取りが上手くいきません。表現色>カラーまたはグレーを選択したうえで文字を描画して最後に表現色>モノクロに変換してください。筆圧をかけすぎると同様に縁取りが既に引かれた線の上を重複し仕上がりが不自然になります。
※漫画原稿などで表現色>モノクロのみで作業をする場合にはサブツール詳細>インク>合成モード>乗算を選択することで白く縁取る作業のほうは多少使えるかと思います
この場合、縁どりを黒く変更するためには白く縁取ったあと編集>階調の反転を使用してください
※作業中に文字の輪郭が確認しづらい場合にはレイヤープロパティ>境界効果>ふちを使用しつつ作業を行ってください。この方法をとったあとはインク>合成モード>比較(濃度)に戻すようにお願いします(ペンのもともとの合成モードです)
3,お好みで変更するところ
デュアルブラシのブラシサイズ(縁の太さを変える)
紙質>拡大率、回転角(かすれの大きさや角度)
紙質濃度>濃度反転(かすれの白黒の面積を反転させる)
カクッとしたやや直線的な書き文字を引きたい場合は後補正を4ぐらいに設定します
※ある程度筆圧によりブラシサイズが変わるブラシになっています。合わない場合はサブツール詳細>ブラシサイズ>✓マークからブラシサイズ影響元設定を行ってください
デュアルブラシのブラシサイズも同様に設定します
Old version


Other materials by 春町フウ


Popular “Brush” materials


New materials


Badges
-
 MVP ◆This user has contributed greatly to the management of the community, by posting many great responses to the questions asked. Once every three months, MVPs are determined based on the points earned during that period and will be recognized accordingly.
 -
 New Valuable Player (NVP) ◆These are the next-best contributors to the community after MVPs. This is awarded to users who have not yet won an MVP award, based on the number of points they have earned.
 -
 Official Expert ◆Chosen out of all MVP awardees, who are already proof of excellence, this is a testimony of outstanding correspondence in the community. After careful screening, they are appointed by CELSYS and assume their position.Note: Formally called “Evangelists”
 -
 Official Moderator of CELSYS ◆Moderators are official CELSYS staff members who are fluent in Japanese as well as various other languages. Moderators are not experts on the software or illustration, so they are not able to directly answer your questions. However, moderators provide communication and language support to ensure that everyone can smoothly communicate with each other.
 -
 CELSYS official accountThe Official Administrator Account